
Strawberry Matcha Cheesecake Cups: Where “What If?” Meets “You Gotta Try This!”
Hey friends, Jackson here from Food Meld. Let’s get real for a second. Are you ever just… done? Done with complicated recipes that dirtied every bowl in the kitchen? Done with desserts that promise the world but leave you with a sink full of regret? Yeah, me too. That’s exactly why I’m obsessed with recipes like these Strawberry Matcha Cheesecake Cups. They’re the ultimate kitchen hack: stunningly beautiful, packed with wild flavor, and so simple you can make them on a whim after a long day.
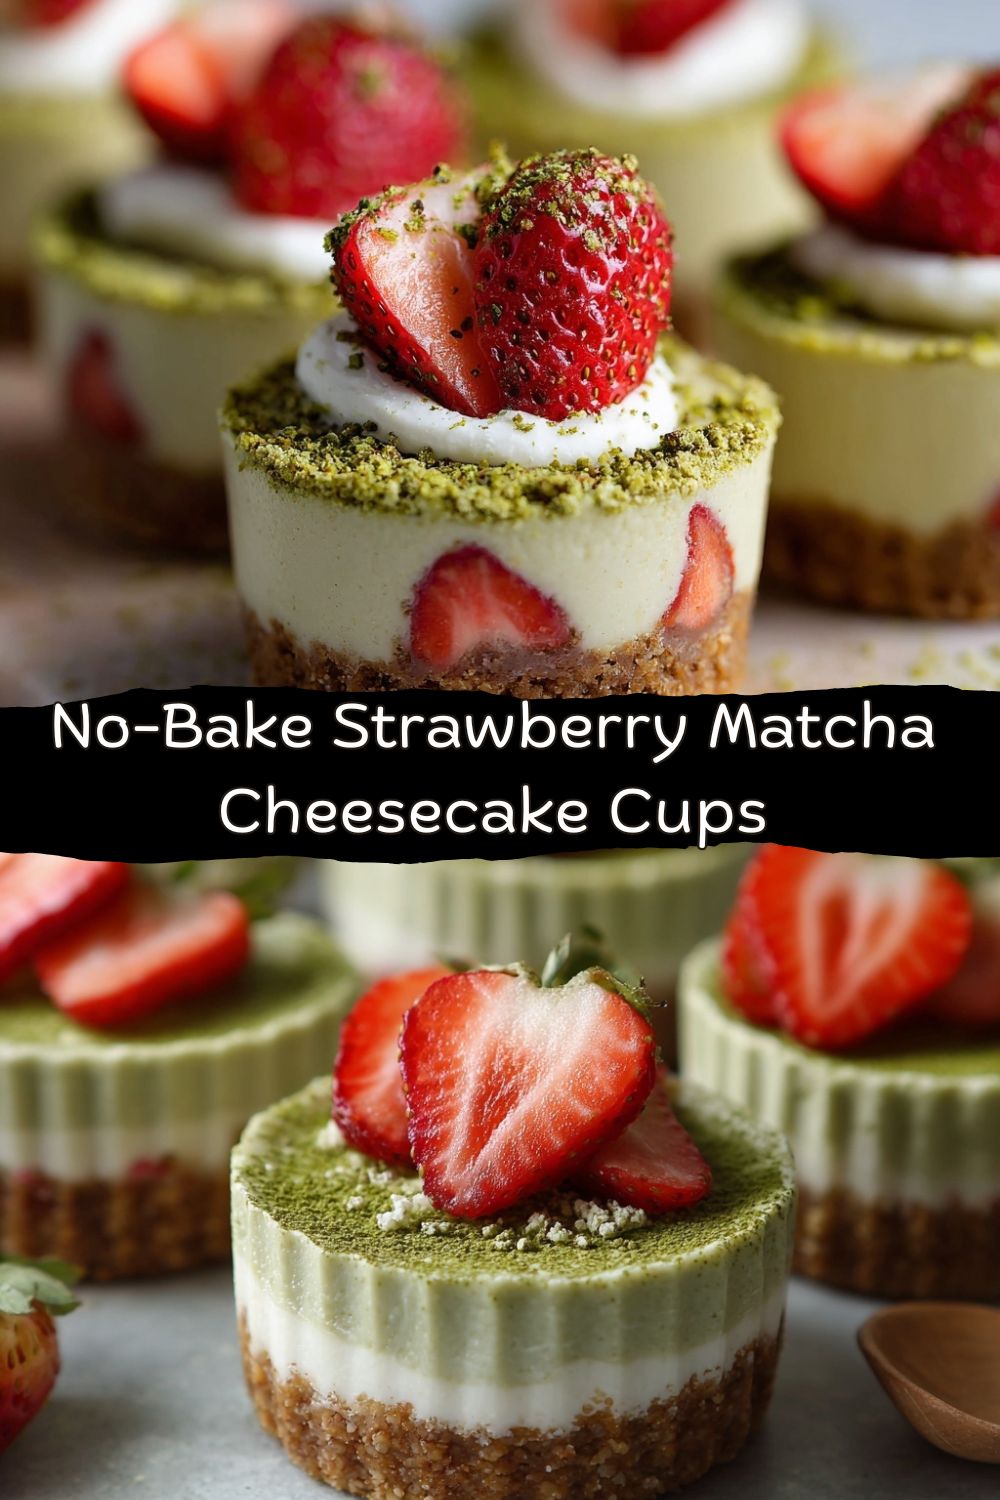
We’re talking about a creamy, dreamy no-bake cheesecake filling that gets split into two personalities. One half gets a vibrant, earthy kick from brilliant green matcha. The other gets loaded with sweet, juicy chopped strawberries. They sit on a buttery, crunchy graham cracker base, all layered up in cute little jars or cups. Each spoonful is a party—a little bit of zen from the matcha, a little bit of sunshine from the berries, and all the rich, comforting joy of cheesecake.
This isn’t just a dessert; it’s a conversation starter. It’s the kind of thing you casually pull out of the fridge and watch your friends’ eyes go wide. “You MADE this?” they’ll ask. And you’ll get to do my favorite thing in the world: smile and say, “Yeah, and it was shockingly easy.” So, if you’re ready to break out of the same-old dessert routine and create something truly unforgettable with minimal fuss, you’re in the right place. Grab a bowl, and let’s cook—er, *chill*—something awesome together.
The Day I Learned to Meld My Cravings
This recipe was born from one of those classic “Jackson cravings.” You know the kind—when you want two completely different things at once, and you refuse to choose. It was a rainy Saturday afternoon. I was buzzing from a seriously good matcha latte, loving that gentle, grassy energy. But my sweet tooth was screaming for something creamy and fruity, specifically the strawberry cheesecake my grandma used to make.
Instead of picking one, I looked at the matcha tin, then at the strawberries on the counter, and had my classic “what if we tried this?” moment. What if I didn’t have to choose? What if I could have *both* in one bite? I started pulling ingredients out, not even sure where it was going. I remember tasting the first matcha-laced cheesecake mixture straight from the bowl, then the strawberry one, and my brain just lit up. It was like the savory-sweet magic of chicken and waffles, but in dessert form—two bold flavors that shouldn’t work but absolutely, deliciously do.
Layering them in little cups was the final “aha!” It felt fun, personal, and way less intimidating than a whole springform pan. That first batch was gone before dinner. Now, it’s my go-to when I need a dessert that feels fancy but keeps my kitchen time (and cleanup) short. It’s a perfect little “Food Meld” story.
Gathering Your Flavor Arsenal
Here’s everything you need to build these flavor-packed cups. Don’t stress about perfection—I’ve got notes and swaps for you!
For the Crust:
- 1 cup graham cracker crumbs: The classic, cozy base. If you’re feeling fancy, digestives or biscoff cookies work amazingly. Just blitz them in a food processor or smash ’em in a zip-top bag with a rolling pin. Very therapeutic.
- 3 tablespoons melted butter: This is the glue. It makes the crust hold together and adds that rich, toasty flavor. For a dairy-free version, coconut oil works like a charm.
- 1 tablespoon sugar (optional): I sometimes skip this because the fillings are plenty sweet, but if you have a mega sweet tooth, add it in. Brown sugar adds a nice caramel note too.
For the Cheesecake Filling:
- 8 oz (one block) cream cheese, softened: Non-negotiable tip: Let it sit on the counter for a good hour. Soft cream cheese is the difference between a silky-smooth filling and a lumpy one. Full-fat is best for texture, but reduced-fat works in a pinch.
- ½ cup Greek yogurt or sour cream: This is my secret for tang and lightness! Greek yogurt adds a slight protein boost and prevents the filling from being too heavy. Sour cream gives you that classic cheesecake bite. Use what you’ve got.
- ¼ cup honey or powdered sugar: I love the floral touch of honey, but powdered sugar dissolves instantly and gives a super smooth texture. Maple syrup is another great unrefined option. Taste as you go!
- 1 teaspoon vanilla extract: The flavor enhancer. It rounds out all the other notes. A tiny scrape of vanilla bean paste would be incredible here.
To Flavor & Layer:
- 1 tablespoon high-quality matcha powder: This is where you don’t want to skimp. Get ceremonial or culinary-grade matcha for a vibrant color and smooth flavor, not bitterness. The cheap stuff can taste like lawn clippings—trust me, I’ve learned the hard way!
- ½ cup fresh strawberries, finely chopped: The juicier, the better! They add little bursts of freshness. Frozen won’t work here as they’re too wet.
- 1 tablespoon strawberry jam (optional): My little chef’s hack for intensifying the strawberry flavor and giving that layer a beautiful pink hue. A great trick if your berries aren’t super ripe.
Let’s Build Some Delicious Layers!
Ready? This is the fun part. We’re going layer by layer, no special skills required. Just follow these steps and you’ll be a pro.
- Make the Crust: In a medium bowl, mix your graham cracker crumbs and melted butter (and sugar, if using) until it looks like wet sand. It should hold together when you pinch it. Divide this mixture evenly among your serving glasses or jars—I like 4-6, depending on size. Use the bottom of a small glass or a spoon to press it down firmly into an even layer. This is your foundation! Pop them in the fridge to set up while you make the magic.
- Whip Up the Base Filling: In a large bowl, beat your softened cream cheese with a hand mixer (or a stand mixer with the paddle attachment) until it’s completely smooth and no lumps remain. This is key! Scrape down the sides. Add the Greek yogurt (or sour cream), your sweetener of choice, and vanilla. Beat again on medium-high for 1-2 minutes until the mixture is fluffy, light, and well combined. Taste it. Isn’t that good? Okay, now we play.
- Divide & Conquer with Flavor: Scoop out half of your beautiful cream cheese filling into a separate bowl. To the first bowl, add your matcha powder. Here’s a pro tip: to avoid matcha clumps, you can sift it directly into the filling or mix it with a teaspoon of hot water first to make a smooth paste, then fold it in. Mix until you have a beautifully uniform, vibrant green mixture. To the second bowl, add your chopped strawberries and the optional jam. Gently fold until the berries are evenly distributed and the filling is streaked with pink.
- The Art of the Layer: Pull your cups from the fridge. Now, you’re the artist. You can do a matcha layer first, then strawberry, or vice-versa. I love the visual pop of green on the bottom with pink on top. Spoon one flavor gently over the crust and smooth it out. Then, carefully spoon the second flavor on top. For super-clean layers, you can chill the first layer for 15 minutes before adding the second, but I’m usually too impatient—it’ll taste amazing either way.
- The Chill-Out Phase: Once all your cups are assembled, cover them loosely (plastic wrap is fine) and refrigerate for at least 2 hours, or ideally 3-4. This isn’t just about getting cold; it’s about letting the filling firm up perfectly so every spoonful is lush and creamy, not runny. Overnight is absolutely fantastic.
Plating Up the Wow Factor
You’ve done the work, now let’s make these beauties shine. Right before serving, grab your garnishes. A fresh strawberry slice perched on the rim is classic. A light dusting of matcha powder over the top (use a small sieve!) looks incredibly professional. A dollop of whipped cream or a tiny mint leaf adds a final touch of elegance.
Serve them straight from the fridge with a small spoon. The joy of individual cups is that there’s no slicing, no mess—just hand them out and accept the compliments. They’re perfect for a patio gathering, a fancy-ish dinner party, or just treating yourself on the couch with a good movie.
Make It Your Own: 5 Fun Twists
The “meld” doesn’t stop here! This recipe is a fantastic blueprint. Here’s how to run with it:
- Vegan Dream: Use vegan cream cheese, coconut yogurt, and maple syrup. Swap the butter for coconut oil in the crust. It works like a dream.
- Chocolate Lover’s Switch: Swap the matcha for 2 tablespoons of sifted cocoa powder. You’ve got a stunning chocolate-strawberry combo.
- Tropical Vibes: Replace the strawberries with finely diced mango or passionfruit pulp. Matcha and mango is an insanely good pairing.
- Lemon-Matcha Zing: Add the zest of one lemon to the plain filling before dividing it. Layer the matcha with the lemon filling instead of strawberry for a bright, citrusy kick.
- “Cheesecake Parfait” Style: Crumble the crust instead of pressing it, and create layers in a glass: crust crumbles, matcha filling, more crumbles, strawberry filling. Top with fresh berries. It’s deconstructed and gorgeous.
Jackson’s Kitchen Notes
This recipe has evolved from that first rainy-day experiment. I’ve learned that a tiny pinch of salt in the filling makes all the flavors pop—don’t skip it! I’ve also tried it with frozen yogurt for a slightly icier texture (great in summer), and once, in a moment of madness, I added a thin layer of dark chocolate ganache between the crust and filling. 10/10, would recommend for special occasions.
The best part? Kids LOVE making these. Let them press the crust, choose the layer order, and do the garnishing. It’s a fantastic, no-bake cooking lesson. Just maybe keep the matcha portion to yourself… unless you want them bouncing off the walls with you!
Your Questions, Answered
Q: My filling is too runny! What did I do wrong?
A: This usually means the cream cheese wasn’t soft enough to blend smoothly, or it needed more chill time. Make sure your cream cheese is at room temperature. Also, full-fat dairy firms up better. If it’s still loose after mixing, just chill the filled cups longer—overnight is your best friend here.
Q: My matcha tastes bitter. Help!
A> Ah, the matcha trap. First, always use high-quality powder. Second, don’t over-mix it. Vigorous beating can bring out bitterness. Gently fold it in. You can also balance it by adding an extra teaspoon of your sweetener to the matcha portion only.
Q: Can I make one big one instead of individual cups?
A> Absolutely! Use a 7-inch or 8-inch springform pan. Press the crust into the bottom, then spread your layers. You’ll need to chill it for at least 6 hours or overnight before slicing.
Q: How long do these keep in the fridge?
A> They’re best within 2-3 days. The crust may get slightly softer, but the flavor is still amazing. Keep them covered tightly.
Nutritional Info (A Quick Glance)
Okay, let’s keep it real—this is a dessert, a treat meant to be enjoyed fully. But if you’re curious about what’s in your cup, here’s a rough estimate per serving (based on 6 servings, using honey and Greek yogurt). Remember, these numbers can vary based on your specific ingredients and substitutions.
- Calories: ~220
- Protein: 5g (Thank you, Greek yogurt!)
- Carbohydrates: 18g
- Fat: 14g
- Sugar: 10g
- Fiber: 1g
Using swaps like reduced-fat cream cheese or increasing the yogurt can tweak these numbers. But my philosophy? Enjoy incredible food mindfully. Savor each bite of these cups, and that’s the best kind of nourishment.
Ready to Meld Some Flavors?
And there you have it—the complete guide to creating these show-stopping, no-fuss Strawberry Matcha Cheesecake Cups. This recipe embodies everything I love about cooking: bold flavors that surprise and delight, a process that’s actually fun, and a result that makes everyone (including you!) feel like a kitchen hero.
So, what are you waiting for? Grab those strawberries, sift that matcha, and let’s prove that unforgettable desserts don’t have to be complicated. I can’t wait to hear how yours turn out. Tag me on social with #FoodMeld so I can see your gorgeous creations! Now, go enjoy every single delicious, layered bite. You’ve earned it.
Until next time, keep mixing it up,
Jackson


