Dreamy Orange Creamsicle Cake: Your New Favorite Slice of Sunshine
Hey friends, Jackson here from Food Meld. Let’s talk about a flavor that instantly teleports you to the best parts of being a kid: that magical, sunny combo of sweet orange and creamy vanilla. You know the one. It’s the taste of a melting creamsicle on a hot summer day, the stickiness on your fingers, that pure, simple joy. I’ve been chasing that feeling in my kitchen for years, and let me tell you, turning it into a showstopping layer cake is the ultimate victory.
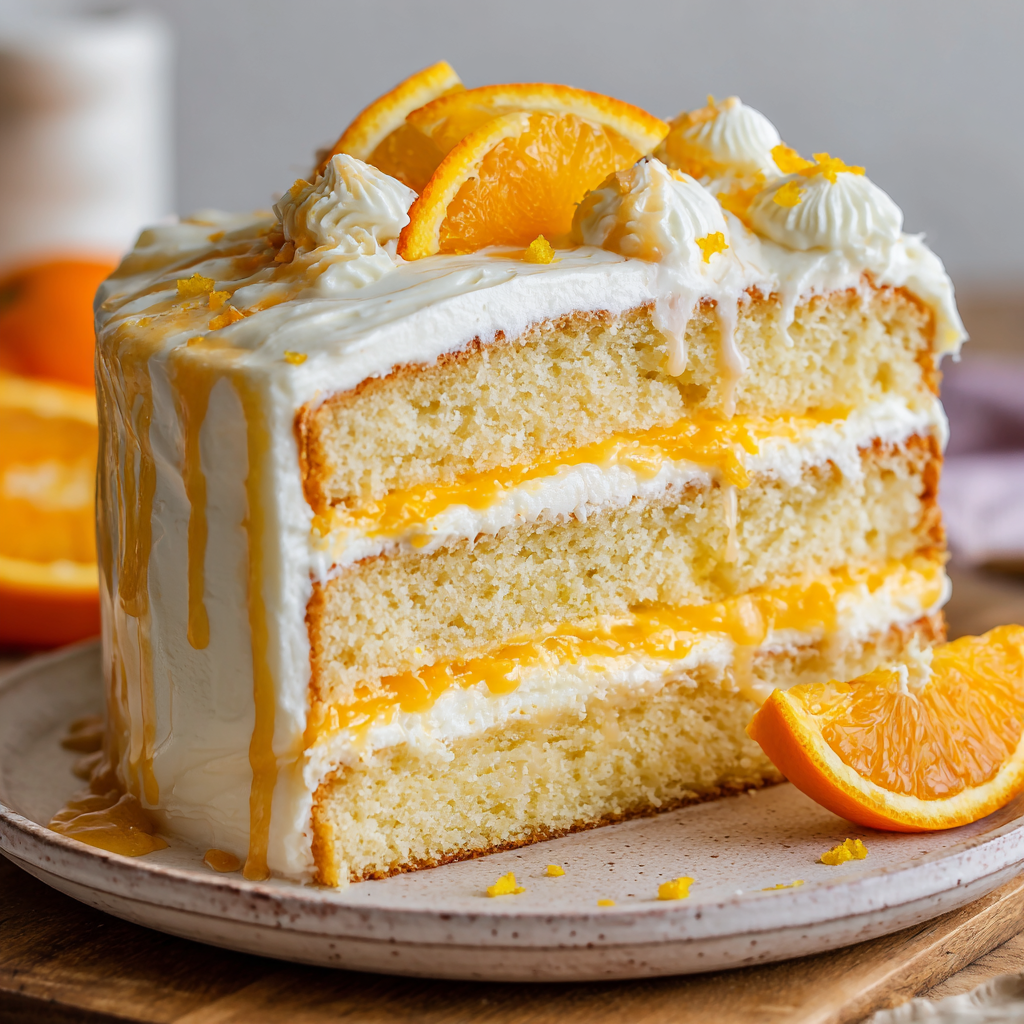
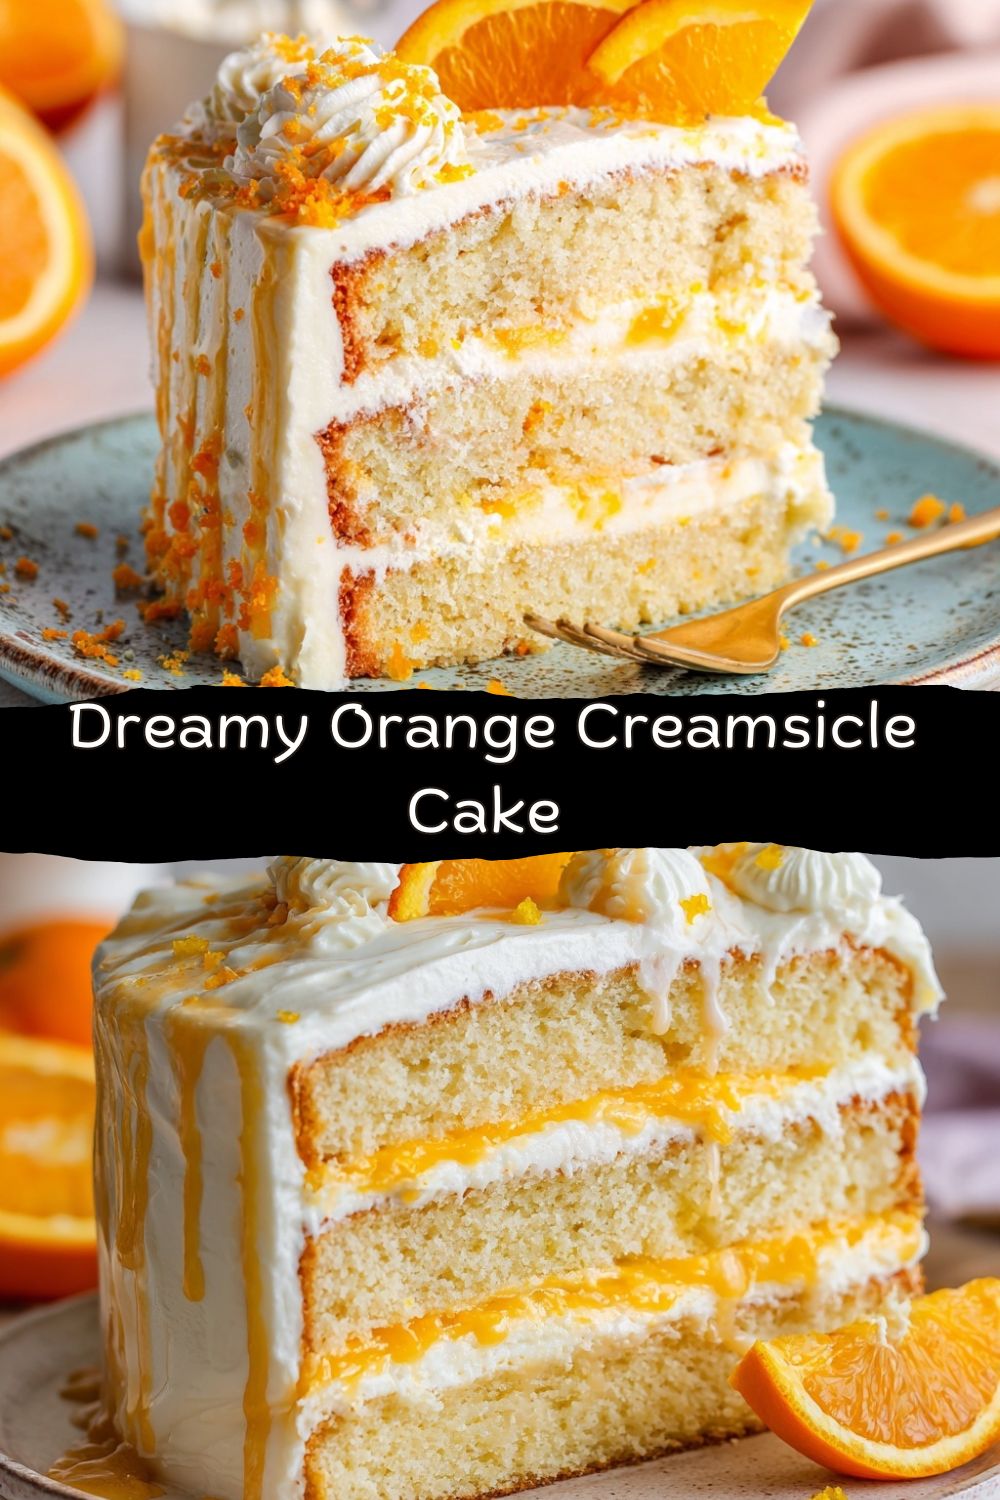
This isn’t just an orange cake. This is a Dreamy Orange Creamsicle Cake, and it’s everything the name promises. We’re talking unbelievably moist, citrus-kissed layers that are light yet sturdy, hugging a cloud of whipped vanilla-orange frosting so fluffy and vibrant, you’ll want to eat it with a spoon. Every single bite is a harmony of bright and creamy, a nostalgic hug and a fresh, sophisticated dessert all at once.
I designed this recipe for real people in real kitchens. Whether you’re celebrating a birthday, bringing the star dish to a backyard BBQ, or just declaring Tuesday a cake-worthy day, this beauty delivers. It looks impressive but comes together with trusty techniques and a whole lot of heart. So, preheat that oven, grab your favorite mixing bowl, and let’s bake a slice of pure, unadulterated sunshine together. Get ready for those “you’ve gotta try this!” moments.
The Sidewalk Symphony & My Creamsicle Obsession
My love for this flavor goes way back. Growing up, the most exciting sound of a summer afternoon wasn’t the ice cream truck’s full song—it was the specific, glorious *ding-ding* right outside our house. My brother and I would sprint to the curb, coins clutched in our sweaty palms, and without fail, I’d go for the orange creamsicle every single time.
But here’s the secret ritual: I’d carefully nibble all the vanilla ice cream off the outside first, saving the pure orange ice pop core for last. That final, intense burst of citrus was the grand finale! This cake is my grown-up, “what if we tried this?” version of that experience. The frosting is that initial wave of creamy, dreamy vanilla, and the cake layers are that powerful, joyful punch of orange. It’s my culinary homage to those slow, sweet summer days and the simple pleasure of a treat that just makes you smile. Baking it always brings back that feeling of anticipation, standing on hot concrete, knowing something awesome is about to happen.
Gathering Your Sunshine: Ingredients & Why They Matter
Here’s where the magic starts. Using quality, fresh ingredients makes all the difference in creating that true creamsicle vibe. Let’s break it down.
For the Sunshine Cake Layers:
- 2 ½ cups all-purpose flour: The trusty foundation. Spoon and level it into your measuring cup for accuracy—don’t scoop directly from the bag or you’ll pack in too much!
- 2 ½ tsp baking powder: Our leavening superstar. It gives the cake its beautiful rise and tender crumb. Make sure yours is fresh (less than 6 months old) for the best lift.
- ½ tsp salt: The flavor enhancer. It’s not enough to make things salty; it just makes the orange and vanilla flavors sing louder by balancing the sweetness.
- ¾ cup unsalted butter, softened: “Softened” is key here. It should give slightly when pressed but not be oily. This creates the airy structure when creamed with the sugar. For a dairy-free twist, a high-quality plant-based butter works great.
- 1 ¾ cups granulated sugar: Sweetness and tenderness. It helps create a delicate texture and that golden-brown edge we love.
- 4 large eggs: Bring them to room temperature! Cold eggs can make the creamed butter seize up. They add richness, structure, and moisture.
- 1 tbsp orange zest: THE FLAVOR BOMB. This is non-negotiable for the brightest citrus flavor. Use a fine grater and only the bright orange part of the skin (the white pith is bitter).
- ½ cup fresh orange juice & ¾ cup milk: The dynamic duo of moisture. The acid in the OJ also tenderizes the crumb. Use full-fat milk for the richest taste, but any milk you have works.
- 1 tsp vanilla extract: The vanilla base note. It starts building that classic creamsicle partnership.
- Optional: ½ tsp orange extract: My chef’s hack for an extra layer of intense, candied-orange aroma. It’s like turning the volume up on the orange flavor without adding more liquid.
For the Whipped Creamsicle Frosting:
- 1 cup unsalted butter, softened: Yes, more butter. This is the base of our fluffy cloud. Same softening rule applies!
- 3 cups powdered sugar: Sift it if you can! This prevents lumps in your silky-smooth frosting.
- 1 tsp vanilla extract: The creamy half of the creamsicle dream.
- 2 tbsp orange juice & Zest of 1 orange: Fresh is best here too. The zest adds little pops of vibrant flavor and a gorgeous speckled look.
- 2–3 tbsp heavy cream: The texture magician. Start with 2 tablespoons and add the third only if needed to reach a perfectly spreadable, whipped consistency.
For the Topping:
- Fresh orange slices or zest: This is for style and a little extra zing! I love using thin half-moon slices or just a generous sprinkle of fresh zest.
Let’s Build This Sunny Masterpiece: Step-by-Step
Alright, team. Let’s get mixing. Put on some good tunes, and let’s have fun with it.
Step 1: Prep Like a Pro. First things first, preheat your oven to a solid 350°F (175°C). Grab two 9-inch round cake pans. Now, here’s my foolproof method to prevent sticking: smear a little softened butter all over the inside, then add a tablespoon of flour. Tap and tilt the pan until the flour coats every buttered spot, then tap out the excess. It’s like a non-stick insurance policy. Line the bottoms with a round of parchment paper for absolute cake-release confidence.
Step 2: Combine the Dry Crew. In a medium bowl, whisk together your flour, baking powder, and salt. Whisking by hand for a good 30 seconds does two things: it combines everything evenly, and it aerates the flour a bit, which is a good thing! Set this bowl aside.
Step 3: The Creaming Method – This is Crucial! In your large mixing bowl, beat the softened butter and granulated sugar together on medium-high speed for a full 3-4 minutes. Don’t skimp! We want it pale, fluffy, and almost like a very thick whipped cream. This incorporates air, which is part of your cake’s rise. Scrape down the bowl halfway through.
Step 4: Incorporate the Eggs & Zest. With the mixer on medium, add your room-temperature eggs one at a time, letting each fully incorporate before adding the next. This ensures a smooth, emulsified batter. Then, beat in the vanilla and that glorious tablespoon of orange zest. Your kitchen should already smell incredible.
Step 5: The Gentle Merge. In a measuring cup, combine the fresh orange juice and milk (it might look a little curdled—that’s fine!). Now, with your mixer on low speed, add about one-third of your dry flour mixture to the butter bowl. Mix until just combined. Follow with half of the juice/milk mixture. Repeat: another third of flour, the rest of the juice/milk, and finally the last of the flour. Stop mixing as soon as the last streaks of flour disappear. A few small lumps are better than overmixing, which leads to a tough cake.
Step 6: Bake to Golden Perfection. Divide the beautiful orange batter evenly between your prepared pans. I like to use a kitchen scale for precision, but the trusty eyeball method works too. Smooth the tops. Bake for 25-30 minutes. The cakes are done when they’re golden, spring back lightly when touched, and a toothpick inserted into the center comes out with just a few moist crumbs (not wet batter).
Step 7: The Patience Game (The Hardest Step!). Let the cakes cool in their pans on a wire rack for 15 minutes. Then, run a knife around the edge, invert them onto the rack, peel off the parchment paper, and let them cool completely. I’m serious—frosting a warm cake is a recipe for a melty, sliding mess. Use this time to wash up and make the frosting.
Step 8: Whip Up the Dreamy Frosting. In a clean bowl, beat the softened butter on medium-high for 2-3 minutes until it’s super creamy and almost white. Reduce speed to low and gradually add the sifted powdered sugar. Once it’s incorporated, add the vanilla, orange juice, and zest. Crank the speed back up to medium-high and beat for another 2 minutes. It will be thick. Stream in the heavy cream, one tablespoon at a time, until you reach a fluffy, spreadable consistency.
Step 9: Assemble & Celebrate! Place one cooled cake layer on your plate or cake stand. Dollop a generous amount of frosting in the center and spread it evenly to the edges. Gently place the second layer on top, bottom-side up for a perfectly flat surface. Spread a thin layer of frosting all over the cake to seal in crumbs (this is a “crumb coat”). Pop it in the fridge for 15 minutes to set, then pile on the rest of the frosting and swirl it to your heart’s content! Top with fresh orange slices or a shower of zest.
Serving Your Slice of Sunshine
This cake is a showstopper all on its own, but how you serve it can make the moment even more special. For a casual, homey vibe, slice it thick right on the kitchen counter and serve it on simple plates with a cold glass of milk. The contrast of the cool milk with the citrus cake is *chef’s kiss*.
If you’re feeling fancy for a party, garnish each plate with a tiny twist: a candied orange slice, a sprinkle of edible gold dust on the frosting, or a tiny mint leaf for a pop of color. In the summer, I love serving it with a side of lightly sweetened fresh berries or a small scoop of vanilla bean ice cream—because why not double down on the creamsicle theme?
The most important tip? Let the cake sit at room temperature for about 20 minutes before slicing if it’s been in the fridge. This allows the frosting to soften up and the flavors to bloom, ensuring you get that perfect, dreamy texture in every bite.
Make It Your Own: Flavor Twists & Swaps
The “what if we tried this?” spirit is my favorite part of cooking! Here are some easy twists on this classic:
- Citrus Swap: Try blood orange juice and zest for a stunning pink-hued cake with a slightly deeper, berry-like citrus note. Or, use a mix of lemon and orange (like ¼ cup lemon juice, ¼ cup OJ) for a brighter, tangier kick.
- Boozy Creamsicle: For a grown-up twist, add 1-2 tablespoons of Grand Marnier or Cointreau to the frosting instead of the extra tablespoon of cream. It adds a wonderful depth.
- Cupcake Crew: This batter makes amazing cupcakes! Line a muffin tin, fill cups ⅔ full, and bake for 18-22 minutes. Frost when cool for portable sunshine.
- Dairy-Free Dream: Easy! Use your favorite plant-based butter sticks and milk (oat or almond milk work great). For the frosting cream, a thick, plain, unsweetened coconut cream (chilled) can be substituted.
- Nutty Crunch: Add a textural surprise by sprinkling a layer of finely chopped toasted almonds or pecans between the cake layers with the frosting. The nuttiness pairs beautifully with orange.
Jackson’s Kitchen Notes & Stories
This recipe has seen some… experiments. The first time I tested it, I got overzealous with the orange juice in the frosting. Let’s just say I created a delicious but very soft orange soup that refused to hold up the layers. My wife came into the kitchen to find me holding a collapsing cake, laughing hysterically. It tasted amazing, but it was a delicious lesson in balancing wet and dry ingredients! That’s how I landed on the current frosting formula—flavor-packed but sturdy enough to stack.
Over time, I also learned that the quality of the orange zest is everything. I once made this in the winter with sad, bland oranges, and the cake was just… meh. Now, I wait for good, fragrant citrus or I lean a little heavier on that optional orange extract to boost the aroma. It’s a reminder that sometimes, the simplest ingredients need the most attention.
FAQs: Your Questions, Answered
Q: My cake layers sunk in the middle! What happened?
A> Don’t stress—it happens! The usual culprits are: 1) Overmixing after adding the flour (develops too much gluten), 2) Old baking powder that’s lost its lifting power, or 3) Opening the oven door too early before the cake has set (try not to peek before the 22-minute mark!). The good news? Sunken layers still taste amazing. Just level them off with a serrated knife before frosting, and no one will ever know.
Q: Can I make this cake ahead of time?
A> Absolutely, and it actually improves the flavor! You can bake the cake layers up to 2 days in advance. Let them cool completely, wrap each layer tightly in plastic wrap, and store at room temperature. You can also frost the entire cake and store it, covered, inthe fridge for up to 3 days.Just remember to let it sit out for about 20 minutes before serving so the frosting softens and the flavors really shine.
Nutritional Info (Because Balance Matters)
Here’s a rough estimate per slice (based on 12 servings). Keep in mind these numbers can vary depending on brands and portion size—and that this cake is meant to be enjoyed, not optimized.
-
Calories: ~410
-
Fat: 22g
-
Saturated Fat: 13g
-
Carbohydrates: 50g
-
Sugar: 36g
-
Protein: 4g
-
Sodium: ~190mg
If you want to lighten it slightly, you can:
-
Use reduced-fat milk
-
Cut the frosting layer between cakes a bit thinner
-
Serve smaller slices (this cake is rich!)
Final Thoughts: Bake the Joy
This Dreamy Orange Creamsicle Cake is more than a dessert—it’s a feeling. It’s nostalgia wrapped in citrus zest. It’s sunshine on a plate. It’s the kind of cake that makes people pause mid-bite and say, “Okay… wow.”
If you’re baking for a crowd, expect requests for the recipe. If you’re baking for yourself, expect a second slice. And if you’re baking with kids? Get ready for sticky fingers, big smiles, and memories that matter.
That’s what Food Meld is all about—taking flavors that already live in our hearts and turning them into something we can share.
So go on. Zest those oranges. Whip that frosting.
And bake something that makes your kitchen—and your day—brighter. 🍊✨
— Jackson


