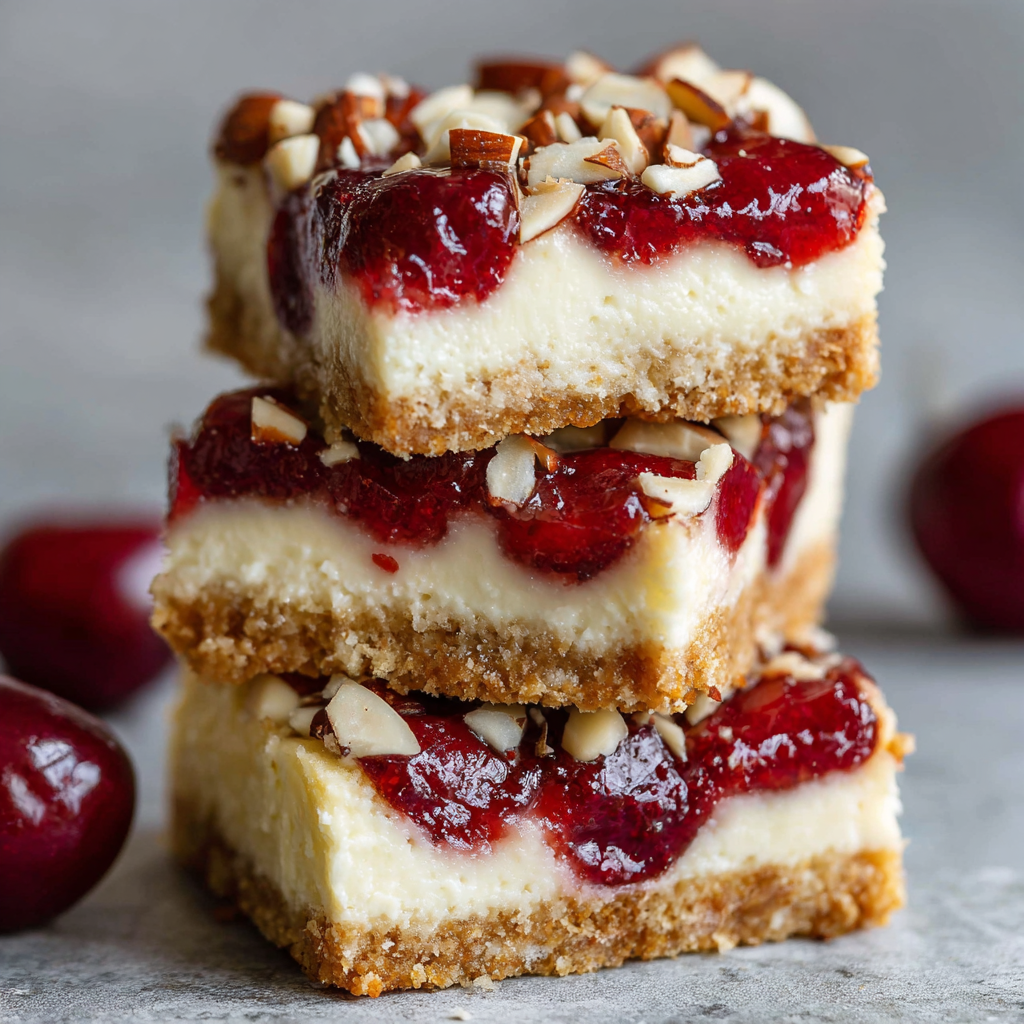
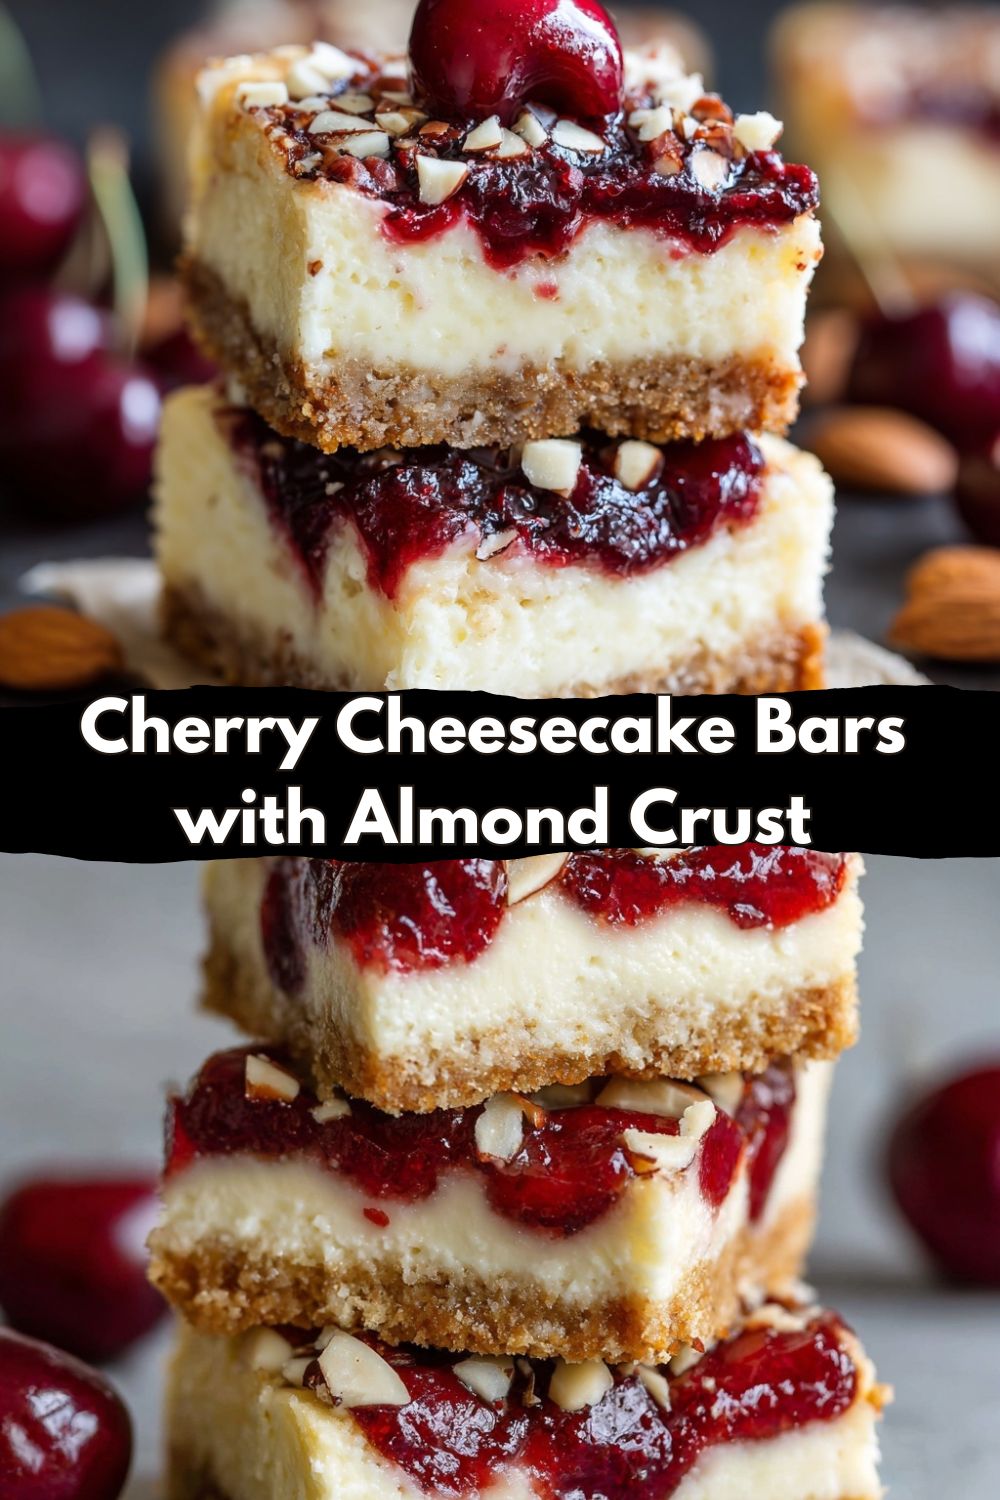
Let’s Make Something Unforgettable: Cherry Cheesecake Bars with an Almond Crust Twist
Hey friends, Jackson from Food Meld here. Let me paint you a picture: you’re craving something decadent, something that feels like a hug from the inside. You want the creamy, dreamy satisfaction of a perfect cheesecake, but maybe without the stress of a water bath and the whole “will-it-crack?” anxiety. Enter my secret weapon: Cherry Cheesecake Bars with an Almond Crust. These little squares are my go-to for a reason. Imagine a toasty, nutty almond crust that crumbles just right, a layer of velvety vanilla cheesecake so smooth it practically sings, and a bright, glossy crown of sweet-tart cherry pie filling. It’s a flavor meld that just works—Southern comfort meets diner dessert case glory, all in one no-fuss pan.
This recipe is the epitome of what I build Food Meld on: bold, comforting food with a creative twist that’s absolutely doable. We’re taking the classic and giving it a nutty, textural upgrade that makes people go, “Wait, what’s in the crust? It’s amazing!” And the best part? You probably have most of this in your kitchen right now. No fancy equipment, no intimidating techniques. Just you, a bowl, a spoon, and the promise of a dessert that’s guaranteed to steal the show. So, tie on your apron, and let’s turn that “what if we tried this?” energy into your new favorite treat. Ready? Let’s cook something awesome together.
The Story Behind the Crust: A Nutty Family Tradition
This recipe’s heart—that almond crust—isn’t just there for texture. It’s a little nod to my Grandma Elsie. She wasn’t a fancy chef, but she was a wizard with a jar of almonds and a rolling pin. Every Christmas, she’d make these delicate almond crescent cookies that vanished in minutes. The smell of toasting almonds from her tiny kitchen is one of my core flavor memories.
When I started playing with cheesecake bars, a graham cracker crust felt… expected. I wanted a base with more personality, something that brought its own flavor to the party. One day, staring at a bag of almonds, Grandma Elsie’s cookies popped into my head. What if we tried this? I ground up some almonds, mixed them with a little butter and sugar, and pressed it into a pan. The moment I tasted that first baked crust—warm, fragrant, subtly sweet—I knew. It was the missing piece. It transformed a simple cheesecake bar into something with a story, with a crunchy, nutty soul. Now, every time I make these, that smell takes me right back. It’s my way of keeping her magic in my kitchen and sharing it with you.
Gathering Your Flavor Team: Ingredients & Chef Insights
Here’s the squad we’re working with. Simple, quality ingredients are the key. Let’s break them down so you know exactly why each one is here and how you can make it your own.
For the Almond Crust:
- 1 cup finely ground almonds or almond flour: This is our star. Almond flour gives a tender, moist crumb and that incredible nutty flavor. Chef’s Insight: If you’re grinding whole almonds, pulse them in a food processor with a tablespoon of the recipe’s flour to prevent turning them into almond butter!
- 1/2 cup all-purpose flour: The stabilizer. It gives the crust structure so it holds together in perfect, sliceable bars.
- 1/4 cup brown sugar: For depth. Brown sugar adds a hint of molasses warmth that pairs so well with the almonds. White sugar works in a pinch, but trust me, the brown sugar is a game-changer.
- 1/2 cup unsalted butter, melted: Our binding agent and flavor carrier. Melted butter makes the crust pressable and gives it that rich, irresistible shortbread vibe. Using unsalted lets you control the salt level.
- 1/2 teaspoon vanilla extract: A flavor enhancer. A splash of vanilla in the crust ties it seamlessly to the cheesecake layer.
For the Cheesecake Layer:
- 16 oz (two 8-oz blocks) cream cheese, softened: Non-negotiable. It MUST be at room temperature. This is the single biggest tip for a lump-free, silky filling. Take it out 1-2 hours ahead. Sub Tip: Full-fat is best for texture, but reduced-fat will work in a pinch (just don’t tell the dessert purists I said so).
- 1/2 cup granulated sugar: Just the right amount to sweeten without overpowering. We’re balancing the sweet cherries and nutty crust.
- 2 large eggs, at room temperature: Another room-temp MVP! Cold eggs can re-solidify bits of cream cheese, causing lumps. Room temp eggs blend in smoothly for a cohesive filling.
- 1 teaspoon vanilla extract: The aromatic backbone. Use pure vanilla if you have it—it makes a difference in such a simple filling.
For the Topping:
- 1 can (21 oz) cherry pie filling: Our easy, vibrant finish. It’s all about that sweet-tart cherry flavor and gorgeous color. Chef’s Twist: Feel free to use homemade compote or another pie filling like blueberry or apple for a totally different vibe!
Building Your Masterpiece: Step-by-Step Instructions
Okay, team. Let’s get into it. Follow these steps, lean into my little hacks, and you’ll have perfect bars every single time.
Step 1: Preheat & Prep. Fire up your oven to 350°F (175°C). Now, line an 8×8 or 9×9-inch baking pan with parchment paper, leaving some overhang on two sides. This is your “cheat code” for lifting the entire slab of cheesecake out perfectly for clean slicing. No sticking, no mess. Lightly grease the exposed sides of the pan.
Step 2: Make the Nutty Foundation. In a medium bowl, stir together the almond flour, all-purpose flour, and brown sugar. Pour in the melted butter and vanilla. Mix with a fork until it looks like damp sand and starts to clump together when pressed. Dump this into your prepared pan and press it into a firm, even layer across the bottom. I use the bottom of a measuring cup to really tamp it down—it bakes more evenly that way. Chef’s Hack: For extra toasty flavor, you can bake this crust for 8 minutes, let it cool, then proceed. But our one-bake method works beautifully too!
Step 3: Par-bake That Crust. Pop the crust into your preheated oven for 10-12 minutes. You’re looking for it to be lightly golden at the edges and smell amazing. This step sets the crust so it doesn’t turn soggy when we add the wet filling. Let it cool on a rack for about 10 minutes. Don’t skip this cooling time—it matters!
Step 4: Create the Creamy Dream. While the crust cools, make the filling. In a large bowl, beat the softened cream cheese and granulated sugar together with a hand mixer (or stand mixer) on medium speed for 1-2 minutes. Stop and scrape down the bowl. It should be completely smooth, with zero lumps. Now, add the eggs one at a time, beating on low speed just until each is fully incorporated. Scrape the bowl again! Finally, beat in the vanilla. Key tip: Don’t overbeat after adding the eggs. Too much air can cause the cheesecake to puff and fall, leading to cracks. We want it smooth, not fluffy.
Step 5: Assemble & Bake. Pour your luscious cheesecake batter over the slightly cooled crust. Smooth the top with a spatula. Give the pan a gentle tap on the counter to release any air bubbles. Slide it into the oven and bake for 25-30 minutes. The center should look set but still have a slight, gentle jiggle when you nudge the pan—like Jell-O. The edges might be just barely starting to puff. This is perfect. Overbaking is the enemy of creamy cheesecake.
Step 6: The Patience Payoff (Cooling & Chilling). Here’s where magic happens. Let the bars cool completely in the pan on a wire rack. This gradual cooling helps prevent major cracking. Once at room temp, cover the pan and refrigerate for at least 2 hours, but overnight is honestly ideal. This sets the structure and intensifies the flavors. I know it’s hard to wait, but it’s 100% worth it.
Step 7: The Grand Finale – Cherry Topping. When you’re ready to serve, use the parchment paper overhang to lift the whole cheesecake slab onto a cutting board. Spread the can of cherry pie filling evenly over the top. Now, slice into bars with a sharp knife wiped clean between cuts for those pristine edges. And get ready for the applause.
How to Serve These Show-Stopping Bars
Presentation is part of the fun! These bars are stunning all on their own, but a little flair never hurt. For a casual family treat, just slice and stack them on a plate—they’ll disappear. For a party or gathering, I love plating them individually. Place a bar on a small dessert plate, add a tiny dollop of freshly whipped cream on the side, and maybe a single mint leaf for a pop of green. The red, white, and golden brown looks gorgeous.
Thinking about pairings? A cup of strong, black coffee cuts through the richness beautifully. A glass of cold milk is always a classic, nostalgic move. Or, for the adults, a small glass of dessert wine or a bourbon with notes of vanilla and oak is an incredible “chef’s table” experience. Remember, the bars are rich, so small slices are totally acceptable (though I won’t judge if you go back for seconds).
Make It Your Own: Flavorful Twists & Swaps
One of my favorite parts of cooking is playing with variations. This recipe is a fantastic canvas. Here are a few of my favorite “what if we tried this?” spins:
- The Chocolate Swirl: Melt 1/2 cup of chocolate chips. After pouring the cheesecake batter over the crust, dollop the melted chocolate on top and use a knife to swirl it dramatically into the batter before baking. Skip the cherry topping for a marbled masterpiece.
- Lemon-Berry Burst: Add the zest of one lemon to the cheesecake filling. After baking and chilling, top with a simple mix of fresh blueberries and raspberries (tossed with a teaspoon of sugar) instead of the cherry pie filling. Bright, fresh, and stunning.
- Gluten-Free Friend: Super easy! Simply replace the 1/2 cup of all-purpose flour in the crust with a 1:1 gluten-free baking blend. Ensure your almond flour is certified GF, and you’re all set.
- Salted Caramel Pretzel Crust: Swap the almond crust! Use 1.5 cups of crushed pretzels, 1/4 cup sugar, and 1/2 cup melted butter. Press and bake as directed. Drizzle the finished bars with salted caramel sauce instead of cherry topping for the ultimate sweet-salty crunch.
- Mini Marvels: Use a muffin tin lined with cupcake liners. Press about 1.5 tablespoons of crust mixture into each, par-bake for 8 minutes, then fill 3/4 full with cheesecake batter. Bake for 15-18 minutes. Perfect for portion control and parties!
Jackson’s Kitchen Notes & Stories
This recipe has been on quite a journey in my kitchen. The first time I made it, I was so eager I sliced it after only an hour in the fridge. Let’s just say we had “cherry cheesecake soup” on plates. It was delicious, but not exactly photogenic! That’s how I learned the sacred rule of full chilling time.
Another fun evolution: I used to make my own cherry compote from scratch, which is amazing, but one busy Tuesday, I reached for the trusty can of pie filling. You know what? It was fantastic, and it saved 30 minutes. That’s the Food Meld spirit—sometimes, the simpler route lets the other flavors (like that almond crust!) shine even brighter. Don’t let perfect be the enemy of delicious. These bars are forgiving and fun. If a tiny crack appears, who cares? It’s getting covered in glorious cherries anyway!
Your Questions, Answered: FAQs & Troubleshooting
Q: My cheesecake layer cracked! What did I do wrong?
A: Don’t stress! The cherry topping is the ultimate concealer. Cracks usually happen from overmixing the batter (incorporating too much air), overbaking, or cooling too quickly. Next time, mix on low after adding eggs, bake just until the center is set but jiggly, and let it cool gradually in the oven with the door cracked open for 30 minutes before moving to the counter.
Q: Can I freeze these cheesecake bars?
A> Absolutely. Freeze the cheesecake slab (without the cherry topping) solid on a tray, then wrap tightly in plastic and foil. It keeps for 1-2 months. Thaw overnight in the fridge and add the cherry topping right before serving.
Q: My crust is soggy. How can I prevent that?
A> Sogginess comes from not par-baking the crust enough or adding the filling while the crust is still piping hot. Make sure your crust is a light golden brown after that first bake, and let it cool for a solid 10 minutes before adding the filling. That creates a protective “seal.”
Q: Can I use a different nut for the crust?
A> You bet! Pecans or hazelnuts would be incredible. Just make sure they’re finely ground to a flour-like consistency for the best texture.
Nutritional Information (For Your Info!)
Hey, we’re all about balance, right? Here’s a rough breakdown per bar (assuming 12 servings from a 9×9 pan). Remember, this is an estimate based on the specific ingredients used, and homemade is always a better choice than ultra-processed desserts!
Per Bar: Calories: ~290 | Total Fat: 19g | Saturated Fat: 9g | Carbohydrates: 24g | Sugar: 17g | Protein: 5g | Sodium: 130mg
These bars are a treat, and they’re meant to be enjoyed as such! The protein from the almonds and eggs, and the calcium from the cream cheese are little bonuses in my book. If you’re looking to lighten things up slightly, you can use reduced-fat cream cheese and a sugar substitute that bakes well, but for the best texture and flavor experience, I recommend sticking with the classic ingredients for special occasions.
Final Thoughts: Your New Go-To Dessert Awaits
And there you have it! My recipe for Cherry Cheesecake Bars with an Almond Crust—a dessert that’s destined to become part of your “legendary desserts” list.
These Cherry Cheesecake Bars with an Almond Crust are everything I love about baking—comforting, nostalgic, just a little unexpected, and completely doable. They give you all the joy of a classic cheesecake without the stress, and that nutty almond crust adds a layer of warmth and personality that makes people pause mid-bite and say, “Wow… what is that crust?” That’s the moment. That’s the win.
This is the dessert you bring when you want to be remembered. The one that quietly disappears first at the party. The one someone texts you about the next day asking for the recipe. Whether you’re baking for a holiday table, a casual get-together, or just because your week deserves a sweet ending—this one delivers every time.
So take your time chilling it. Slice it clean. Share it generously. And don’t be surprised if it becomes your signature dessert.
As always, if you make these, tag Food Meld or drop a comment with your twist. I love seeing how these recipes live on in your kitchens.
Until next time—keep that “what if we tried this?” energy alive.
— Jackson 🍒🧀✨


