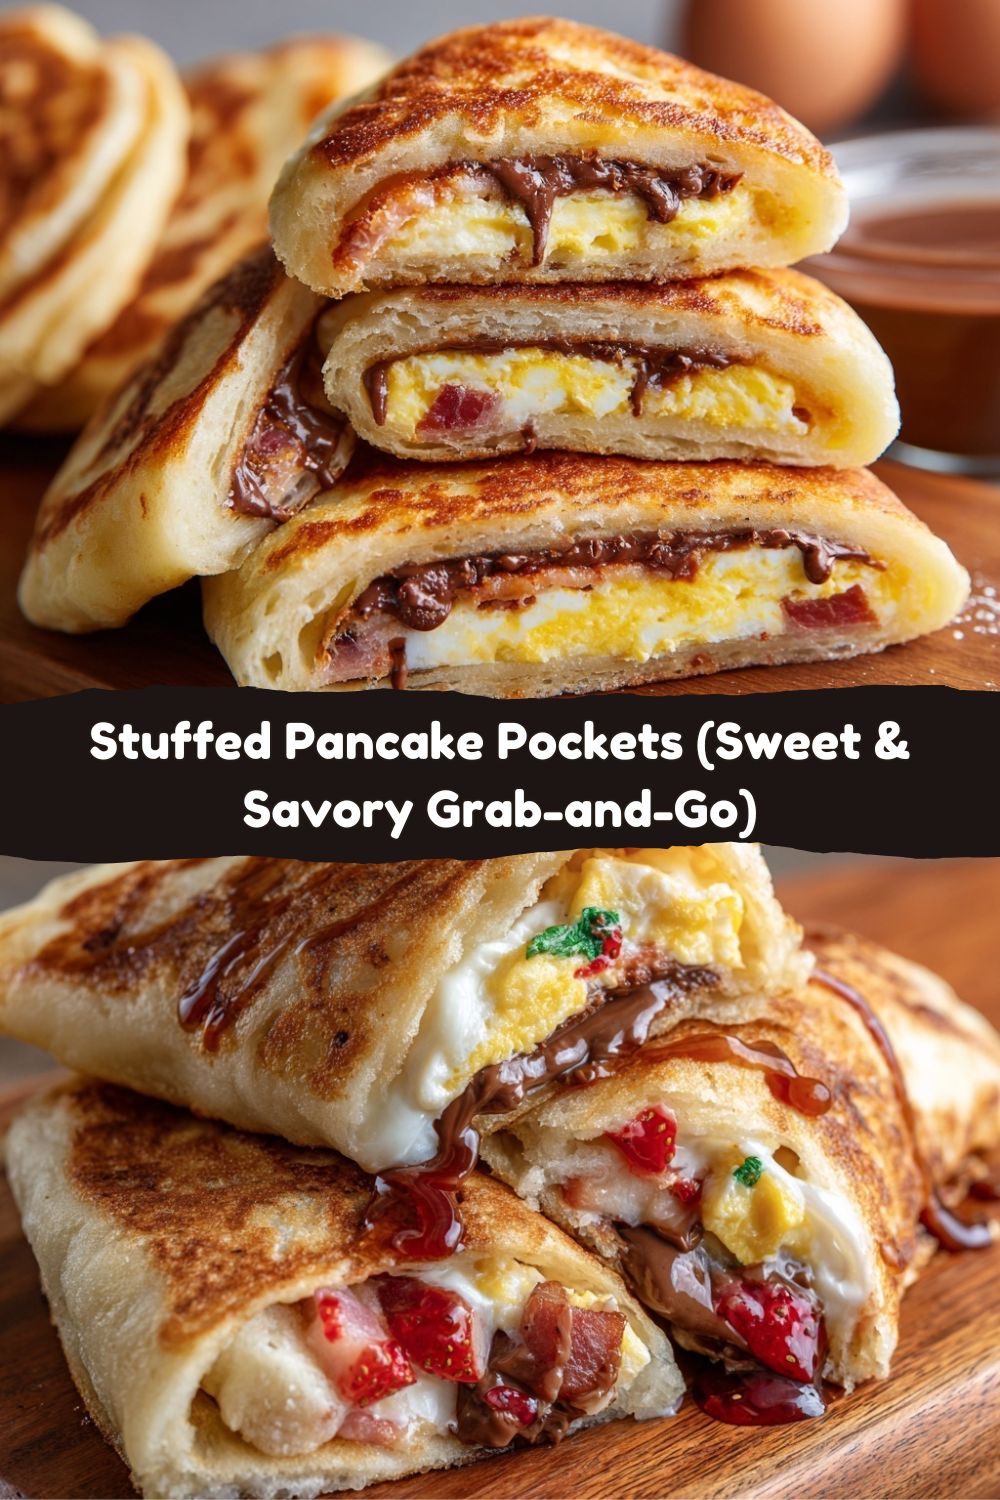
Stuffed Pancake Pockets (Sweet & Savory) | The Ultimate Grab-and-Go Pancake Hack
Hey friends, Jackson here from Food Meld. Let’s be real for a second: how many times have you stood in front of the fridge or pantry on a chaotic morning, willing something delicious and fast to magically appear? You reach for the cereal box… again. Or you hand your kid yet another granola bar. It’s fine, but it’s not awesome. And you know what? You deserve awesome. Your busy, beautiful life deserves a breakfast (or lunch, or snack) that feels like a hug and tastes like a celebration.
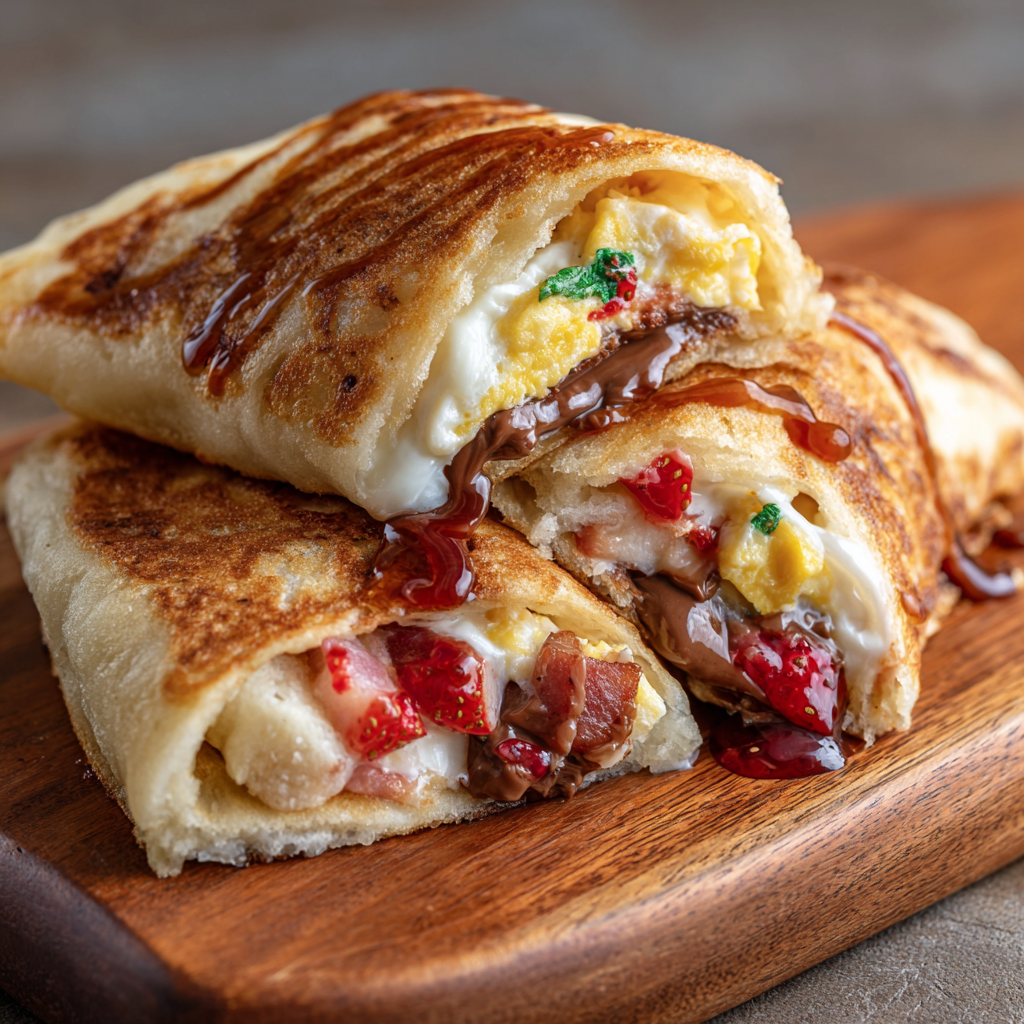
That’s exactly why I’m obsessed with these Stuffed Pancake Pockets. We’re taking the humble, beloved pancake and turning it into a portable, sealed masterpiece with a surprise inside. Imagine a fluffy, golden pillow that, when you bite into it, reveals oozy Nutella and sweet banana, or perfectly scrambled eggs and crispy bacon. It’s the food hack you didn’t know you were searching for, and I promise it’s going to change your grab-and-go game forever.
This isn’t about fancy techniques or hard-to-find ingredients. It’s about smart, fun cooking that works for real life. These pockets are your secret weapon for meal prep Sundays, school lunchboxes that actually get eaten, and lazy weekend brunches that wow everyone. They’re kid-approved, adult-adored, and so customizable that you’ll never get bored. So, grab your favorite skillet and let’s turn “meh” mornings into “you’ve gotta try this!” moments. Let’s cook something awesome together.
The Pancake Flip That Started It All
This whole idea hit me in a glorious, messy kitchen memory. Picture me, maybe ten years old, standing on a wobbly stool next to my grandma. Sunday mornings at her house meant pancake mountains, and I was her official “bubble watcher.” My job was to yell “FLIP ’EM!” when the bubbles popped and didn’t fill back in. One morning, we got adventurous. We spooned a little too much blueberry compote onto the batter before flipping. The result was a leaky, purple-tinted pancake that was… incredible. The berries had sort of caramelized inside their fluffy pocket.
That “mistake” stuck with me—the joy of a hidden center, the fun of breaking the rules. Years later, when I was scrambling to pack lunches for a camping trip, that memory resurfaced. What if I could intentionally seal the goodness inside? A few (dozen) test runs later, from delicious disasters to perfectly sealed pockets, the recipe was born. It’s a tribute to my grandma’s kitchen, where the best ideas often came from a happy accident and a “what if we tried this?” spirit. Every time I make these, I think of her, and I hope this recipe becomes a part of your own kitchen stories, too.
Your Pocket Power Ingredients
Here’s everything you need to build your flavor fortress. I’ve added my chef notes beside each one—why it’s there, how to swap it, and little insights to guarantee your success.
- 1 ½ cups all-purpose flour: This is our trusty structure-builder. It gives the pockets just enough strength to hold the filling without being tough. Chef’s Insight: For a lighter, whole-grain twist, you can swap out up to ½ cup for whole wheat flour. If you need gluten-free, a 1:1 GF blend works perfectly here.
- 2 tbsp sugar: A touch for balance and that perfect golden-brown color. It’s not just for sweetness! Chef’s Swap: For savory-only batches, you can reduce this to 1 tbsp. Any granulated sugar works, or maple syrup in the wet ingredients.
- 1 tbsp baking powder: Our leavening superstar. This is what gives you those fluffy, airy pockets (literally!). Chef’s Tip: Make sure yours is fresh! If it’s been in the cabinet for a year, it may not give you the lift you crave.
- ½ tsp salt: The flavor enhancer. Never skip this, even in sweet recipes. It makes every other ingredient taste more like itself.
- 1 ¼ cups milk: The hydrator. Whole milk gives a richer flavor, but any milk you have works. Chef’s Swap: Buttermilk is a fantastic tangy twist, or use your favorite non-dairy milk like oat or almond.
- 1 large egg: The binder. It adds richness and helps the batter hold together around the filling. Chef’s Tip: Have your egg at room temperature for a smoother batter. Just pop it in a bowl of warm water for 5 minutes if you forgot!
- 2 tbsp melted butter (plus extra for the skillet): Flavor and tenderness in one. Chef’s Insight: I use unsalted to control the salt level. For a dairy-free version, neutral oil or melted coconut oil are great substitutes.
- 1 tsp vanilla extract (for sweet versions): The aromatic kick. It deepens all the sweet flavors. Feel free to skip if you’re going all savory.
Filling Ideas (Mix & Match!)
Sweet Pockets:
- Nutella + Banana Slices: A classic for a reason. The banana gets warm and soft.
- Cream Cheese + Berries: Use softened cream cheese and fresh or frozen berries (pat frozen ones dry).
- Peanut Butter + Jam: My personal favorite. Use a thick peanut butter so it doesn’t run.
Savory Pockets:
- Scrambled Eggs + Bacon: Pre-cook your eggs just slightly wetter than you normally would, and chop the bacon.
- Ham + Cheddar: Use small diced ham and shredded cheese. Gruyere is also magical here.
- Spinach + Feta: Sauté the spinach first to wilt it and squeeze out excess water. Crumble the feta.
Let’s Build Some Pockets: A Step-by-Step Adventure
Follow these steps, and you’ll be a pocket-pro in no time. I’m talking you through every little detail so your first batch is a total win.
Step 1: Make the Base Camp (The Batter)
In a large bowl, whisk together your flour, sugar, baking powder, and salt. This is your dry team. In another bowl or a large measuring jug, whisk the milk, egg, melted butter, and vanilla (if using) until they’re one happy, smooth, liquid family. Now, pour the wet team into the dry team. Here’s my biggest hack: mix until *just* combined. A few lumps are FINE, I promise. Over-mixing is the enemy of fluffy pancakes—it develops the gluten and makes them tough. Think of it as gently folding them together, not beating them into submission. Let the batter rest for 5 minutes while you prep your fillings and skillet. This lets the baking powder start doing its thing.
Step 2: Prep Your Station (This is Key!)
Heat a non-stick skillet or griddle over medium-low to medium heat. Not high! We need time to assemble the pocket before the bottom sets. Lightly grease it with butter or oil. Have your fillings ready in small bowls, a spoon for the batter, a small offset spatula or regular spatula for flipping, and a plate lined with paper towels nearby. Trust me, organization here makes the process smooth and fun, not frantic.
Step 3: The Art of the Seal (The Fun Part!)
Spoon about 1 tablespoon of batter onto the skillet. Use the back of the spoon to gently spread it into a circle, about 3-3.5 inches wide. Now, quickly place 1-2 teaspoons of your chosen filling right in the center. Leave a good margin (about ½ inch) all the way around—this is your sealing zone. Immediately spoon another 1 tablespoon of batter directly on top of the filling, trying to cover it completely and touching the edges of the bottom circle. This is your lid. If you need to, use the spoon to gently nudge the top batter to meet the edges. The goal is to encase the filling completely.
Step 4: The Patient Flip (Watch for the Bubbles!)
Now, walk away. Just for 2-3 minutes. Let the magic happen. You’ll see bubbles forming around the edges of the top pancake layer. This is your signal. The bottom should be golden brown. Slip your spatula underneath with confidence and flip it in one smooth motion. The top will now be wet batter, and it will seal itself as it cooks. Cook for another 1-2 minutes on the second side until it’s also golden and feels set when you gently press the center.
Step 5: Cool & Repeat
Transfer your beautiful, sealed pocket to the paper-towel-lined plate. Let it cool for a few minutes—the filling will be molten lava hot! Repeat with the remaining batter and filling, regreasing the skillet as needed. You’ll get faster with each one. I like to keep the cooked ones in a single layer on a baking sheet in a warm (200°F) oven while I finish the batch.
How to Serve These Flavor Parcels
Okay, you’ve created a stack of golden deliciousness. Now what? The beauty is in the versatility.
For a weekend brunch showstopper, pile them high on a platter. Dust sweet ones with powdered sugar and serve with a side of warm maple syrup for dipping. For savory pockets, a dollop of sour cream or a side of spicy salsa or cool avocado crema takes them to the next level.
For the ultimate grab-and-go life, let them cool completely on a wire rack. Then, wrap each one individually in a little parchment paper or foil, or just pop them into reusable containers. They’re perfect at room temperature for a few hours, or you can reheat them in a toaster oven or air fryer for 3-4 minutes to get the outside crispy again. Microwave for 20-30 seconds works in a pinch, but they’ll be softer.
They are the MVP of lunchboxes, road trips, post-workout snacks, and “I-need-food-now” afternoons. Seriously, tuck a few in your bag and be the hero of your own day.
Make It Yours: Endless Flavor Twists
The basic pocket is just the beginning. Here are 5 ways to run with this recipe and make it uniquely yours.
- Apple Pie Pocket: Sauté small diced apples with a bit of butter, cinnamon, and brown sugar until soft. A tiny sprinkle of oats adds great texture.
- Pizza Pocket: Add ½ tsp Italian seasoning to the dry batter. Fill with a spoonful of marinara, shredded mozzarella, and mini pepperoni. Dip in more marinara!
- Tropical Escape: Use coconut milk in the batter and fill with diced mango and a drizzle of coconut cream.
- Everything Bagel Savory: Mix 1 tbsp everything bagel seasoning into the dry ingredients. Fill with scallion cream cheese and smoked salmon (for adults) or just the cream cheese for kids.
- Dairy-Free & Vegan: Use plant-based milk, a flax egg (1 tbsp ground flax + 3 tbsp water, let sit 5 min), and oil. Fill with vegan cheese, beans, or dairy-free chocolate spread.
Jackson’s Kitchen Notes & Stories
This recipe is a living thing in my kitchen. The first time I tried a savory version, I got cocky and overstuffed a pocket with shredded chicken and barbecue sauce. It erupted on the flip like a tiny flavor volcano. Delicious, but messy! That taught me the golden rule: less is more with the filling. You want enough for a surprise in every bite, not a burst.
I’ve also learned that the batter thickness is key. If it seems too runny, add a tbsp more flour. Too thick? A splash more milk. You want it scoopable, not pourable. And my dog, Biscuit, has become the official floor-cleaner for any filling that misses its mark—a crucial part of the process, really.
The best evolution has been seeing what my community makes. Someone once sent me a photo of a “Reuben Pocket” with corned beef and sauerkraut—genius! So don’t be afraid to raid your fridge leftovers. That’s where the real magic happens.
Your Questions, Answered
Q: My pocket broke open when I flipped it! What did I do wrong?
A: This usually means 1) The bottom layer was overcooked before you added the top layer, so they didn’t fuse. Work faster on the assembly, or 2) The heat was too high. Try medium-low next time. A broken pocket is still 100% delicious—just call it a deconstructed masterpiece.
Q: Can I make the batter ahead of time?
A: You can mix the dry and wet ingredients separately the night before and combine them in the morning. But I don’t recommend storing the mixed batter for more than an hour or two, as the baking powder will lose its oomph.
Nutritional Snapshot (Approximate)
Because fillings vary, here’s a base estimate per pocket (no filling):
-
Calories: ~110
-
Protein: ~4g
-
Carbohydrates: ~14g
-
Fat: ~4g
Sweet fillings add carbs and sugars; savory fillings boost protein and fats. The beauty here is portion control and flexibility—you choose how indulgent or balanced each pocket becomes.
Why This Recipe Just Works
Stuffed Pancake Pockets hit that rare sweet spot:
-
comforting but clever
-
familiar but exciting
-
indulgent yet practical
They solve real-life problems:
-
rushed mornings
-
picky eaters
-
meal prep burnout
-
“I’m hungry but nothing sounds good” moments
And they do it with ingredients you already know how to use.
Final Thoughts from My Kitchen to Yours
These aren’t just pancakes.
They’re possibility.
They’re the reason your freezer becomes your best friend. The reason breakfast stops feeling repetitive. The reason leftovers turn into something fun instead of forgotten. They invite you to experiment, to use what you have, and to cook with confidence instead of pressure.
So don’t overthink it. Start simple. Seal the pocket. Flip with faith. And when one bursts open? Laugh, taste-test, and keep going.
If you make these, I hope they become one of your “how did we live without this?” recipes—the kind you pass along, tweak, and make again and again.
From my Food Meld kitchen to yours—keep it playful, keep it practical, and always keep it delicious.


