Black Forest Mini Cakes: Where Chocolate Dreams & Cherry Joys Collide
Today, we’re tackling the legendary Black Forest Gateau—but we’re doing it the Food Meld way. We’re turning that towering masterpiece into adorable, utterly devourable Black Forest Mini Cakes. Think: all the soul-satisfying goodness of rich chocolate cake, tart cherries, and clouds of whipped cream, but in a perfectly personal, no-sharing-required package (unless you’re feeling generous).
This isn’t about fussy techniques or hard-to-find ingredients. It’s about that beautiful “meld” of flavors and fun. We’re keeping it simple, real, and packed with those “you’ve gotta try this” moments. Whether you’re making them for a date night, a birthday, or just a Tuesday that needs a little sparkle, these mini cakes are your ticket to feeling like a total kitchen rockstar. So, grab your favorite mixing bowl, and let’s cook something awesome together.

My First (Slightly Chaotic) Encounter with Black Forest Magic
My love affair with Black Forest cake started not in a fancy restaurant, but in my Nana’s 70s-era kitchen, with its yellow laminate counters and the constant hum of a radio playing old country tunes. She decided to make a “real authentic” one for my granddad’s birthday. The recipe, clipped from a magazine, seemed to have more steps than her crochet patterns.
I was her official “cherry pitter” and “bowel licker” (spoiler: I still hold both titles proudly). I remember watching, wide-eyed, as she stacked the layers, the whipped cream threatening to slide right off the chocolate. It was messy. It was lopsided. But when we all took a bite, the room went quiet. The sharp kiss of the cherries against the deep chocolate and the sweet cream… it was a revelation. It wasn’t a perfect bakery cake. It was better. It was ours, filled with laughter and a few cherry stains on the tablecloth. That’s the spirit I want to bring you today—the incredible flavor, minus the intimidation. Let’s make some new, slightly less messy, memories.
Gathering Your Flavor Crew: Ingredients & Why They Matter
Great food starts with great ingredients, but understanding your ingredients is the real superpower. Here’s everything you’ll need and my quick chef insights on each. Don’t stress—this is a “no-judgment” zone with plenty of swap-outs.
For the Incredibly Moist Chocolate Mini Cakes:
- 1 ½ cups (190g) all-purpose flour: The trusty foundation. For a slightly more tender crumb, you can swap in cake flour. For a gluten-free version, a 1:1 GF blend works like a charm (I’ve tested it!).
- ½ cup (50g) unsweetened cocoa powder: This is where your chocolate personality shines. I use natural cocoa powder for that classic, slightly tangy flavor. Want it extra dark and intense? Use Dutch-processed. It’s a flavor meld, so make it yours.
- 1 cup (200g) granulated sugar: Sweetness balance is key. It caramelizes while baking, giving the edges a lovely hint of magic.
- 1 tsp baking soda & ½ tsp baking powder: Our dynamic leavening duo. The baking soda reacts with the acidic buttermilk and cocoa for a great rise. Don’t mix them up!
- ½ tsp salt: The ultimate flavor enhancer. It makes the chocolate taste more… chocolaty. Never skip it.
- 1 cup (240ml) buttermilk: The SECRET to ultra-moist cake. It adds a subtle tang and creates a tender texture. Chef Hack: No buttermilk? Add 1 tablespoon of white vinegar or lemon juice to a cup of regular milk, stir, and let it sit for 5 minutes. Boom. Done.
- ⅓ cup (80ml) neutral oil (like vegetable or canola): Oil keeps the cake moist for days, way better than butter here. Trust me on this.
- 2 large eggs, at room temperature: They bind the party together. Room temp eggs incorporate better, leading to a smoother batter. Just pop them in a bowl of warm water for 5 minutes if you forgot to take them out.
- 1 tsp pure vanilla extract: The aromatic backbone. It rounds out all the flavors.
- 1 cup pitted cherries, fresh or jarred (plus ¼ cup of the juice!): The star of the show! Jarred morello cherries in light syrup are my weeknight hero—they’re already pitted and packed with flavor. Reserve that juice; it’s liquid gold for our batter and syrup. Fresh? Amazing when in season.
For the Cloud-Like Filling & Topping:
- 1 cup heavy whipping cream, very cold: The colder your cream and bowl, the faster and fluffier it whips. I sometimes chill my mixing bowl and whisk for 10 minutes beforehand. It’s a game-changer.
- 2-3 tbsp powdered sugar: Sweetens and stabilizes the cream a bit. Adjust to your taste.
- 1 tsp vanilla extract: A little more vanilla love for the cream.
- ¼ cup reserved cherry juice: We’ll brush this on the cake layers. It keeps them insanely moist and packs a punch of cherry flavor. This step? Non-negotiable. It’s the pro move.
- Dark chocolate shavings: For that gorgeous, finished look and a hit of pure chocolate. Use a vegetable peeler on a bar of good dark chocolate. It’s oddly satisfying.
Let’s Build Some Magic: Step-by-Step Instructions
Okay, team. Let’s fire up the oven and get mixing. Follow these steps, read my little hacks along the way, and you’ll be golden.
Step 1: Prep & Preheat
Preheat your oven to 350°F (175°C). This isn’t just a suggestion—a properly preheated oven is crucial for even baking. While it heats, line a mini muffin tin with paper liners, or grease a small square/round cake pan (8-inch works great). If you’re going the mini cake route, you’ll get about 12-14 perfect little cakes. Set that aside.
Step 2: Mix the Dry Crew
In a large mixing bowl, grab a whisk. We’re going to sift together the flour, cocoa powder, sugar, baking soda, baking powder, and salt. “But Jackson, do I *really* need to sift?” For cocoa powder, yes. It gets clumpy, and sifting ensures your cake is smooth and lump-free. It takes 30 seconds and makes a huge difference. This also evenly distributes our leaveners so every bite rises perfectly.
Step 3: Unleash the Wet Team
In another bowl (or a large measuring cup), whisk together the buttermilk, neutral oil, eggs, vanilla, and that ¼ cup of reserved cherry juice. Whisk until it’s one harmonious, slightly frothy liquid. See how the cherry juice instantly turns everything a beautiful reddish-brown? That’s the flavor infusion starting.
Step 4: The Grand Meld (Don’t Overmix!)
Pour your wet ingredients into the bowl with the dry ingredients. Now, with a spatula or your whisk, gently fold and stir until the ingredients are *just* combined. A few streaks of flour are okay—they’ll disappear. The moment you see no more dry patches, STOP. Overmixing is the enemy of tender cake; it develops gluten and can make things tough. Now, gently fold in the pitted cherries until they’re dotted throughout the batter.
Step 5: Bake & Test for Perfection
Divide the batter evenly among your prepared mini muffin cups or pour it into your cake pan. For mini cakes, bake for 15-20 minutes. For a single layer cake, bake for 25-30 minutes. The true test? Not the clock, but the toothpick. Insert one into the center of a cake. It should come out with a few moist crumbs clinging to it, but not wet batter. That’s your cue. Let them cool in the pan for 10 minutes, then transfer to a wire rack to cool completely. Pro-Tip: Let these cool ALL THE WAY before assembling. Warm cake will melt your whipped cream into a puddle (still tasty, but less pretty).
Step 6: Whip Up the Cloud
While the cakes cool, make your whipped cream. Ensure your cream, bowl, and beaters are cold. In your chilled bowl, combine the heavy cream, powdered sugar, and vanilla. Whip on medium-high speed until you get soft to medium peaks. This means when you lift the beaters, the cream holds a gentle peak that curls over slightly. You want it sturdy enough to hold its shape but still lush and smooth. Don’t go all the way to stiff peaks—it can get grainy.
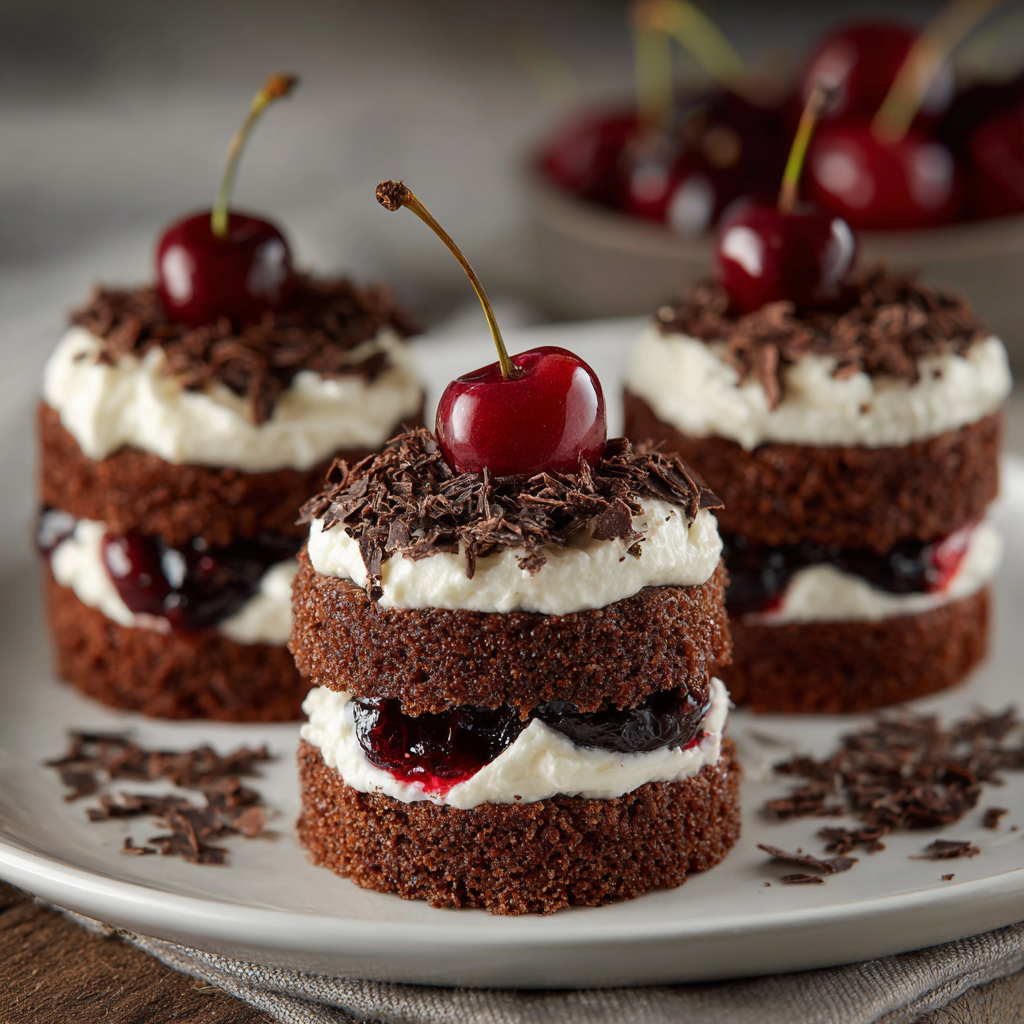
Step 7: Assemble with Flair
Here’s the fun part! If you made a single layer cake, slice it horizontally into two even layers. If you made mini cakes, slice each one in half horizontally with a serrated knife—like you’re making a tiny sandwich. Brush the cut sides generously with the remaining cherry juice. This is the flavor lock! Then, spread or pipe a layer of whipped cream on the bottom half. Place the top half back on, then finish with another dollop or swirl of cream. Finally, the grand finale: shower each one with those gorgeous dark chocolate shavings.
Serving Your Masterpiece: Make It Shine
Presentation is just telling your food’s story. For these mini cakes, you’ve got options!
For a Casual Gathering: Pile them on a rustic wooden board or a simple white platter. Let people grab and go. Maybe add a few extra whole cherries on the side for color.
For a Fancy Moment: Plate each mini cake individually on a dessert plate. Add a tiny mint leaf or a single perfect cherry on top. Dust the plate with a little extra cocoa powder or powdered sugar just before serving for that “chef’s kiss” look.
The Ultimate Experience: Serve them slightly chilled. The cream is firmer, the flavors are bright, and it’s pure heaven. They’re perfect with a cup of strong coffee, a glass of dessert wine, or just a big glass of cold milk for the ultimate nostalgic trip.
Make It Your Own: Recipe Variations
This recipe is your canvas. Here are a few ways to mix it up and truly “meld” it to your taste.
- Boozy Black Forest: Swap the cherry juice for 2-3 tablespoons of Kirsch (cherry brandy). Brush it on the layers for the classic, authentic adult kick.
- Berry Bliss: Not a cherry fan? Use raspberries or chopped strawberries. Their tartness works beautifully with the chocolate.
- Dairy-Free Delight: Use a plant-based milk + vinegar for the buttermilk swap, and chill a can of full-fat coconut milk overnight. Scoop out the solid coconut cream and whip it with sugar for a lush dairy-free topping.
- Chocolate Ganache Drizzle: Feeling extra? Melt some chocolate with a touch of cream for a simple ganache and drizzle it over the whipped cream before adding shavings. It’s decadent and stunning.
- Individual Jars: Crumble the baked cake and layer it in small glasses with the whipped cream and cherries for a stunning, no-assembly-required parfait.
Chef’s Notes: Stories from My Kitchen
This recipe has been my go-to for years, and it’s evolved from that lopsided cake in Nana’s kitchen. The biggest game-changer was adding that cherry juice into the batter and as a syrup. It went from “cherry on top” to “cherry in every single bite.” I’ve also learned that these cakes taste even better the next day, as the flavors fully meld together in the fridge. Just store them in an airtight container.
One time, I was filming a video for the blog and accidentally used the entire bowl of whipped cream as “frosting” before slicing the cakes. It was a glorious, cream-covered mess. We ate it with spoons and called it a Black Forest “trifle.” Moral of the story? There are no real mistakes in the kitchen, just delicious detours. Have fun with it.
FAQs & Troubleshooting: Your Questions, Answered
Q: My cherries sank to the bottom of the cakes! How do I prevent that?
A: This is super common and easy to fix. Before folding the cherries into the batter, toss them with 1–2 teaspoons of the dry flour mixture. That light coating helps them “grip” the batter and stay suspended instead of sinking.
Q: My mini cakes turned out dry. What went wrong?
A: The most likely culprit is overbaking. Mini cakes bake quickly, so start checking early. Also make sure you measured the flour correctly—spoon and level, don’t scoop. Finally, don’t skip brushing the layers with cherry juice; it adds moisture and flavor.
Q: The whipped cream isn’t holding its shape. Help!
A: Temperature is everything. Your cream, bowl, and beaters should all be cold. If it’s still soft, whip a little longer until medium peaks form. You can also add an extra tablespoon of powdered sugar to help stabilize it.
Q: Can I make these ahead of time?
A: Yes! You can bake the cakes a day ahead and store them wrapped at room temperature. Assemble and decorate them up to 6 hours before serving and keep them chilled. They actually taste even better after a little rest.
Q: Can I use canned cherry pie filling instead of cherries?
A: You can, but it will be much sweeter and softer. If you do, skip the extra cherry juice and reduce the sugar in the whipped cream slightly to keep things balanced.
Q: How should I store leftovers?
A: Store assembled mini cakes in an airtight container in the refrigerator for up to 2 days. Let them sit at room temperature for about 10 minutes before serving so the flavors can fully shine.
Q: Can I freeze these mini cakes?
A: You can freeze the unfrosted cakes very well. Wrap them tightly and freeze for up to 2 months. Thaw at room temperature, then assemble with fresh whipped cream and toppings for best results.
Nutrition Information
Approximate values per mini cake (based on 12 mini cakes; will vary by brands and portions).
-
Calories: ~285
-
Total Fat: 16g
-
Saturated Fat: 9g
-
Carbohydrates: 32g
-
Sugars: 22g
-
Fiber: 2g
-
Protein: 5g
-
Sodium: 210mg
These Black Forest Mini Cakes are a true dessert treat—rich, satisfying, and meant to be enjoyed mindfully. Thanks to the cherries and whipped cream, each mini cake feels indulgent without needing a huge slice, making them perfect for celebrations or special moments when you want something sweet but balanced.
Final Thoughts
These mini cakes are proof that legendary desserts don’t need to be intimidating. By breaking Black Forest cake down into small, manageable layers, you get all the drama and flavor—without the pressure. They’re nostalgic, celebratory, and just plain fun to make.
Whether you keep them classic, spike them with a little cherry liqueur, or turn them into parfaits after a happy kitchen “oops,” I hope they bring some joy (and chocolate smudges) into your day. Remember: great desserts aren’t about perfection—they’re about flavor, memories, and sharing something made with care.
Now grab a fork, maybe a cherry or two, and let’s keep cooking something awesome.
—Jackson


