The Red Velvet Bundt Cake That Stole My Heart (And Might Just Steal Yours)
Hey friends, Jackson here from Food Meld. Let’s get real for a second. Valentine’s Day desserts can be… a lot. Fussy layers, temperamental chocolates, the pressure of a perfect heart-shaped *anything*. What if I told you the most stunning, conversation-stopping, romantic dessert you could make this year is secretly one of the most forgiving and fun to bake? Enter my Red Velvet Cream Cheese Bundt Cake.
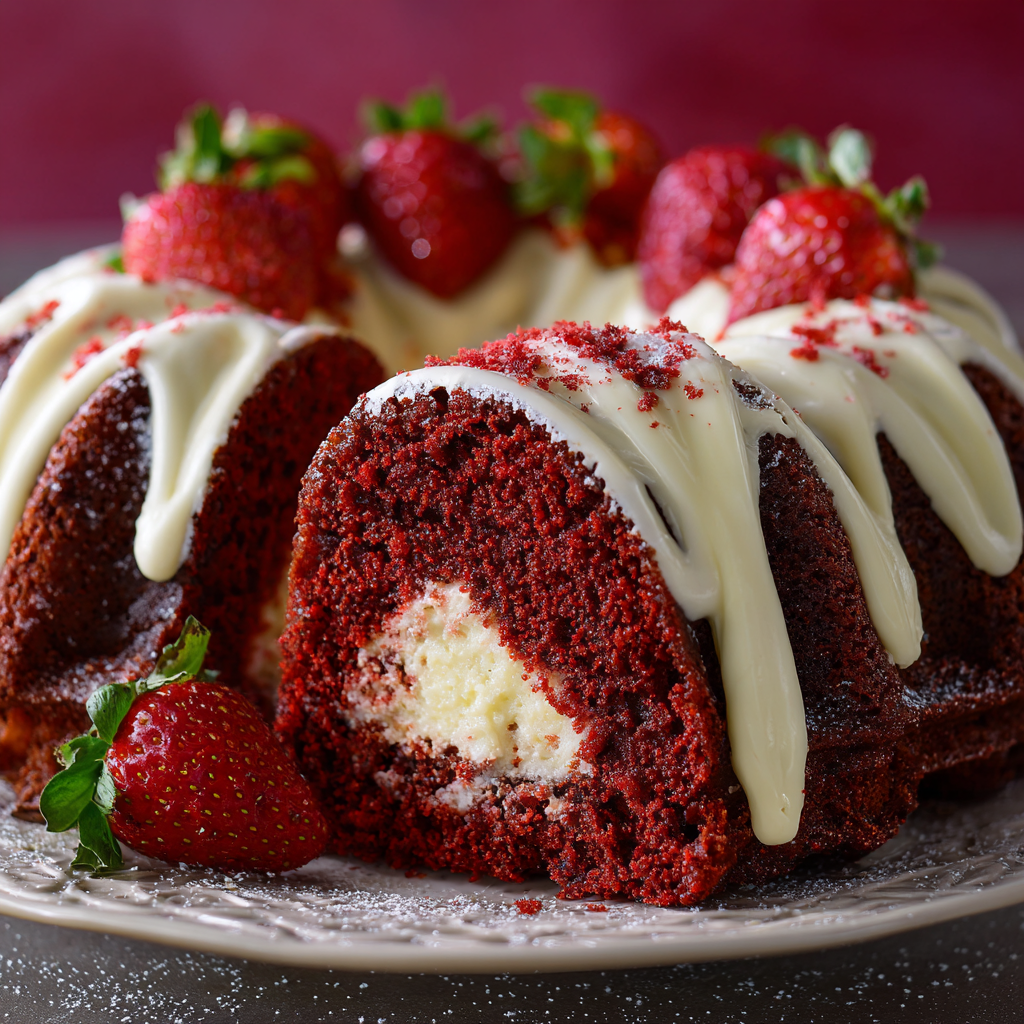
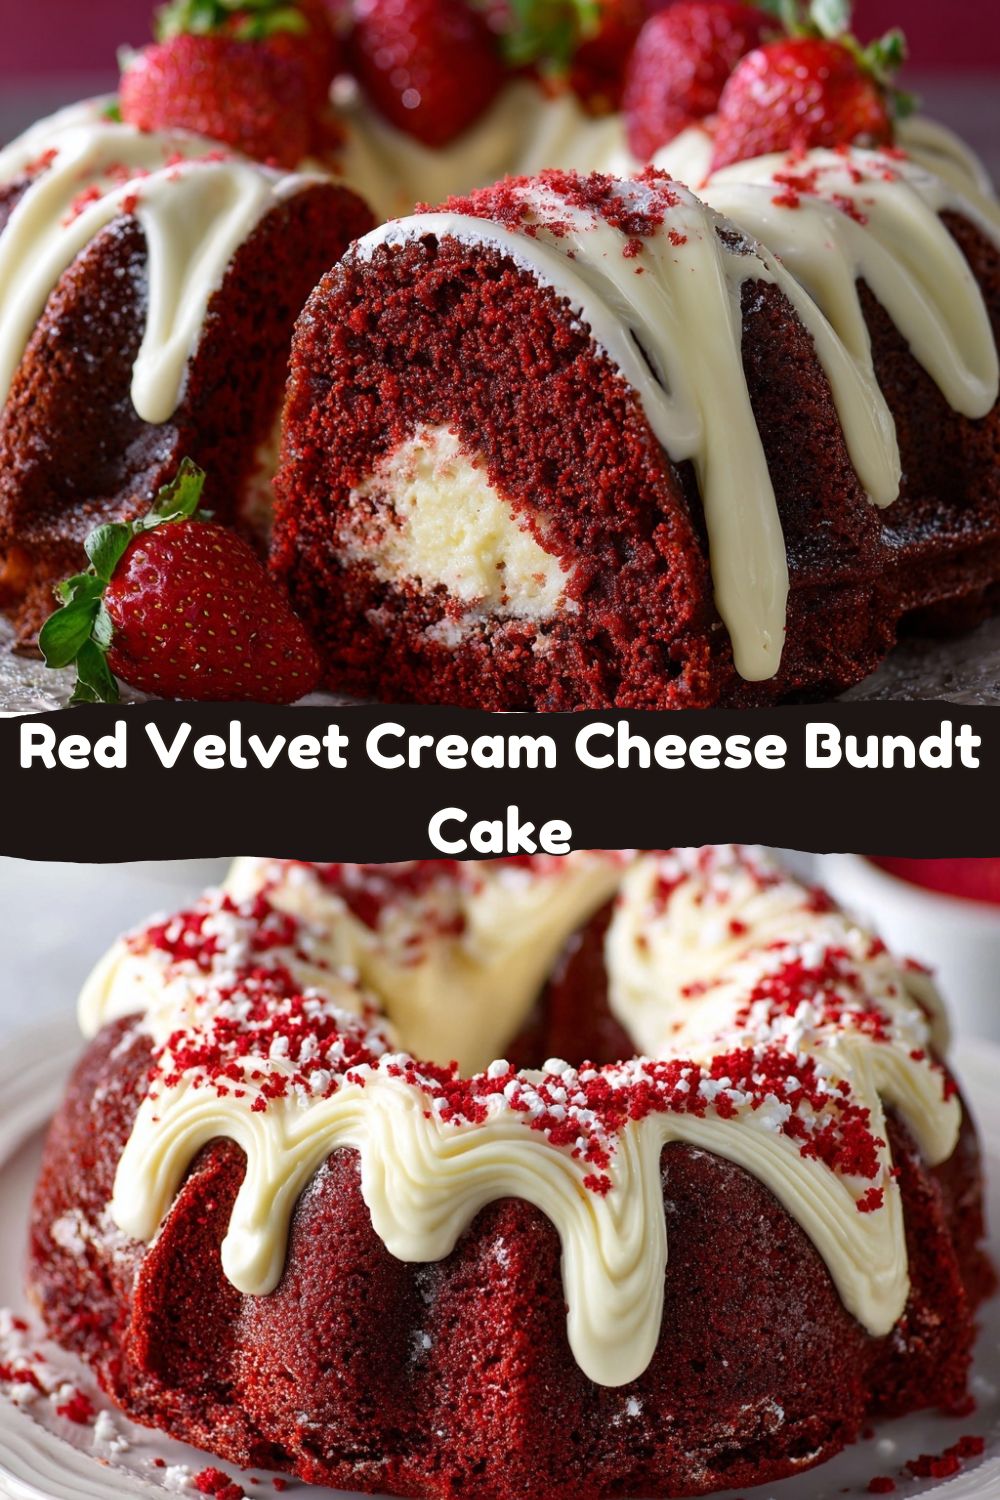
This isn’t just a cake; it’s a flavor experience. Imagine the classic, velvety-soft crumb of red velvet, kissed with just enough cocoa, wrapped around a river of luscious, tangy cream cheese filling, and all crowned with a rich, drippy cream cheese frosting. Every slice is a surprise—a beautiful swirl of red and white that promises (and delivers) pure decadence.
I built this recipe for us—the home cooks who want “wow” factor without the wrist-aching stress. The Bundt pan does the heavy lifting on presentation, giving us that gorgeous, sculpted shape. And that hidden filling? That’s our little secret of deliciousness. It’s the perfect centerpiece for a cozy date night in, a Galentine’s feast, or any day that needs a dose of celebration. So, preheat that oven, grab your favorite mixing bowl, and let’s cook something awesome—and unabashedly romantic—together.
My First “Bungled” Bundt & The Lesson It Taught Me
I have to confess, my relationship with Bundt pans wasn’t always love at first sight. My first attempt, years ago, was a disaster of epic, crumbly, stuck-in-the-pan proportions. I was trying to impress a date (spoiler: it didn’t work), and I was so focused on the flavor I completely neglected the most important step: properly greasing the pan. What emerged was a sad, fragmented cake that looked like it had gone through a breakup itself.
But here’s the thing—we slathered it with frosting, piled it into bowls, and ate it with spoons anyway. And it was STILL incredible. That mess taught me a vital kitchen truth: flavor always wins. It also taught me the sacred ritual of “grease and flour.” This Red Velvet Bundt recipe is the glorious, beautiful outcome of all those lessons learned. It’s my promise to you that with a few simple tricks (which I’ll share, don’t worry!), you’ll get a cake that releases like a dream, looks like it came from a boutique bakery, and tastes even better because you made it with your own two hands.
Gathering Your Flavor Arsenal
Here’s everything you’ll need. I’ve added my chef insights and swaps so you can bake with confidence!
For the Cake
- 2 1/2 cups all‑purpose flour: The foundation. Spoon and level it into your measuring cup for accuracy—don’t scoop from the bag!
- 1/4 cup unsweetened cocoa powder: Not a lot, but essential for that classic red velvet flavor. Use natural, not Dutch-process, for the right chemical reaction with the baking soda.
- 1 teaspoon baking soda: Our leavening agent. It reacts with the acid in the buttermilk and cocoa for a beautiful rise.
- 1/2 teaspoon salt: Crucial for balancing all that sweetness and making the chocolate notes pop.
- 1 cup (2 sticks) unsalted butter, softened: “Softened” is key! It should give slightly when pressed. This creams with the sugar to create a light, fluffy cake texture.
- 1 3/4 cups granulated sugar: Sweetness and structure.
- 4 large eggs, at room temp: Room temp eggs incorporate much more smoothly into the butter mixture. A quick 10-minute soak in warm water works if you forgot to take them out!
- 1 cup sour cream: The secret weapon for unbelievable moisture and a slight tang. Full-fat is best here.
- 1/2 cup buttermilk: The other half of the tangy, tenderizing duo. Chef’s Swap: No buttermilk? Mix 1/2 cup milk with 1 1/2 tsp lemon juice or vinegar and let it sit for 5 minutes.
- 2 teaspoons pure vanilla extract: The flavor enhancer. Use the good stuff.
- 1 tablespoon red food coloring: For that iconic hue. Gel paste gives a vibrant color without thinning the batter, but liquid works too.
For the Cream Cheese Filling
- 8 oz (one block) cream cheese, softened: Full-fat, please. It needs to be as soft as the butter for a smooth, lump-free filling.
- 1/4 cup granulated sugar: Just enough to sweeten the tang.
- 1 large egg: Helps the filling set into a firm, creamy layer as it bakes.
- 1 teaspoon vanilla extract: A flavor bridge between the filling and the cake.
For the Cream Cheese Frosting
- 4 oz cream cheese, softened: Half a block. Again, softness is non-negotiable for a silky drizzle.
- 2 tablespoons unsalted butter, softened: Adds shine and a richer mouthfeel.
- 1 cup powdered sugar, sifted: Sifting prevents lumps in your gorgeous glaze.
- 1/2 teaspoon vanilla extract: The finishing touch.
- 1–2 tablespoons milk or cream: To thin the frosting to your perfect drizzling consistency.
Let’s Build This Beauty: Step-by-Step
Follow these steps, and you’re golden. I’m talking you through it like you’re right here in my kitchen.
- Preheat & Prep: Get your oven roaring to 350°F (175°C). Now, give your Bundt pan some LOVE. This is the most important step! Use melted butter or baking spray (the kind with flour in it is magic) and get into every nook and cranny. Dust with a light coat of flour, tap out the excess. Chef’s Hack: After greasing, pop the empty pan in the fridge for 10 minutes. The cold butter sets up and creates an even better release layer.
- Mix the Dry Goods: In a medium bowl, whisk together the flour, cocoa powder, baking soda, and salt. Whisking = no sifting needed, and it ensures everything is evenly distributed. Set this aside.
- Cream the Butter & Sugar: In a large bowl, use an electric mixer to beat the softened butter and granulated sugar on medium-high for 3-4 minutes. You want it pale, fluffy, and beautiful. This incorporates air, which is part of your rise! Scrape down the bowl halfway through.
- Add Eggs & Wet Ingredients: Beat in the eggs, one at a time, letting each fully incorporate before adding the next. Now mix in the sour cream, buttermilk, vanilla, and that bold red food coloring. It’ll look a bit split or curdled—that’s totally normal! The flour will bring it all together.
- Bring It All Together: With the mixer on low, gradually add the dry ingredients to the wet. Mix just until the flour disappears. A few streaks are okay—overmixing is the enemy of a tender cake! Your batter will be thick and gloriously red.
- Make the Filling: In a clean bowl, beat the softened cream cheese until smooth. Beat in the sugar, then the egg and vanilla, until it’s a homogenous, creamy mixture. Set this aside.
- Layer It Up: Spoon or pour half of your red velvet batter into the prepared Bundt pan. Smooth it out. Carefully spoon all of the cream cheese filling over the batter, trying to keep it in the center and away from the edges of the pan. Gently top with the remaining red velvet batter, spreading it to cover the filling completely. Give the pan a light tap on the counter to settle any air bubbles.
- Bake to Perfection: Slide it into the center of your preheated oven. Bake for 50-60 minutes. The cake is done when a long toothpick or skewer inserted into the cake part (not the filling) comes out with just a few moist crumbs. The top will be springy to the touch. Chef’s Tip: Rotate the pan halfway through for even baking.
- The Critical Cool-Down: Let the cake cool in the pan on a wire rack for 25-30 minutes exactly. This lets it set and pull away from the sides. Then, place your serving plate on top, and with confidence, flip it over. Give it a gentle shake—it should release beautifully. Let it cool completely before frosting. Patience is a virtue here!
- Whip Up the Frosting & Drizzle: While the cake cools, beat the 4 oz cream cheese and 2 tbsp butter until smooth. Beat in the sifted powdered sugar and vanilla. Add milk, one tablespoon at a time, until it’s a thick but pourable consistency. Drizzle artfully over the completely cooled cake. Let the frosting set for a few minutes before slicing.
How to Serve This Showstopper
Presentation is part of the fun! Place the glazed cake on a simple cake stand or a pretty plate. For that extra Valentine’s touch, scatter a few fresh raspberries, edible rose petals, or a dusting of extra powdered sugar around the base. When slicing, use a sharp, thin knife wiped clean between cuts for perfect portions.
This cake is rich, so serve it with something that cuts through the sweetness. A dollop of lightly sweetened whipped cream, a scoop of vanilla bean ice cream, or even a few fresh berries on the side are perfect companions. And don’t forget the coffee—a strong cup is its best friend.
Make It Your Own: Creative Twists
Love the base recipe? Try one of these fun spins!
- Chocolate Chip Swirl: Fold 1 cup of mini chocolate chips into the cream cheese filling before layering.
- Orange-Zested Bliss: Add the zest of one orange to the cake batter and a teaspoon of zest to the frosting for a bright, citrusy twist.
- “Naked” Bundt: Skip the frosting drizzle and instead dust the whole cake heavily with powdered sugar for an elegant, snowy look.
- Gluten-Free Friendly: Swap the all-purpose flour for a 1:1 gluten-free baking blend. The structure from the Bundt pan helps GF cakes hold up beautifully.
- Natural Color: Want to skip the food coloring? You can! The cake will be a lovely ruddy-brown from the cocoa. For a natural red, try 1-2 tablespoons of beet powder whisked into the dry ingredients, but note the color will be more muted.
Jackson’s Chef Notes
This recipe has been my Valentine’s MVP for years. I’ve learned that the brand of cocoa powder can slightly change the red hue, so don’t stress if it’s not fire-engine red—it’s the taste that matters! Also, if a little filling peeks out on top after baking, just consider it a preview of the goodness inside. I once brought this to a potluck, and a friend thought the marbled slice was so fancy, she assumed I’d bought it. That’s the best compliment—when homemade looks and tastes *that* good.
Your Questions, Answered
Q: My cake stuck to the pan! Help!
A: It happens to the best of us. Next time, be religious about greasing and flouring (or use that flour-based spray). If it’s stuck now, gently use a thin, flexible silicone spatula to carefully loosen the edges. Patch it together on the plate—frosting is a great baker’s bandage!
Q: Can I make this ahead of time?
A: Absolutely! Bake and cool the cake completely, wrap it tightly in plastic wrap (unglazed), and store at room temp for a day or in the freezer for up to a month. Thaw overnight and make the fresh frosting the day you serve it.
Q: Why did my filling sink/burst through the top?
A: This usually means the batter layered on top was too thin or the filling was too liquid. Make sure your cream cheese is truly softened (not melted) and that you’re spreading the top layer of batter all the way to the edges to fully encase the filling.
Q: I don’t have a Bundt pan. Can I use something else?
A: You can! A 9×13-inch pan works well—just spread all the batter in the bottom, dollop the filling over it, and swirl gently with a knife. Bake time may be less, so start checking at 35 minutes.
Nutritional Information*
*Please note: These are estimates provided for informational purposes based on a standard recipe calculator. Values can vary based on specific brands and portion sizes.
Yield: 12-14 slices | Prep Time: 20 mins | Bake Time: 50-60 mins | Total Time: 1 hr 20 mins (plus cooling)
Approximate Nutrition Per Slice (1/12th of cake): Calories: 380 | Total Fat: 22g | Saturated Fat: 13g | Cholesterol: 95mg | Sodium: 230mg | Total Carbohydrates: 39g | Sugars: 27g | Protein: 5g
This is a celebratory dessert, meant to be enjoyed and savored. My philosophy? Eat the real, good stuff, enjoy every bite with people you love, and balance is key the rest of the time.
Final Thoughts: Let’s Celebrate Flavor
And there you have it, my foodie friend—your guide to a truly unforgettable Red Velvet Cream Cheese Bundt Cake. This recipe is a perfect example of what Food Meld is all about: taking bold, comforting flavors, adding a creative twist (hello, secret filling!), and making the process feel like a fun adventure, not a final exam.
Whether you’re making this for someone special or just as a glorious gift to yourself, I hope this cake fills your kitchen with the incredible smell of baking and your table with even better conversation. Remember, the mess is part of the memory, and the flavor is always the goal. Now go forth, bake with confidence, and let’s create those “you’ve gotta try this” moments. Don’t forget to tag me @FoodMeld if you make it—I love seeing your creations!
Happy Baking,
Jackson


