Easter Egg Cookie Dough Truffles: Your New No-Bake Tradition!
Hey there, friend! Jackson here from Food Meld. Can we talk about Easter candy for a second? I love a good chocolate bunny as much as the next person, but let’s be real—sometimes the store-bought stuff can be a little… predictable. And you know me, I’m all about mixing it up with a little “what if we tried this?” energy in the kitchen.
What if you could give your people something that combines the nostalgic, buttery joy of eating straight-from-the-bowl cookie dough with the festive, colorful fun of Easter eggs? And what if you could do it without even turning on your oven? That, my friends, is the magic of these Easter Egg Cookie Dough Truffles.
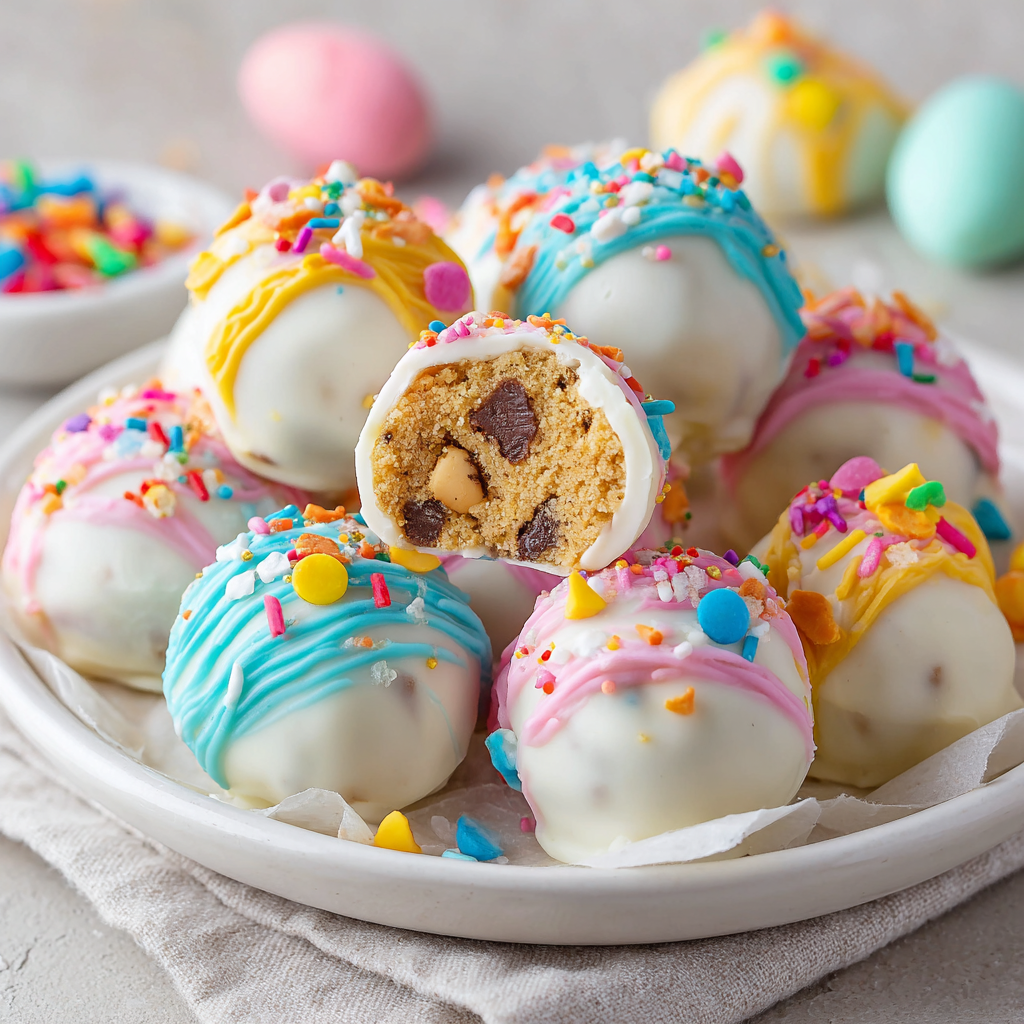
We’re talking creamy, sweet, totally safe-to-eat cookie dough, hand-shaped into cute little eggs, and dunked in a rainbow of pastel chocolate. They’re the ultimate DIY treat—perfect for stuffing into Easter baskets, gifting to neighbors, or just keeping on a platter for when that 3pm sweet tooth hits. They look like you fussed for hours, but the secret is they come together with just a bowl, a spoon, and a whole lot of fun. No baking skills required, just a willingness to get a little messy and make something awesome. Ready to create some edible confetti? Let’s get mixing!
The Cookie Dough Sneak: A Kitchen Confession
I have a confession to make. Growing up, the best part of making cookies was, well… not making the cookies. It was the raw dough. My sister and I would launch into a covert ops mission the second my mom’s back was turned, stealthily scooping fingerfuls of that sweet, salty, buttery goodness. We’d get that “deer in headlights” look if she turned around, spoons hidden behind our backs, trying to chew innocently. It was the ultimate prize.
When I started developing recipes for Food Meld, I knew I had to create a treat that celebrated that pure, unadulterated cookie dough joy—but in a way you could enjoy guilt-free (and salmonella-free!). These truffles are my edible love letter to those sneaky kitchen moments. They capture that childhood thrill in a grown-up, shareable, and totally gorgeous form. Every time I shape one of these little eggs, I chuckle, thinking of my sister and our failed attempts at culinary espionage. Now, we don’t have to sneak around—we can just make a whole batch dedicated to the best part. Life’s too short not to eat the dough.
Gathering Your Flavor Arsenal
Here’s everything you’ll need to build these little nuggets of joy. Remember, quality ingredients make a happy truffle! Don’t worry, I’ve got notes and swaps for you.
- ½ cup unsalted butter, softened – This is our flavor foundation. Unsalted lets you control the salt level. “Softened” is key! It should give easily when poked, but not be greasy or melted. Pro tip: if you forgot to take it out, cut it into tablespoons and let it sit for 15-20 minutes.
- ½ cup brown sugar & ¼ cup granulated sugar – The dynamic duo! Brown sugar brings that deep molasses moisture and chew, while white sugar adds sweetness and structure. Pack that brown sugar firmly into your measuring cup.
- 1 tsp pure vanilla extract – The soul whisperer of baking. It rounds out all the flavors. Splurge on the real stuff if you can—it makes a world of difference.
- 2 tbsp milk – Any kind you have! Whole milk, 2%, even almond milk. This is just to bring the dough together into a pliable, dreamy consistency.
- 1 ¼ cups heat-treated all-purpose flour – This is the most important step for safety! Raw flour can carry bacteria just like eggs. To heat-treat: spread flour on a baking sheet and bake at 350°F for 5-7 minutes. Let it cool completely before using. It gives the dough that classic flavor without the risk.
- ½ tsp salt – Don’t skip it! Salt is the secret weapon that makes all the sweet flavors pop and prevents the truffles from being one-note.
- ½ cup mini chocolate chips – The classic mix-in! Minis are perfect for our egg shapes—regular chips can be too bulky. Love a mix? Swap in half mini M&Ms for extra color!
- 12 oz white chocolate or candy melts (assorted pastel colors) – The colorful shell! Candy melts (like Wilton brand) are easiest—they melt smoothly and set firmly. Good-quality white chocolate bars (chopped) taste amazing but can be trickier to temper. For pastels, you can melt white candy melts and add a drop of oil-based food coloring, or buy pre-colored melts.
- Sprinkles or edible glitter (optional) – The party clothes! This is where you can go wild. Pastel jimmies, sanding sugar, or a little edible glitter make them sparkle.
Let’s Make Some Magic: Step-by-Step
Alright, team! Clear some counter space, put on a fun playlist, and let’s dive in. This is the fun part.
- Cream the Butter & Sugars: In a medium bowl, combine your softened butter, brown sugar, and granulated sugar. Using a hand mixer (or some serious elbow grease with a wooden spoon), beat them together for a good 2-3 minutes. We’re not just mixing—we’re creaming. You want it to become noticeably lighter in color and fluffy. This incorporates air, which gives our truffles a melt-in-your-mouth texture, not a dense one. Chef Hack: If your butter is still a little cool, pop the bowl in the microwave for 5-second bursts, mixing between, until it’s perfect.
- Wake Up the Flavors: Beat in the vanilla extract and milk until everything is smooth and homogenous. It might look a little separated at first, but keep mixing—it’ll come together beautifully.
- Bring in the Dry Crew: Add your cooled, heat-treated flour and the salt to the bowl. Mix on low speed (or stir carefully) until just combined and no dry flour remains. Overmixing at this stage can make the dough tough. We want tender truffles!
- The Chip Fold: Now, gently fold in those glorious mini chocolate chips with a spatula. Make sure they’re evenly distributed for maximum chocolate in every bite.
- Shape Your Eggs: Line a baking sheet or plate with parchment paper. Scoop out about 1 tablespoon of dough (a small cookie scoop is your BEST friend here for uniformity). Roll it into a ball between your palms, then gently shape it into an oval/egg shape. Place it on the parchment. Repeat until all dough is used. Chef Insight: If the dough gets too sticky, pop it in the fridge for 10 minutes. Or, keep a little bowl of water nearby to dampen your hands slightly—it prevents sticking!
- The Chill Session: This is non-negotiable! Slide the tray of shaped eggs into the fridge for at least 30-45 minutes. This firms them up, making dipping a clean, dreamy process instead of a chocolatey landslide.
- Melt Your Chocolate: While the eggs chill, melt your coating. Use separate microwave-safe bowls for each color. Heat candy melts in 30-second bursts at 50% power, stirring vigorously between each burst, until smooth. For white chocolate, do 20-second bursts to avoid seizing. Pro Tip: Add a tiny teaspoon of coconut oil or vegetable shortening to the melts as they melt for an even smoother, thinner consistency that’s perfect for dipping.
- The Big Dip: Remove a few eggs from the fridge at a time (keep the rest cold!). Using a fork or dipping tool, lower an egg into the melted chocolate. Tap the fork gently on the side of the bowl to let the excess drip off. Carefully slide the coated egg onto a fresh piece of parchment paper.
- Decorate Immediately! The chocolate sets fast. Within seconds of placing it on the parchment, add your sprinkles or a pinch of glitter. If you’re doing multiple colors, work in batches—decorate one color before moving to the next.
- Set & Serve: Let the truffles set at room temperature if your kitchen is cool, or pop the tray back in the fridge for 10-15 minutes to speed things up. Once the shells are firm, they’re ready to devour or package up!
How to Serve These Little Jewels
Presentation is half the fun with these guys! Here’s how to make them shine:
For a stunning
Easter dessert board, arrange them in the center of a large platter or rustic wooden board. Scatter some pastel jelly beans, a few fresh berries, and maybe some sprigs of mint around them. It creates a whole vibe.
For
individual gifting, clear cellophane bags tied with a ribbon are perfect. Tuck 3-4 truffles into a mini cupcake liner first, then into the bag—it looks so professional!
And of course, for the classic
Easter basket, nestle them right on top of the grass. They’re the treat everyone will dig for first. I love serving them straight from the fridge with a cold glass of milk or a hot coffee—the cool, creamy center is just *chef’s kiss*.
Make It Yours: Fun Twists & Swaps
Got an idea? Run with it! Here are a few ways to mix up the meld:
- Chocolate Overload: Use melted dark or milk chocolate for the coating instead of pastels. Roll in crushed pretzels or flaky sea salt for a sweet & salty situation.
- Peanut Butter Paradise: Replace 2 tablespoons of the butter with creamy peanut butter in the dough. Use Reese’s Pieces minis instead of chocolate chips, and coat in chocolate.
- Funfetti Party: Omit the chocolate chips and fold in ⅓ cup of rainbow sprinkles into the dough. Coat in pastel chocolate and add more sprinkles—it’s a sprinkle explosion!
- Gluten-Free & Easy: Use a 1:1 gluten-free all-purpose flour blend (like Bob’s Red Mill). Remember to heat-treat it the same way! The texture is identical.
- “Carrot Patch” Eggs: Mix a little orange oil-based coloring into your coating chocolate. After dipping, use a little green icing or melted green candy melts to draw a cute little squiggle of a “carrot top” on one end.
Jackson’s Kitchen Notes
This recipe is a total crowd-pleaser, but it’s evolved in my kitchen. The first time I made them, I didn’t chill the dough balls long enough… let’s just say I had more chocolate on my hands than on the truffles! Lesson learned: patience is a virtue (and keeps your kitchen clean).
I also started adding that tiny pinch of salt directly to the butter and sugar stage after my friend’s daughter said the first batch “tasted like sweet clouds.” I wanted them to taste like cookie dough, not clouds! That salt made all the difference. Don’t be afraid to taste your dough before shaping (the perk of no eggs!). Adjust to your liking—that’s how you make it yours.
FAQs & Quick Fixes
Q: My dough is too crumbly and won’t hold together when shaping!
A: No sweat! This usually means it needs a bit more moisture. Add an extra ½ to 1 tablespoon of milk and mix until it comes together. Different flours and butters have different absorption rates.
Q: My chocolate coating is thick and clumpy. Help!
A: This means it’s either overheated or you’re using pure chocolate without thinning it. For candy melts, add a teaspoon of coconut oil and stir. For real chocolate, try using a double boiler for gentler melting. If it’s seized (turned into a grainy mess), sadly it’s hard to come back. Start with a new batch and use lower heat!
Q: Can I make these ahead of time?
A: Absolutely! They are perfect for making ahead. Store the finished, set truffles in a single layer in an airtight container in the fridge for up to 1 week. You can also freeze them for up to 2 months—just thaw in the fridge overnight.
Q: Why heat-treat the flour? Can I skip it?
A: Please don’t skip it! Consuming raw, untreated flour carries a risk of foodborne illness, just like raw eggs. The 5 minutes in the oven to heat-treat it is a simple, essential step for safe, edible cookie dough. It’s a game-changer.
Nutritional Info (Because We’re Curious!)
Okay, let’s keep it real—these are a celebratory treat, meant to be savored and enjoyed! But if you’re curious about the details, here’s a rough estimate
per truffle (assuming the recipe makes about 20 and using standard ingredients):
Calories: ~120 |
Fat: 6g |
Carbohydrates: 15g |
Protein: 1g
Remember, this is just a guideline. Using different chocolates or add-ins will change things. My philosophy? Enjoy a couple of these delicious homemade truffles mindfully, savoring every bite, rather than a whole bag of something less satisfying. It’s all about that flavor joy!
Final Thoughts: Let’s Keep the Fun Rolling!
And there you have it! Your guide to creating the most fun, festive, and downright delicious no-bake treat this Easter season. I hope this recipe brings as much laughter and joy to your kitchen as it has to mine.
The best part about cooking—and life—is making it your own. So grab that bowl, pick your favorite pastel color, and don’t stress about making them perfect. The slightly lopsided egg shaped by your kiddo’s hands or the one with a mountain of sprinkles will be the one everyone remembers. That’s the real magic.
If you make these (and I really hope you do!), tag me on social
@FoodMeld—I love seeing your creations! It makes my day to see you guys mixing it up and having fun in your kitchens. From my family to yours, have a blessed, delicious, and wonderfully messy Easter.
Stay bold, stay creative, and always make room for seconds,
Jackson