Forget the Red Carpet, We’re Rolling Out the Green Dough
Hey friends, Jackson here from Food Meld. Let’s talk about that first magical moment of the weekend: you shuffle into the kitchen, the coffee is brewing, and then… you pull a pan of something spectacular out of the oven. The smell of cinnamon and butter fills the air, but there’s a twist. These aren’t just any cinnamon rolls. They’re vibrant, playful, and dressed in their finest emerald attire.
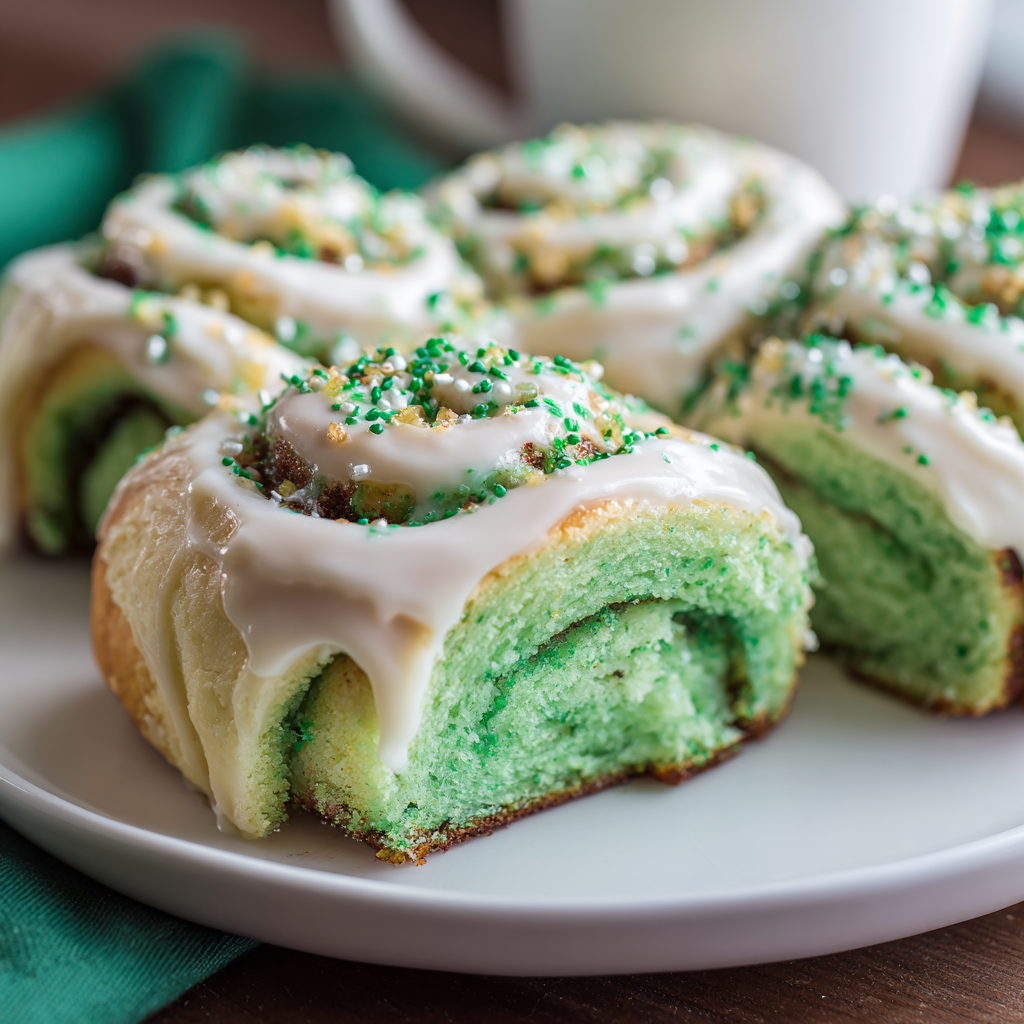
That’s the joy I want to bring to your table today with these Green Velvet Cinnamon Rolls. We’re taking everything we love about the classic, pillowy-soft, cream-cheese-glazed masterpiece and injecting it with a serious dose of fun. This isn’t *just* a St. Patrick’s Day recipe (though, yeah, they’ll absolutely steal the show at your March brunch). This is a recipe for turning an ordinary Saturday into a celebration, for surprising your family with a breakfast that makes them gasp, or for simply satisfying that sweet, creative itch we all get in the kitchen.
I promise you, the “wow” factor is huge, but the process is all the familiar, cozy comfort of baking. No tricky techniques, no hard-to-find ingredients—just my tested, foolproof method for incredible cinnamon rolls, plus a little bottle of food coloring. So, tie on your apron, crank up your favorite tunes, and let’s bake something that’s as much a joy to make as it is to devour. Welcome to the delicious, slightly mischievous world of Food Meld.

A Dash of Food Coloring & A Heap of Memories
This recipe always takes me back to my Aunt Ginny’s sun-drenched kitchen. She wasn’t a fancy chef, but she was the undisputed queen of “kitchen joy.” One gloomy March morning, she decided our regular weekend pancakes were just too…beige. With a wink, she pulled out a tiny bottle of green food coloring. “What if,” she said, her eyes sparkling, “we make the dough *fun*?”
What followed was a flour-dusted adventure. My sister and I got to knead the suddenly emerald dough, our hands turning vaguely Hulk-like, giggling the whole time. The rolls that emerged from the oven were like nothing we’d ever seen—swirls of cinnamon brown against a shock of green, topped with a river of white glaze. They tasted like home, but they felt like a party. That’s the spirit I’m channeling here. It’s not about perfection; it’s about the memory you create while your hands are in the dough. These rolls are my edible high-five to Aunt Ginny’s philosophy: never underestimate the power of a little color and a lot of love to turn a meal into a moment.
Gathering Your Emerald Arsenal
Here’s everything you need to build your green velvet masterpiece. Don’t sweat the details—I’ve got notes and swaps for you.
For the Dough:
- 3½ cups all-purpose flour: The trusty backbone. Spoon and level it into your measuring cup for accuracy—don’t scoop straight from the bag or you’ll pack in too much!
- 2¼ tsp instant yeast (one packet): Our little magic worker. Instant yeast is my hero because you can mix it right in with the dry ingredients. No proofing required!
- ¾ cup warm milk: Whole milk gives the richest texture, but any milk you have works. “Warm” means baby-bottle warm (about 110°F/43°C). If it’s too hot, it’ll fuss with the yeast.
- ¼ cup granulated sugar: Just enough to sweeten the dough and give the yeast a nice snack to get started.
- ¼ cup unsalted butter, melted: For tenderness and flavor. I use unsalted to control the salt level. If you only have salted, just reduce the added salt in the dough by a pinch.
- 1 large egg, room temperature: The glue that brings it all together and adds richness. A quick 10-minute soak in warm water brings a cold egg to temp fast.
- 1 tsp pure vanilla extract: The secret background singer that makes the whole flavor profile pop.
- Green food coloring: Gel coloring is my strong preference. It’s more potent, so you use less, and it won’t throw off your dough’s liquid balance. Start with a teaspoon and add until you get a shade you love!
- ½ tsp salt: The essential flavor enhancer. Never skip it.
For the Filling:
- ½ cup packed brown sugar: Dark or light—your call. Dark gives a deeper, almost molasses note. Pack it firmly into your cup.
- 2 tsp ground cinnamon: The classic. Smell it first—if it doesn’t smell strong and sweet, it might be time for a new bottle.
- ¼ cup (½ stick) unsalted butter, softened: This gets spread over the rolled-out dough, creating the glue for our cinnamon sugar. Properly softened butter spreads like a dream.
For the Cream Cheese Glaze:
- 4 oz (115g) full-fat cream cheese, softened: Full-fat is non-negotiable for that luxuriously creamy, tangy glaze. Let it sit out for a good 30-45 minutes.
- 2 Tbsp unsalted butter, softened: Combined with the cream cheese for the perfect spreadable consistency.
- 1 cup powdered sugar: Sift it if you have lumps! It makes whisking so much easier.
- ½ tsp vanilla extract: Because even the glaze deserves a flavor boost.
- 1-2 Tbsp milk: Your texture adjuster. Start with one, and add the second only if you want a thinner, more drizzle-able glaze.
Let’s Build Some Magic: Step-by-Step
Ready? Let’s do this. I’ll walk you through each step with all my favorite chef hacks.
Step 1: Make the Dough. In the bowl of a stand mixer fitted with the dough hook (or a large bowl if mixing by hand), combine 2 cups of the flour, the instant yeast, sugar, and salt. Give it a quick whisk. Add the warm milk, melted butter, egg, vanilla, and your green food coloring. Mix on low until a shaggy dough forms. Chef’s Tip: Start with a lower amount of coloring. You can always add more as you knead! Gradually add the remaining 1 ½ cups of flour, a half cup at a time, until the dough pulls away from the sides of the bowl but is still slightly tacky to the touch. You might not need all the flour—this depends on your humidity!
Step 2: Knead & Let Rise (First Proof). Knead on medium speed for 5-7 minutes, or by hand on a lightly floured surface for 8-10 minutes, until the dough is smooth, elastic, and beautifully green. Chef’s Hack: The “windowpane test” is your friend. Stretch a small piece of dough between your fingers. If you can stretch it thin enough to see light through it without it tearing, you’re golden. Place the dough in a lightly oiled bowl, turning once to coat. Cover with a damp kitchen towel or plastic wrap and let it rise in a warm, draft-free spot until doubled in size, about 1 hour. (I sometimes turn my oven on to the “warm” setting for 1 minute, turn it off, and let the dough rise in there—just make sure it’s not hot!)
Step 3: Roll, Fill, & Roll Again. Punch down the risen dough (so satisfying!). Turn it out onto a lightly floured surface. Roll it into a roughly 10×15 inch rectangle. Spread the softened ¼ cup of butter evenly over the entire surface, leaving a ½-inch border along one long edge. In a small bowl, mix the brown sugar and cinnamon, then sprinkle it evenly over the butter. Starting with the long edge opposite the clean border, roll the dough up tightly into a log, pinching the clean edge to seal.
Step 4: Slice & Arrange. Using a sharp serrated knife or, even better, a piece of unflavored dental floss, slice the log into 12 even rolls. Pro Tip: Slide the floss under the roll, cross the ends over the top, and pull—it gives you perfectly clean cuts without squishing the dough. Arrange the rolls in a greased 9×13 inch baking dish. Cover again and let rise for the second time until puffy, about 30-45 minutes. Meanwhile, preheat your oven to 350°F (175°C).
Step 5: Bake to Golden Perfection. Once puffy, bake the rolls for 20-25 minutes, or until the tops are golden brown and the centers are set. The amazing cinnamon smell will be your first clue they’re done! Watch them: if they’re browning too fast, you can tent loosely with foil for the last 5-10 minutes.
Step 6: The Glaze (The Grand Finale!). While the rolls bake, make the glaze. In a medium bowl, beat the softened cream cheese and butter until completely smooth. Sift in the powdered sugar, add the vanilla, and beat again. Add 1 tablespoon of milk and whisk until smooth and drizzle-able. Add the second tablespoon only if you want it thinner. As soon as the rolls come out of the oven, spread or drizzle the glorious glaze over the top. It will melt into every nook and cranny. Serve warm—this is non-negotiable for the best experience.
How to Serve These Emerald Jewels
Presentation is part of the fun! I like to serve these right from the baking dish, family-style, letting everyone pull apart their own gooey roll. The contrast of the white glaze on the green dough is stunning. For a real showstopper, place a roll on a simple white plate and drizzle a little extra glaze around it. A light dusting of extra cinnamon or even a few festive sprinkles can be fun.
Pairing is key. A strong pot of black coffee or a glass of cold milk is the classic companion. For a brunch spread, balance the sweetness with savory items like crispy bacon, scrambled eggs, or a simple fruit salad. And remember, these are just as incredible at room temperature as an afternoon snack with a cup of tea. No judgment if you eat one straight from the pan, though. I’ve been there.
Make It Your Own: Fun Twists & Swaps
The beauty of this recipe is its adaptability. Here are a few ways to play:
- The “Everything But” Roll: Add ½ cup of toasted pecans or walnuts to the cinnamon-sugar filling for a wonderful crunch.
- Chocolate Mint Twist: Swap the cinnamon filling for a mix of ½ cup granulated sugar and ¼ cup cocoa powder. Add ¼ tsp of peppermint extract to the cream cheese glaze for a shamrock shake vibe!
- Orange-Zested Glaze: Add the zest of one orange to the cream cheese glaze. The citrus cuts through the sweetness beautifully and pairs wonderfully with the spice.
- Dairy-Free/Vegan Friendly: Use plant-based milk and butter, a flax egg (1 Tbsp ground flax + 3 Tbsp water), and vegan cream cheese. The color and fun remain 100% intact.
- Natural Color Route: Want to skip the food coloring? You can try blending 1-2 Tbsp of spinach powder into the dry ingredients for a more muted, natural green. The flavor is undetectable!
Jackson’s Kitchen Notes
This recipe has become a staple in my house, and it’s evolved a bit. I used to be terrified of yeast, but instant yeast changed the game—it’s so forgiving! One time, I got a little *too* enthusiastic with the gel coloring and made rolls so green they almost glowed in the dark. My friends still tease me about “The Hulk Buns.” Lesson learned: a little goes a long way.
The biggest win was discovering the dental floss slicing trick. It seems so silly, but it creates the most perfect, uncompressed spirals. Don’t skip the second rise—that’s what gives you that incredibly light, fluffy texture. And finally, if you want to get a head start, you can assemble the rolls the night before, cover the dish tightly, and let them do their second rise slowly in the fridge overnight. In the morning, just pop them in the oven. Fresh, warm, magical rolls with zero morning effort. You’re welcome.
Your Questions, Answered
Q: Can I use active dry yeast instead of instant?
A: Absolutely! You’ll just need to “proof” it first. Dissolve it in the warm milk with a pinch of the sugar and let it sit for 5-10 minutes until frothy. Then proceed with the recipe as written.
Q: My dough didn’t rise much. What happened?
A> Two likely culprits: 1) The milk was too hot and deactivated the yeast, or 2) Your rising spot was too cold. Yeast loves a warm, cozy environment. Next time, try the warm (then off) oven trick I mentioned.
Q: The rolls are dense, not fluffy. Why?
A> This usually means the dough was over-kneaded (developing too much gluten) or, more commonly, you added too much flour. Remember, the dough should be slightly tacky, not bone-dry. Trust the process and go by texture, not just the cup measurement.
Q: Can I freeze these?
A> Yes! Bake and glaze them, let them cool completely, then freeze the whole pan (wrapped tightly) or individual rolls. Reheat in the microwave or a 300°F oven until warm. You can also freeze the un-baked, sliced rolls after the second rise. Thaw in the fridge overnight, then let them come to room temp before baking.
Nutritional Information*
*Please note: This is an estimate for informational purposes, based on the specific ingredients used. Values can vary.
Per Roll (1 of 12):
Calories: ~340 | Total Fat: 14g | Saturated Fat: 8g | Cholesterol: 55mg | Sodium: 180mg | Total Carbohydrates: 48g | Dietary Fiber: 1g | Sugars: 22g | Protein: 5g


