Forget Everything You Thought You Knew About Sugar Cookies
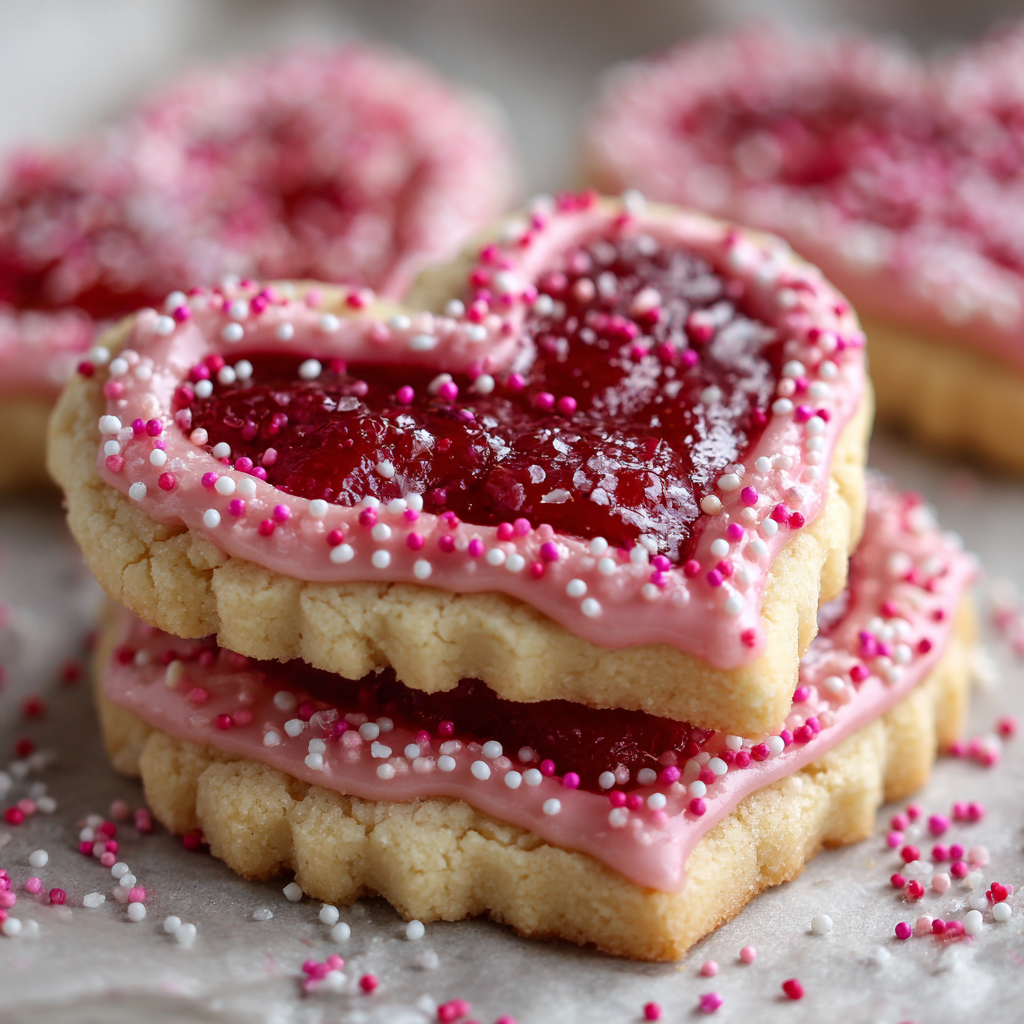
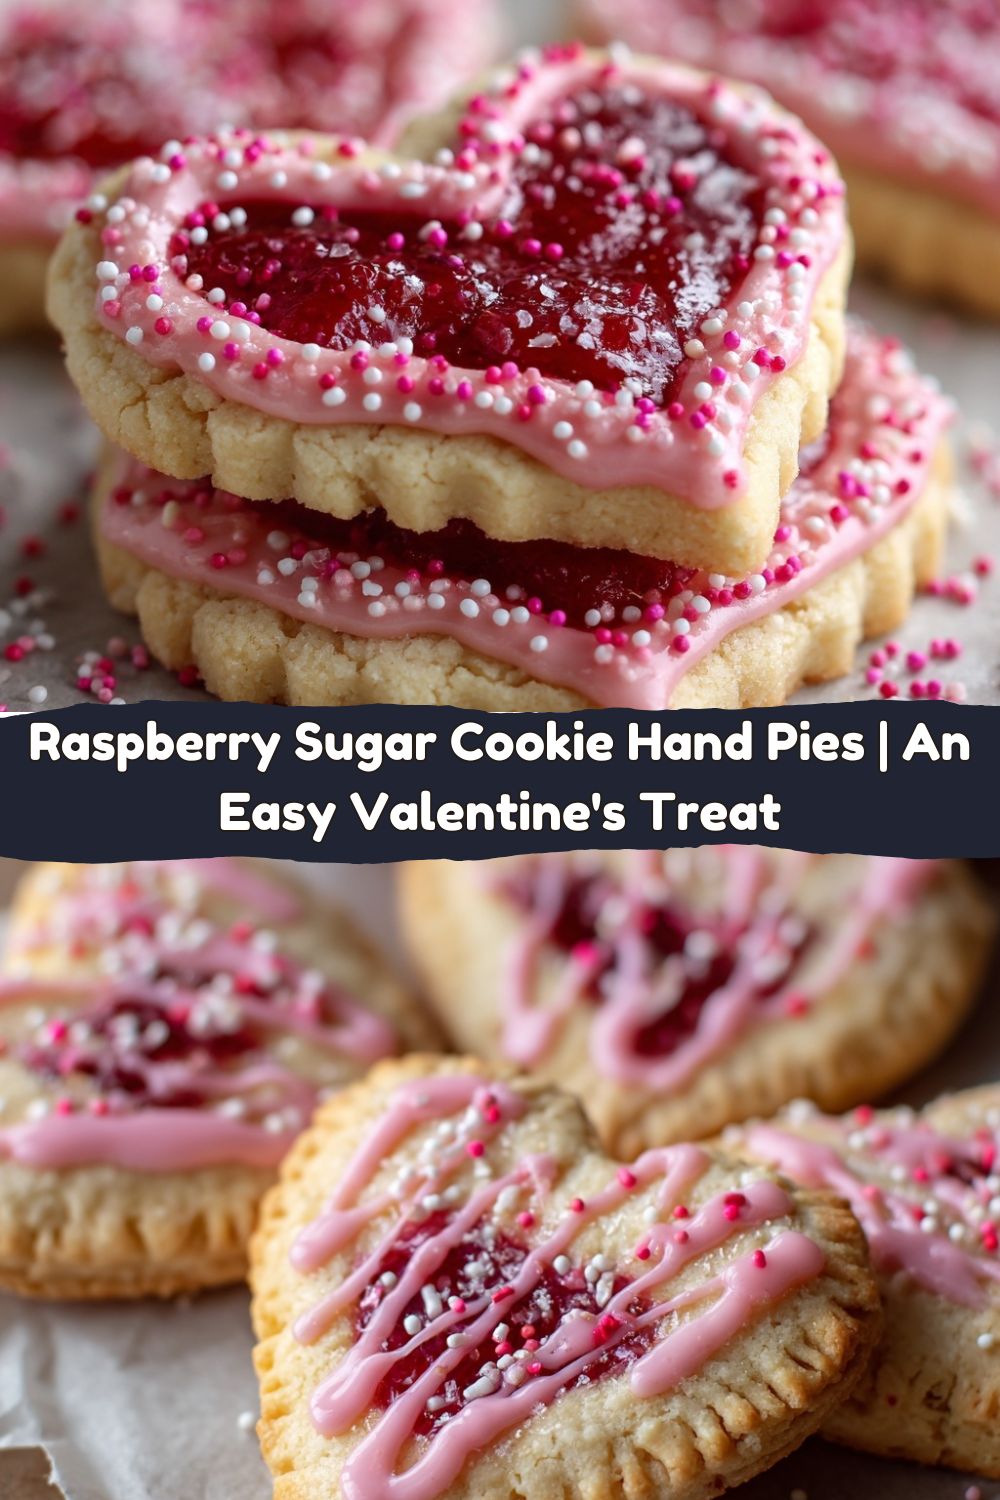
Hey friends, Jackson here from Food Meld. Let’s get one thing straight right out of the gate: these aren’t your grandma’s sugar cookies. Don’t get me wrong, I love a classic, but I’m all about that “what if we tried this?” energy, and today, we’re melding two of my favorite things: buttery, melt-in-your-mouth sugar cookies and the juicy, vibrant punch of a homemade hand pie. The result? These Raspberry Sugar Cookies that are secretly adorable, heart-shaped hand pies.
Imagine this: a tender, shortbread-like sugar cookie crust, hugging a sweet-tart burst of raspberry jam, all wrapped up in a cute little heart package and drizzzed with a dreamy pink glaze. They’re like little edible valentines, but here’s the best part—you don’t need a special occasion to make them. A random Tuesday absolutely deserves this kind of celebration. I’ve tested this recipe more times than I can count (a tough job, but someone’s gotta do it), and I’ve streamlined it so it’s totally approachable, even if you’re not a pie crust pro. We’re keeping things simple, real, and packed with so much flavor, you’ll be the hero of your own kitchen. So, grab your rolling pin and let’s cook something awesome together.
A Little Sweetness and a Lot of Mess
This recipe takes me right back to my grandma’s linoleum-floored kitchen. She was a pie wizard—her lattice tops were things of beauty. But when I was about seven, my job was the “cookie cutter specialist.” We’d make her famous apple hand pies, and I’d be covered in flour, proudly pressing stars and circles into the dough. One time, I decided to get creative and made a “Jackson-shaped” pie. It was… abstract. Let’s just say it baked into a blob that vaguely resembled a dinosaur. But my grandma didn’t care. She drizzled it with glaze, put it on a special plate, and told me it was the best one of the bunch.
That’s the spirit I want to bring to you with these heart-shaped pies. It’s not about perfection. It’s about the fun of creating something with your own two hands, the smell of butter and jam filling your kitchen, and the pure joy of sharing it. Maybe your hearts will be a little lopsided, or the glaze will drip in a funky way. Who cares? That’s what makes them yours. They’re baked with a little bit of nostalgia and a whole lot of love, and I promise, they’ll taste incredible no matter what.
Gathering Your Flavor Arsenal
This is where the magic starts. Simple, quality ingredients coming together to create something truly special. Here’s your shopping list and my chef-y insights to set you up for success.
For the Cookie Dough:
- 2 ½ cups all-purpose flour: The backbone of our structure. Spoon and level it into your measuring cup to avoid a dense, dry dough.
- 1 cup cold unsalted butter, cubed: Cold is non-negotiable! This is our secret to a flaky, tender crust that doesn’t spread. I pop mine in the freezer for 10 minutes before I start.
- ½ cup granulated sugar: Just enough sweetness to complement the tangy raspberry filling without overpowering it.
- 1 large egg: This acts as our binder, bringing the dough together beautifully and adding richness.
- 1 tsp pure vanilla extract: The warm, aromatic flavor that makes everything taste like home. Don’t skimp!
- ¼ tsp salt: The flavor enhancer. It makes the sweet ingredients taste even sweeter and balances everything out.
- 2-3 tbsp cold water, as needed: We add this a tablespoon at a time just to bring the dough together. Too much water = tough cookies, so go slow!
For the Filling & Assembly:
- ¾ cup raspberry jam or preserves: I love using seedless raspberry jam for a smooth texture, but preserves with seeds give a fantastic rustic feel. Chef’s Tip: If your jam is super runny, mix it with that 1 tbsp of cornstarch before filling. It’ll prevent a juicy explosion in the oven!
For the Pink Glaze & Decoration:
- 1 cup powdered sugar: The base of our simple, sweet glaze.
- 1-2 tbsp milk or lemon juice: Milk gives a creamy glaze, while lemon juice adds a lovely tang that cuts the sweetness. Your choice!
- A few drops of pink food coloring: Go for gel food coloring for a vibrant pink without thinning out the glaze. A little goes a long way!
- Sprinkles, for decoration: This is where you let your personality shine. Heart sprinkles? Classic. Rainbow jimmies? A party in every bite!
Let’s Build Some Edible Hearts: Your Step-by-Step Guide
Okay, team. Flour on your apron, music on in the background—let’s do this. Follow these steps, and you’ll have a batch of gorgeous hand pies in no time.
- Preheat and Prep. Fire up that oven to 350°F (175°C). This gives it time to get perfectly hot while we work. Line a baking sheet with parchment paper—this is our insurance policy against sticking and makes cleanup a dream.
- Create the Dough Crumbs. In your food processor (or a large bowl if you’re using a pastry cutter), pulse together the flour, sugar, and salt. Drop in those cold, cubed butter pieces. Pulse (or cut) until the mixture looks like coarse, sandy crumbs with a few pea-sized bits of butter still visible. Those butter bits are your ticket to flakiness!
- Bring It Together. Crack in the egg and add the vanilla. Pulse (or mix with a fork) until just combined. Now, with the motor running (or while stirring), add the cold water, one tablespoon at a time. Stop as soon as the dough starts to clump together. It should feel a bit like Play-Doh, not sticky. Turn it out onto a floured surface and gently press it into a disc. Pro-Tip: Don’t overwork it! Over-mixing makes gluten, which leads to tough cookies.
- Roll and Cut. Lightly flour your rolling pin and roll the dough out to about ¼-inch thickness. This is the perfect thickness—sturdy enough to hold the filling but not too thick to bake through. Now for the fun part! Use a heart-shaped cookie cutter (about 3-4 inches is ideal) to cut out your pairs. Re-roll the scraps to get as many hearts as you can.
- Fill and Seal. Place half of your heart cutouts on the prepared baking sheet. Spoon about a teaspoon of jam into the center of each one, leaving a ½-inch border around the edge. Too much filling and it’ll leak—trust me, I’ve been there! Place the second heart on top. Now, take a fork and press down all around the edges to seal them shut. This also gives them that cute, classic pie-crust look.
- Bake to Golden Perfection. Slide your beautiful creations into the preheated oven and bake for 15-18 minutes. You’re looking for the edges to be just lightly golden. They might look a little pale in the center, and that’s okay—they’ll continue to firm up as they cool.
- The All-Important Cool Down. This is the hardest part: patience! Let the cookies cool on the baking sheet for 5 minutes before transferring them to a wire rack to cool completely. If you glaze them while they’re warm, the glaze will just melt right off and create a puddle. Let’s avoid the sad puddle.
- Glaze and Celebrate! While the cookies cool, whisk together the powdered sugar and your liquid of choice (milk or lemon juice) until smooth. Add a drop or two of pink food coloring. Once the cookies are completely cool, drizzle that gorgeous pink glaze over the top with a spoon, or for more control, put it in a zip-top bag, snip off a tiny corner, and pipe it on. Immediately shower them with sprinkles before the glaze sets. And voilà! You’ve just made magic.
How to Serve Up the Sweetness
Presentation is part of the fun! You’ve put in the work, now let’s make these hand pies shine. For a simple, beautiful look, arrange them on a rustic wooden board or a pretty cake stand. Stack a few in the center for height. If you’re serving them for a special brunch or Valentine’s Day, place each one on a small, individual plate with a dusting of extra powdered sugar and a few fresh raspberries on the side. The pop of red against the pink glaze is just *chef’s kiss*.
And let’s talk pairings. A hot cup of coffee or a glass of cold milk is the classic, perfect companion. But if you really want to level up, serve them with a scoop of vanilla bean ice cream while they’re still slightly warm. The contrast of warm, flaky cookie, cool ice cream, and tart raspberry is a life-changing experience. You’re welcome.
Make It Yours: Creative Twists on the Classic
This recipe is a fantastic canvas for your creativity. Here are a few of my favorite ways to mix it up:
- Mixed Berry Bliss: Swap the raspberry jam for a mix of strawberry, blueberry, or blackberry. A triple-berry blend is a total crowd-pleaser.
- Chocolate-Hazelnut Dream: Who says you need jam? Fill these with a small spoonful of Nutella for a decadent, rich treat. Just be careful not to overfill!
- Lemon-Raspberry Twist: Add a teaspoon of lemon zest to the cookie dough and use lemon juice in the glaze. The bright, citrusy notes make the raspberry flavor sing.
- Brown Sugar & Cinnamon: Replace half the granulated sugar in the dough with brown sugar and add a half-teaspoon of cinnamon. It gives a wonderful, warm depth of flavor.
- Gluten-Free Friendly: No problem! Use a 1:1 gluten-free all-purpose flour blend. I’ve had great results with this swap, and the texture is still fantastic.
Jackson’s Kitchen Confidential
This recipe has evolved in my kitchen more times than I can count. The first batch? Let’s just say I learned the hard way that warm butter makes a puddle, not a pie. I also once got a little overzealous with the filling and created what my friends lovingly called “raspberry lava flows.” They were a mess, but they still disappeared in minutes. The beauty of cooking is in these happy little accidents. Don’t stress if your first heart isn’t perfect. The flavor is what wins people over every single time. Over the years, I’ve found that letting the dough chill in the fridge for 20 minutes before rolling makes it even easier to handle, especially on a warm day. It’s a little extra step that pays off big time.
Your Questions, Answered!
I’ve gotten a lot of questions about this recipe over the years. Here are the big ones to help you out.
Q: My filling leaked everywhere! What did I do wrong?
A: Ah, the classic leak! This usually happens for one of three reasons: the filling was too close to the edge (remember that ½-inch border!), the edges weren’t sealed tightly enough with the fork, or you used a super runny jam. The cornstarch trick is your best friend here to thicken it up pre-bake.
Q: Can I make the dough ahead of time?
A: Absolutely! You can make the dough disc, wrap it tightly in plastic wrap, and keep it in the fridge for up to 2 days. When you’re ready, let it sit on the counter for 10-15 minutes to become roll-able. You can also freeze the dough for up to 3 months.
Q: Why is my dough so tough?
A: This is almost always from over-mixing. Once you add the water, you just want to bring the dough together, not knead it into a smooth ball. Those little bits of butter are good! Treat it gently for the most tender cookie.
Q: Can I use a different shaped cookie cutter?
A: Of course! Hearts are just for fun. Circles, stars, squares—they all work. Just make sure you have matching pairs for the top and bottom.
Straight Talk on Nutrition
Hey, we’re all about balance here at Food Meld. These Raspberry Sugar Cookie Hand Pies are a treat, and it’s good to know what you’re enjoying. This nutritional info is an estimate per cookie (assuming you get about 12 from the batch). Remember, your specific brands of butter, jam, and sugar can cause slight variations.
- Calories: ~210
- Carbohydrates: ~26g
- Fat: ~10g
- Sugar: ~13g
- Protein: ~2g
To lighten things up a bit, you can use a reduced-sugar jam and dial back the glaze a little. But my philosophy? Life’s too short not to enjoy a beautifully made, from-scratch dessert with people you love. Savor every single bite.
You Did It! Now, Go Enjoy the Fruits of Your Labor
Look at you, you kitchen rockstar! You’ve just created a batch of unforgettable, homemade treats that are bursting with flavor and love. This is what Food Meld is all about—taking simple concepts and twisting them into something fun, approachable, and downright delicious. I hope these little heart pies bring as much joy to your kitchen as they have to mine.
I’d love to see your creations! Did you try a different filling? Use funky sprinkles? Tag me on social @FoodMeld with your photos. You’re not just following a recipe; you’re joining a community of food lovers who aren’t afraid to get a little messy and have a whole lot of fun. Until next time, keep mixing it up, make it yours, and enjoy every single bite.
Happy baking,
Jackson