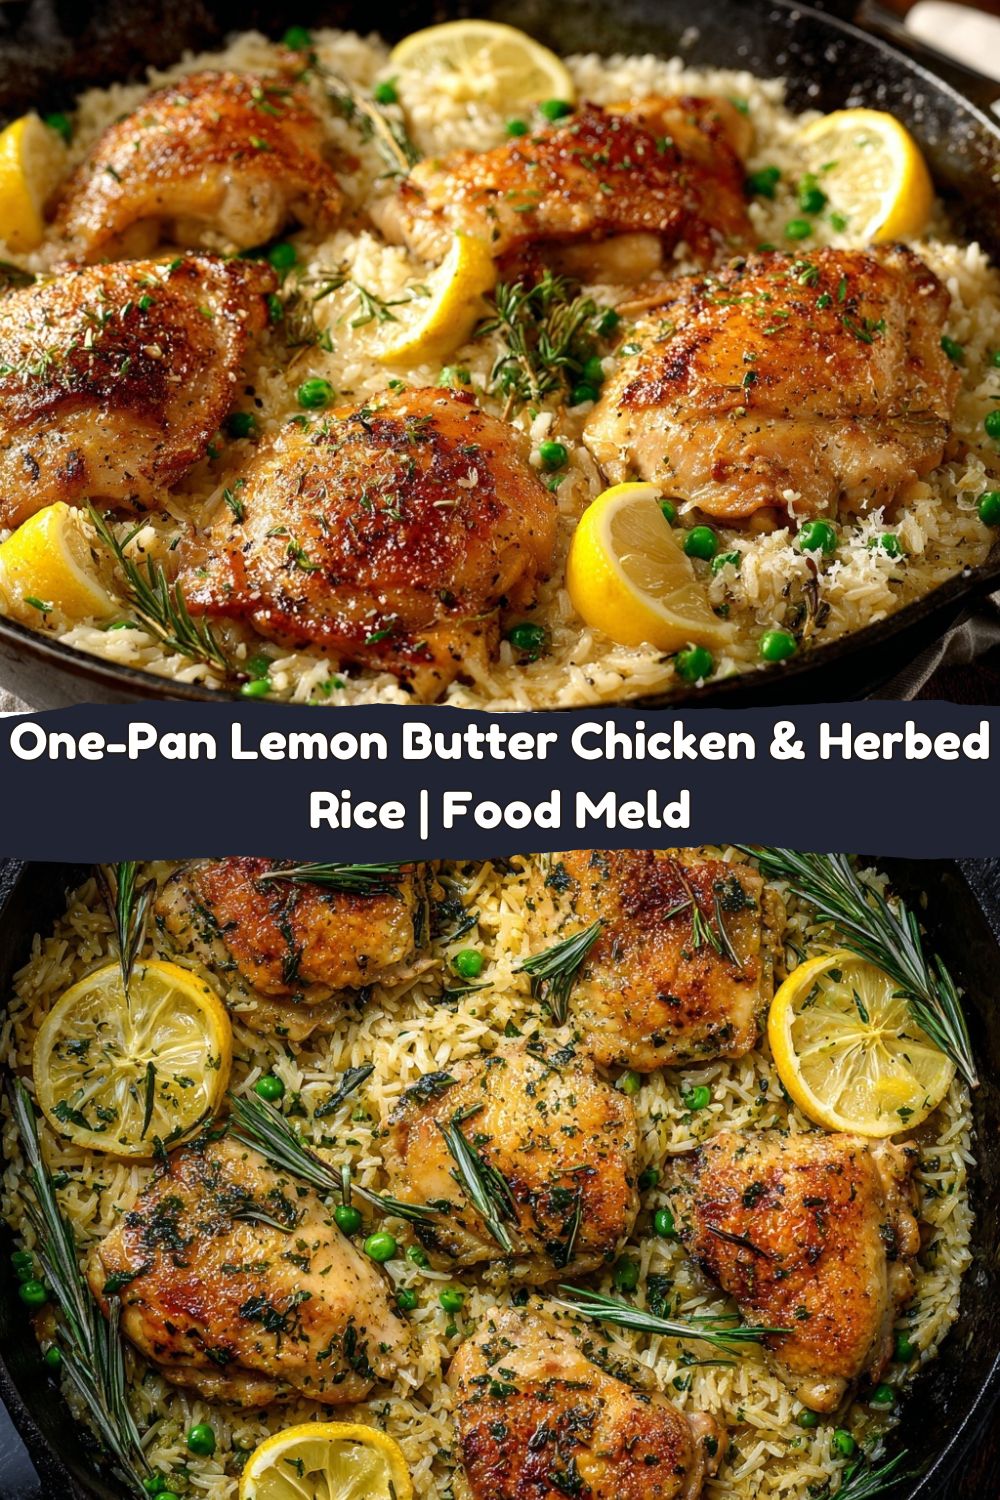
One-Pan Lemon Butter Chicken & Herbed Rice: Your New Kitchen Hero
Hey friends, Jackson from Food Meld here. Let’s get real for a second. How many times have you stared into the fridge after a long day, dreaming of a meal that feels fancy and comforting, but the thought of creating a mountain of dirty pots and pans just completely kills your vibe? I’ve been there more times than I can count. That’s exactly why I’m so dang passionate about one-pan wonders.
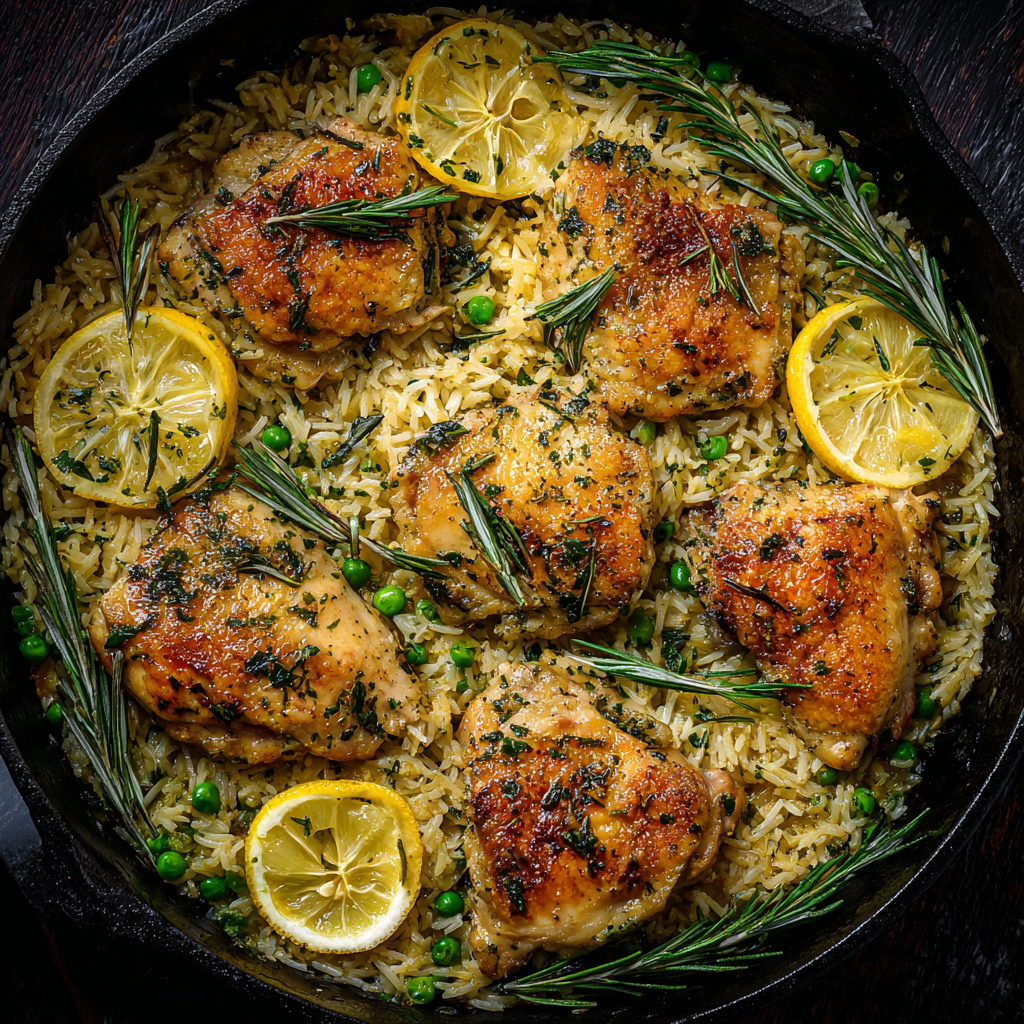
This isn’t just another recipe; it’s your ticket to a stress-free, flavor-packed dinner that looks like you fussed for hours. We’re talking tender, golden-brown chicken nestled right into a bed of the most fragrant, herby rice you’ve ever tasted. The magic? It all happens in one single skillet. The chicken juices, the lemon, the butter, the herbs—they all mingle and meld together while you kick back, creating a symphony of flavor in every single bite.
This One-Pan Lemon Butter Chicken & Herbed Rice is the ultimate proof that “simple” doesn’t have to mean “boring.” It’s the kind of meal that bridges the gap between a hectic Tuesday and a romantic Friday night in. It’s cozy, it’s elegant, and it’s packed with that “you’ve gotta try this” energy I live for. So, grab your favorite skillet, and let’s cook something awesome together that’ll have everyone asking for seconds before they even take their first bite.
The Skillet That Started It All
This recipe takes me right back to my grandma’s kitchen in Georgia. She wasn’t a fussy chef, but she was a genius with a cast-iron skillet. I remember one sweltering summer evening, the air thick with humidity, and she was whipping up dinner without breaking a sweat. She seared some chicken, tossed in what seemed like random handfuls of rice and herbs from her garden, poured in some broth, and clanged the lid on.
Twenty minutes later, she lifted that lid, and a cloud of the most incredible aroma—savory chicken, earthy thyme, and a bright kick of lemon—billowed out. It was pure magic. She taught me right then and there that the best meals aren’t about complicated techniques; they’re about letting good ingredients do their thing together. This dish is my little tribute to her, with my own “what if we tried this?” twist of adding extra lemon and peas for a fresh pop. It’s a taste of Southern comfort, straight from my family’s skillet to yours.
Gather Your Flavor All-Stars
Here’s the beautiful part: the ingredient list is short, sweet, and probably already in your pantry. Using simple ingredients means each one gets a chance to shine. Let’s break it down.
- 4 boneless, skinless chicken thighs or breasts: Thighs are my go-to for this because they stay incredibly juicy and have more flavor, but breasts work perfectly if that’s what you have! No judgment here.
- 2 tbsp butter & 1 tbsp olive oil: This is our dynamic fat duo. The butter gives us that rich, nutty flavor we’re after, while the olive oil raises the smoke point so the butter doesn’t burn. It’s a chef’s hack for a perfect sear.
- 2 garlic cloves, minced: Fresh is best here! That punch of aromatic garlic forms the flavor base for our rice.
- Juice and zest of 1 lemon: Don’t you dare skip the zest! That’s where the real, powerful lemon oil lives. The juice gives us tang, and the zest gives us fragrance.
- 1 tsp dried thyme & ½ tsp dried rosemary: These are the cozy, earthy notes that scream comfort food. If you have fresh, use 3x the amount (so 1 tbsp fresh thyme, 1.5 tsp fresh rosemary).
- Salt & pepper to taste: Season with confidence! This is what wakes up all the other flavors.
For the Rice & Finish:
- 1 cup long-grain white rice: I like long-grain (like Jasmine or Basmati) for its fluffy, separate grains. Chef’s Insight: Don’t use instant rice here—it will turn to mush.
- 2¼ cups chicken broth: Using broth instead of water is a non-negotiable flavor booster. It makes the rice taste incredible all on its own.
- 1 cup peas (fresh or frozen): My “what if” moment! They add a sweet pop of color and a veggie boost. No need to thaw if frozen.
- Optional: extra lemon wedges, fresh herbs for garnish: This is for the “wow” factor. A little fresh parsley or thyme on top makes it look restaurant-quality.
Let’s Build Some Flavor, Step-by-Step
Alright, let’s fire up the stove. This is where the magic happens, and I’ll be right here with you, talking you through every little chef hack.
- Season Like You Mean It. Pat your chicken completely dry with a paper towel—this is the secret to a golden, crispy sear, not a steam. Season both sides generously with salt, pepper, dried thyme, and rosemary. Really rub it in there!
- Get That Golden Sear. Place your large, oven-safe skillet over medium-high heat and add the butter and olive oil. Once the butter is melted and foaming slightly, carefully place the chicken in the pan. Listen to that sizzle! That’s the sound of flavor developing. Don’t touch it for a good 4-5 minutes. We want a beautiful golden-brown crust before we flip it. Sear the other side for another 4-5 minutes. The chicken won’t be cooked through yet, and that’s perfect! Remove it to a plate and set it aside.
- Create the Flavor Base. See all those gorgeous browned bits at the bottom of the pan? That’s called “fond,” and it’s liquid gold! Reduce the heat to medium, add the minced garlic, and sauté for just 30-60 seconds until fragrant. Don’t let it burn! Now, stir in the dry rice. Toasting the rice for a minute in those fats and garlic gives it a nutty depth and helps it stay fluffy.
- Deglaze and Nestle. Pour in the chicken broth and add the lemon juice and zest. Use your spoon to scrape up all that fond from the bottom of the pan—this is where you’re building the soul of the dish. Now, nestle the seared chicken back into the pan, right on top of the rice. Pour any juices from the plate over everything. This is where the one-pan magic truly begins.
- Simmer to Perfection. Bring the liquid to a lively simmer, then immediately reduce the heat to low, cover the skillet tightly with a lid, and walk away. Set a timer for 18 minutes. No peeking! We need to trap that steam to cook the rice and chicken perfectly.
- The Final Pop of Green. After 18 minutes, lift the lid (ah, that smell!), and quickly scatter the peas over the top. Don’t stir them in. Just put the lid back on and let it cook for the final 5 minutes. This gently steams the peas without making them mushy.
- The Most Important Step: Rest! Turn off the heat, and leave the lid on for a final 5-10 minute rest. This allows the rice to steam to fluffy perfection and lets the chicken juices redistribute, making every bite tender.
- Fluff and Serve. Remove the lid, fluff the rice around the chicken with a fork, and you’re ready to go! Serve with an extra squeeze of fresh lemon juice and a sprinkle of fresh herbs.
Plating It Up Like a Pro
You’ve done the hard work, now let’s make it look as good as it tastes. Presentation is part of the fun! I like to bring the whole skillet right to the table—it’s rustic, impressive, and means less cleanup. Use a big spoon to scoop a generous portion of that beautiful herbed rice right onto the plate, place a piece of that golden chicken right on top, and make sure you get some of those vibrant green peas in every bite.
Drizzle a little of the extra lemon butter sauce from the bottom of the pan over the chicken. For a true “wow” moment, garnish with a fresh lemon wedge and a sprig of thyme or a sprinkle of chopped fresh parsley. If you’re feeling extra, a simple side like a crisp arugula salad with a light vinaigrette is the perfect, palate-cleansing companion to this rich, comforting dish.
Make It Your Own: Flavor Twists & Swaps
This recipe is a fantastic canvas for your own creativity. Here are a few of my favorite ways to mix it up:
- Sun-Dried Tomato & Spinach: Swap the peas for a handful of chopped sun-dried tomatoes and a few big handfuls of fresh spinach added in the last 5 minutes of cooking.
- Greek-Inspired: Use oregano instead of rosemary, and add a handful of kalamata olives and crumbled feta cheese over the top right before serving.
- Creamy Lemon & Parmesan: Stir in ¼ cup of grated Parmesan cheese and a splash of heavy cream or half-and-half when you fluff the rice at the end for an ultra-rich, decadent version.
- Dairy-Free Delight: Easy! Just use all olive oil (or a dairy-free butter alternative) instead of the regular butter. The flavor will still be incredible.
- Spice It Up: Add a pinch of red pepper flakes with the garlic, or use a Cajun seasoning blend on the chicken for a bit of a kick.
Jackson’s Chef’s Notes
This recipe has been a work-in-progress in my kitchen for years. The first time I made it, I was so eager I lifted the lid like five times to check on it. Big mistake! The steam escaped, and the rice took forever to cook. I learned the hard way so you don’t have to—trust the process and keep that lid on!
I also once tried to use brown rice without adjusting the liquid or time. Let’s just say we had a very… al dente… dinner that night. The beauty of this recipe is in its simplicity and the specific ratios. Once you master this version, feel free to play. That’s what cooking is all about—a little fun, a little messy, and a whole lot of delicious.
Your Questions, Answered!
Q: My rice is still crunchy/hard. What happened?
A: This usually means there wasn’t enough liquid, the heat was too high so it evaporated too quickly, or the lid wasn’t on tight enough. Next time, make sure you’re using the right amount of broth, keep the heat at a true low simmer, and resist the urge to peek! If it’s close but still a bit firm, add a couple tablespoons of warm broth, cover, and cook for another 5 minutes.
Q: Can I use chicken breasts instead of thighs?
A: Absolutely! Chicken breasts work great. Just be mindful that they can cook faster and dry out more easily. I recommend using thicker, similarly-sized breasts and checking their internal temperature a few minutes early. You’re aiming for 165°F (74°C).
Q: My skillet isn’t oven-safe. Can I still make this?
A> Good news: this recipe is stovetop-only! The “oven-safe” note is just a bonus for other recipes. As long as your skillet has a tight-fitting lid, you’re golden. If you don’t have a lid, a large baking sheet placed on top works in a pinch.
Q: Can I make this ahead of time?
A> You can prep the components ahead (season the chicken, mince the garlic, zest the lemon), but this dish is truly best served fresh. The rice can become a bit gummy upon reheating. It’s so quick to make, it’s really perfect for a fresh-from-the-pan dinner.
Straight Talk on Nutrition
Let’s keep it real. I’m a chef, not a nutritionist, and these are rough estimates that can vary based on your specific ingredients. But I believe in knowing what you’re putting into your body! This dish is a fantastic, balanced meal all on its own. The chicken provides a solid 35 grams of protein to keep you full and satisfied. The carbs from the rice give you energy, and the fats from the butter and olive oil are what carry all that incredible flavor and help you absorb vitamins.
By cooking it all in one pan, we’re also using just enough fat to create amazing taste without going overboard. The peas add a nice little boost of fiber and vitamins. It’s a wholesome, satisfying meal that proves eating well doesn’t mean sacrificing an ounce of flavor.
You’ve Got This!
And there you have it, my friends. A complete, show-stopping meal that proves you don’t need a kitchen full of gadgets or a degree from a culinary school to eat incredibly well. This One-Pan Lemon Butter Chicken & Herbed Rice is more than just a recipe; it’s a reminder that the best cooking is often the simplest. It’s about bringing people together, creating memories around the table, and enjoying every single, flavorful bite without the dreaded pile of dishes.
I hope this recipe becomes a regular in your rotation, just like it is in mine. Give it a try, make it your own, and most importantly, have fun with it. I’d love to see your creation! Tag me on social @FoodMeld so I can cheer you on. Now get out there and cook something awesome!
With flavor and fun,
Jackson Walker


