Your New Favorite Chocolate Cake is Here, and It’s a Triple Threat
Hey friends, Jackson from Food Meld here. Let’s be real for a second. We’ve all had chocolate cake, right? The kind at birthday parties, the slice with your afternoon coffee, the last-piece-in-the-box from the grocery store. They’re… fine. But what if I told you we could leave “fine” in the dust and launch ourselves straight into chocolate nirvana? What if we could create a cake that doesn’t just taste like chocolate, but feels like a rich, velvety, chocolate experience from the first crumb to the last?
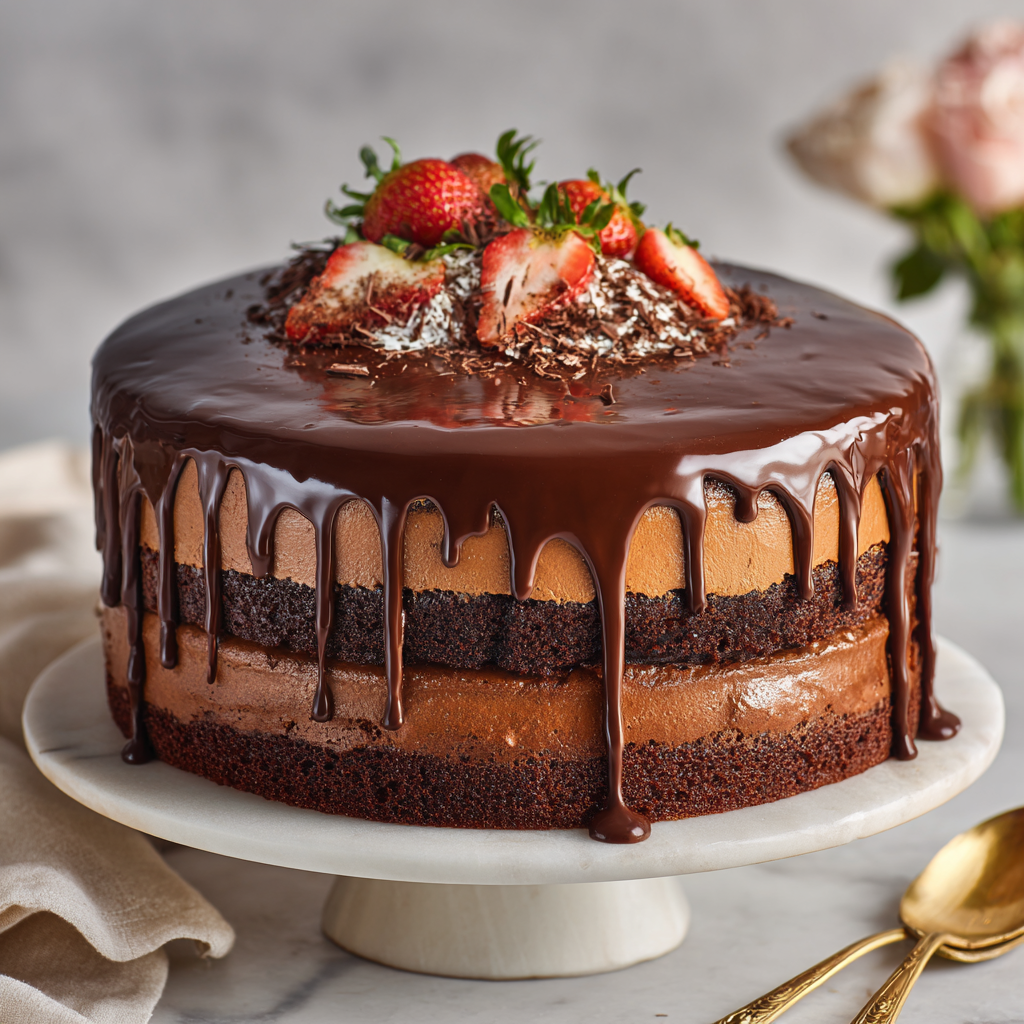
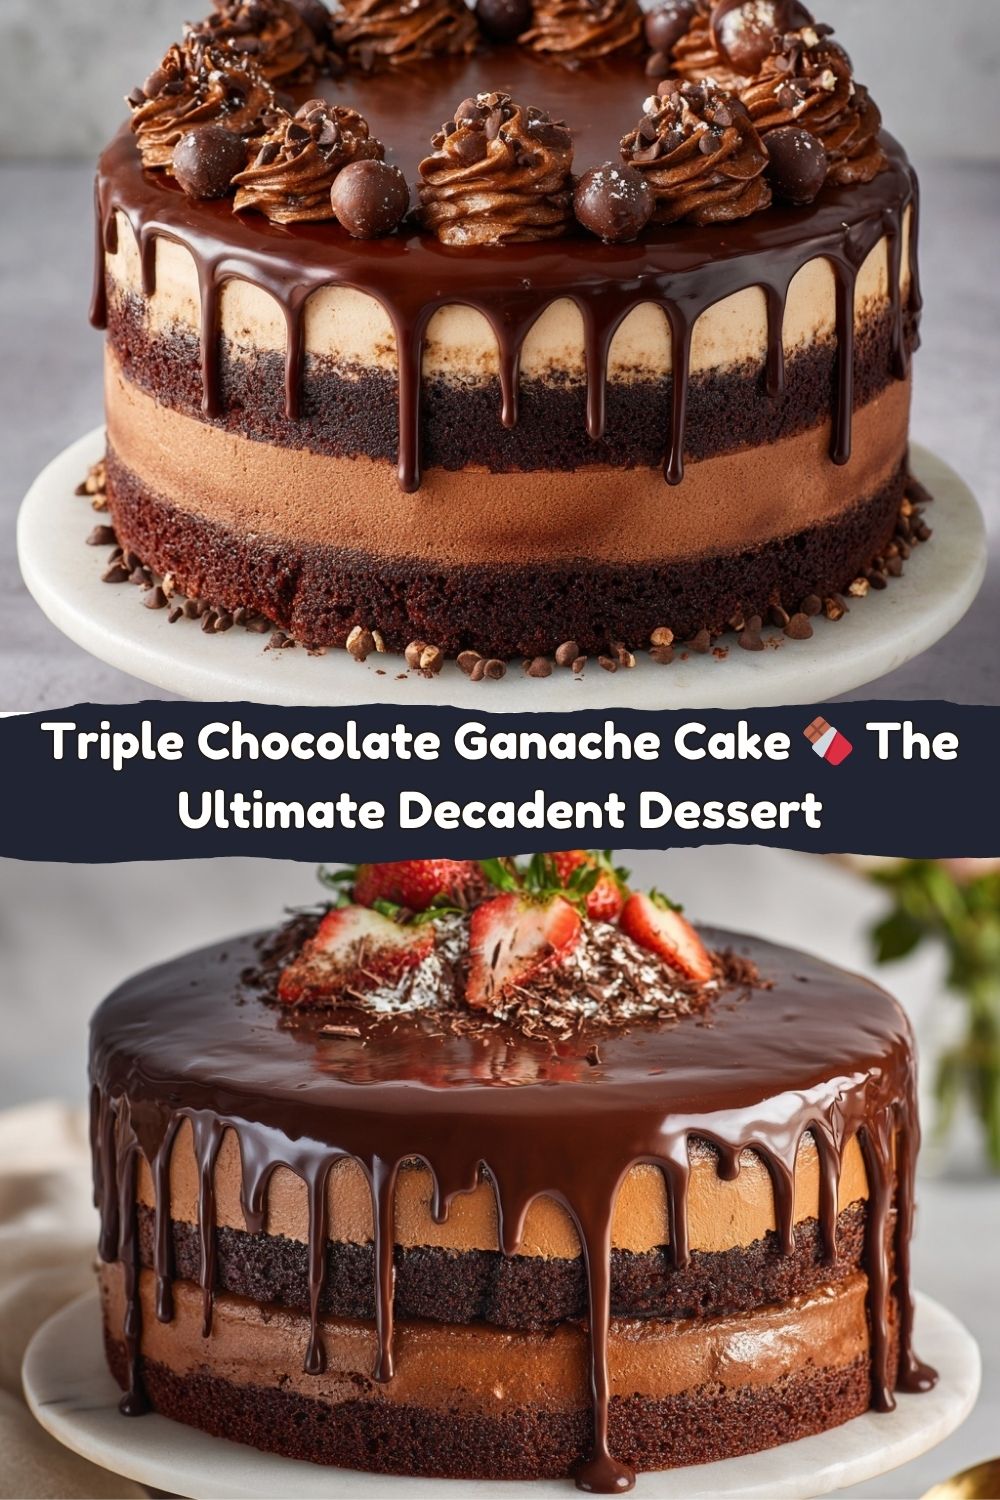
Welcome to my Triple Chocolate Ganache Cake. This isn’t just a dessert; it’s a project of pure, unapologetic joy. We’re talking about a moist, deeply chocolate sponge that practically melts on your tongue. Then, we sandwich it with a cloud of rich, dark chocolate mousse that’s so smooth, it’s like spreading silk. And because we’re going for glory, we’re draping the whole magnificent thing in a glossy, decadent chocolate ganache that cracks just right when you slice into it.
I see you—maybe you’re a little intimidated. Layers? Mousse? Ganache? It sounds fancy, but I promise you, we’re keeping it simple, real, and packed with flavor, just like we do here at Food Meld. I’ve tested every step, worked out all the kinks, and I’m right here with you. So, tie on your apron, clear some counter space, and let’s cook something awesome together. This is the kind of dessert that makes people stop talking, their eyes go wide, and the only thing they can manage is a slow, meaningful, “Wow.” Let’s build that moment.
The Cake That Started It All: A Sweet Slice of Memory
This cake takes me right back to my Grandma Louise’s kitchen. She was a force of nature, a woman who believed any problem could be solved with a hug and a slice of something homemade. For every single one of my childhood birthdays, she’d show up with this towering, lopsided, absolutely perfect chocolate cake. It wasn’t always pretty—sometimes the frosting would be a little wonky, or a layer would slide—but the love baked into it was the real ingredient.
One year, I must have been about ten, I decided I was a “big kid” and was going to “help” her. I’m pretty sure I got more flour on the floor than in the bowl, and I definitely licked the beaters before we were even done. But as we stood there, waiting for the layers to cool, she let me taste the ganache with a spoon. It was my first time trying real, dark chocolate ganache, and my mind was blown. It was so rich and adult, so different from the sugary frostings I was used to. That was the moment I truly got it. Food wasn’t just fuel; it was a feeling. This Triple Chocolate Ganache Cake is my homage to her—a little more refined, a little more “meld-y” with its mousse layer, but carrying that same big, bold, comforting heart.
Gathering Your Flavor Arsenal
Okay, team! Let’s gather our players. Using quality ingredients here makes a world of difference, but I’ve also got all the swaps and hacks you need to make it work with what you’ve got. Read those little notes—they’re your secret weapons!
For the Chocolate Sponge Cake:
- 1 ¾ cups all-purpose flour (220g): The trusty foundation. No need to sift, but do fluff it up in the bag before measuring.
- ¾ cup Dutch-process cocoa powder (75g): This is my MVP. Dutch-process cocoa is less acidic and has a deeper, darker chocolate flavor. If you only have natural cocoa, you can use it, but the cake will be lighter in color and have a more sharp chocolate taste.
- 2 tsp baking powder: Our leavening agent, giving the cake its beautiful rise. Make sure it’s fresh!
- ½ tsp salt: Never skip this! Salt is the flavor enhancer that makes the chocolate taste even more chocolaty. It’s the ultimate wingman.
- 1 cup granulated sugar (200g) & 1 cup light brown sugar (200g): We’re using both! White sugar for sweetness and structure, brown sugar for that hint of molasses and extra moisture. It’s a dynamic duo.
- ½ cup vegetable oil (120ml): Oil keeps this cake incredibly moist and tender, far better than butter would in this specific recipe.
- 2 large eggs: Bring them to room temperature! They’ll incorporate into the batter much more smoothly, giving you a better texture.
- 1 cup buttermilk (240ml): The tanginess of buttermilk balances the sweetness and tenderizes the crumb. No buttermilk? No problem! Add 1 tablespoon of white vinegar or lemon juice to a cup of regular milk and let it sit for 5 minutes.
- 1 tsp vanilla extract: The classic flavor backbone.
- 1 cup hot water + 1 tsp instant coffee: I know, adding water seems wild. Trust the process! This thin batter bakes up super moist. The coffee? You won’t taste it, I promise. It just deepens the chocolate flavor like you wouldn’t believe.
For the Chocolate Mousse Layer:
- 1 ½ cups heavy cream, chilled (360ml): “Chilled” is the key word here. Cold cream whips up better and gives us those lovely, stable peaks.
- 1 cup dark chocolate chips or finely chopped bar (170g): Use a good quality chocolate you enjoy eating on its own. This is the star of the mousse!
- 2 tbsp powdered sugar: Just a touch of sweetness to balance the dark chocolate.
For the Glossy Chocolate Ganache:
- 1 cup heavy cream (240ml): Heating this up is what will melt our chocolate into silky perfection.
- 8 oz dark chocolate, chopped (226g): Chop it fine so it melts evenly. You can use chips in a pinch, but a bar is often higher quality.
- Pinch of salt: Again, our flavor booster. It cuts the richness just enough.
Let’s Build This Masterpiece: A Step-by-Step Adventure
Ready for the fun part? Put on some music, and let’s get baking. I’ll be with you every step of the way with my best tips and hacks.
Step 1: Bake the Chocolate Sponge Layers
1. First things first, preheat your oven to 350°F (175°C). This gives the oven time to get to the perfect, steady temperature. Grease two 8-inch round cake pans with a little butter or cooking spray, then line the bottoms with a circle of parchment paper. This is my number one hack for guaranteeing your cakes will release perfectly. No sticking, no drama.
2. In a medium bowl, let’s whisk together our dry team: the flour, Dutch-process cocoa, baking powder, and salt. Whisking here does two things: it combines everything evenly, and it aerates the mixture a little, which is always a good thing.
3. In a larger bowl, it’s time for the wet ingredients. Grab your hand mixer or a sturdy whisk. Beat together the granulated sugar, brown sugar, and vegetable oil. Then, beat in the eggs, one at a time, followed by the buttermilk and vanilla. The mixture might look a little curdled at this point—that’s totally normal, don’t panic!
4. Now, gradually add the dry ingredients to the wet ingredients. Mix on low speed until they’re just combined. We don’t want to overmix and develop too much gluten, which can make the cake tough.
5. Here’s the secret step! In a measuring cup, combine the hot water and instant coffee until the coffee dissolves. Slowly pour it into the batter while mixing on low. The batter is going to be very, very thin. This is exactly what we want! It seems wrong, but it’s so right. This is the key to an unbelievably moist cake.
6. Divide the batter evenly between your two prepared pans. I like to use a kitchen scale for precision, but the eye-ball method works too. Tap the pans gently on the counter to release any large air bubbles.
7. Bake for 30-35 minutes. You’ll know they’re done when a toothpick inserted into the center comes out with a few moist crumbs attached, not wet batter. Do the touch test, too—the center should spring back when you gently press it.
8. Let the cakes cool in their pans for about 10 minutes. Then, run a knife around the edge, invert them onto a wire rack, and peel off the parchment paper. Let them cool completely. Pro Chef Hack: For easiest assembly, you can wrap these cooled layers in plastic wrap and pop them in the freezer for about 45 minutes. A slightly frozen cake is much easier to handle and less likely to crumb!
Step 2: Whip Up the Chocolate Mousse
1. While the cakes are cooling, let’s make the mousse. Start by melting your dark chocolate. You can do this in a double boiler, or my preferred lazy method: in a microwave-safe bowl in 20-second bursts, stirring well after each burst. Let this melted chocolate cool slightly so it’s not scorching hot, but still fluid.
2. In a separate, clean bowl, pour in your chilled heavy cream and powdered sugar. Using your hand mixer or a whisk, whip the cream until you get soft peaks. That means when you lift the beaters, the peaks should gently curl over. Don’t go to stiff peaks, or the mousse can become grainy.
3. Now, gently fold the slightly cooled melted chocolate into the whipped cream. I like to add about a third first, fold it in to lighten it, then add the rest. Use a spatula and a gentle, turning motion to keep all that air in the cream. You’ll see it turn into a beautiful, light, chocolatey cloud.
4. Cover the bowl and pop it in the fridge to firm up for at least 30 minutes while you make the ganache.
Step 3: Create the Glossy Ganache
1. Place your finely chopped chocolate and that pinch of salt in a heatproof bowl.
2. In a small saucepan, heat the heavy cream over medium heat until it just begins to simmer. You’ll see little bubbles forming around the edges. Don’t let it boil vigorously.
3. Immediately pour the hot cream over the chopped chocolate. Let it sit, untouched, for 2-3 minutes. This is the patience step! Let the heat do its work.
4. Now, take a whisk and start stirring gently from the center outward until you have a smooth, shiny, magical substance known as ganache. Let it cool at room temperature, stirring occasionally, until it thickens to a spreadable consistency, like peanut butter. This can take about 45-60 minutes.
Step 4: The Grand Assembly!
1. Place one completely cooled cake layer on your serving plate or cake stand. If you’re a perfectionist, you can put a little dollop of mousse or ganache on the plate first to keep the cake from sliding.
2. Scoop all of your chilled chocolate mousse onto the first layer and spread it evenly with an offset spatula or the back of a spoon, going right to the edges.
3. Carefully place the second cake layer on top. Gently press down to secure it.
4. Pour and spread your thickened ganache over the top of the cake. I love a “naked cake” look, so I let a little drizzle run down the sides casually. You can cover the entire cake if you prefer! Get creative with it.
5. For the cleanest slices, chill the assembled cake for at least 1 hour before serving. This sets the mousse and ganache perfectly.
How to Serve This Showstopper
Presentation is part of the fun! For a real “wow” moment, serve this cake on a simple, elegant cake stand. When you’re ready to slice, take a large, sharp knife and run it under hot water. Wipe it dry, then make your cut. This hot knife will glide through the ganache and mousse like a dream, giving you those picture-perfect, clean slices.
I like to keep the garnish simple to let the chocolate shine. A light dusting of cocoa powder, a few fresh raspberries on the side (their tartness is amazing with the rich chocolate), or a scattering of chocolate shavings. A dollop of barely-sweetened whipped cream is never a bad idea, either. Pour a glass of cold milk, a strong coffee, or even a nice red wine, and get ready for the compliments to roll in.
Make It Your Own: Fun Flavor Twists
This recipe is a fantastic canvas for your creativity! Here are a few of my favorite ways to mix it up:
- Orange Zest Dream: Add the zest of one large orange to the cake batter and a tablespoon of orange liqueur (like Grand Marnier) to the ganache for a classic, vibrant pairing.
- Mocha Madness: For the coffee lovers, dissolve 1 tablespoon of instant espresso powder (instead of 1 tsp) into the hot water for the cake, and add a teaspoon to the ganache for a powerful mocha kick.
- Mint Chocolate Chip: Add ½ teaspoon of peppermint extract to the mousse layer and fold in ¼ cup of mini chocolate chips for a refreshing, fun twist.
- Raspberry Ripple: Before adding the mousse layer, spread a thin layer of seedless raspberry jam on the bottom cake layer. The sweet-tart jam cutting through the chocolate is pure magic.
- Gluten-Free Swap: Easily make this gluten-free by using a 1:1 gluten-free all-purpose flour blend. I’ve had great results with this!
Jackson’s Kitchen Confidential
This cake has evolved so much from my first attempt, which I lovingly call “The Leaning Tower of Chocolate.” My mousse was too soft, my ganache was too runny, and the whole thing slid apart! But that’s the beauty of cooking—it’s a delicious experiment. The biggest lesson I learned? Patience. Letting the cakes cool completely and letting the ganache thicken are non-negotiable steps for success. Now, this cake is my go-to for birthdays, holidays, and any time I need to impress. It’s seen more “oohs” and “aahs” than I can count, and it never, ever lasts more than a day in my kitchen. The best sound in the world is the silence that falls over the table when everyone takes their first bite.
Your Questions, Answered!
Q: My ganache is too runny! How can I fix it?
A: Don’t panic! It just needs time. Let it sit at room temperature for another 15–30 minutes, stirring occasionally until it thickens to a spreadable consistency. If you’re short on time, pop it in the fridge for 10–15 minutes—but keep a close eye on it so it doesn’t harden too much.
Q: My mousse feels grainy—what happened?
A: That usually means the chocolate was too hot when you folded it into the whipped cream. Next time, let the melted chocolate cool for 5–10 minutes until it’s just warm to the touch before combining. You can still save this batch by gently folding in a few extra spoonfuls of whipped cream to smooth it out.
Q: Can I make the cake ahead of time?
A: Absolutely! You can bake the sponge layers a day in advance and store them tightly wrapped at room temperature. The mousse and ganache can be made the same day as assembly. The fully built cake keeps beautifully in the fridge for up to 3 days—just let it sit at room temperature for 20 minutes before serving for the best texture.
Q: Can I freeze this cake?
A: Yep! Freeze the cake (without the ganache) wrapped tightly in plastic and foil for up to 2 months. Thaw in the fridge overnight, then add the mousse and ganache fresh for the best flavor and texture.
Let’s Talk Nutrition (Because Indulgence Deserves Context)
Alright, I won’t pretend this cake fits into the “light dessert” category—it’s an indulgence, and proudly so. Each slice (based on 12 servings) comes in around 530 calories, with 60g carbs, 28g fat, and 7g protein. But it’s also rich in antioxidants from dark chocolate, and let’s be honest—some desserts feed the soul first and the body second.
If you want to make it a touch lighter, use half-and-half instead of heavy cream in the ganache, or swap half the oil for unsweetened applesauce in the cake. It won’t lose its magic, promise.
Final Thoughts
And there it is—your Triple Chocolate Ganache Cake, the ultimate chocolate lover’s dream come to life. 🍫 It’s rich, silky, and so satisfying you’ll close your eyes with every bite. More than a dessert, it’s an experience—a love letter to chocolate, patience, and the joy of sharing something beautiful you made with your own hands.
So go ahead, whisk, pour, and spread with confidence. Whether it’s a birthday, a dinner party, or just a random Tuesday that needs a little sparkle, this cake delivers that “wow” moment every single time.
Because here at Food Meld, we don’t just bake—we build memories, one decadent slice at a time.


