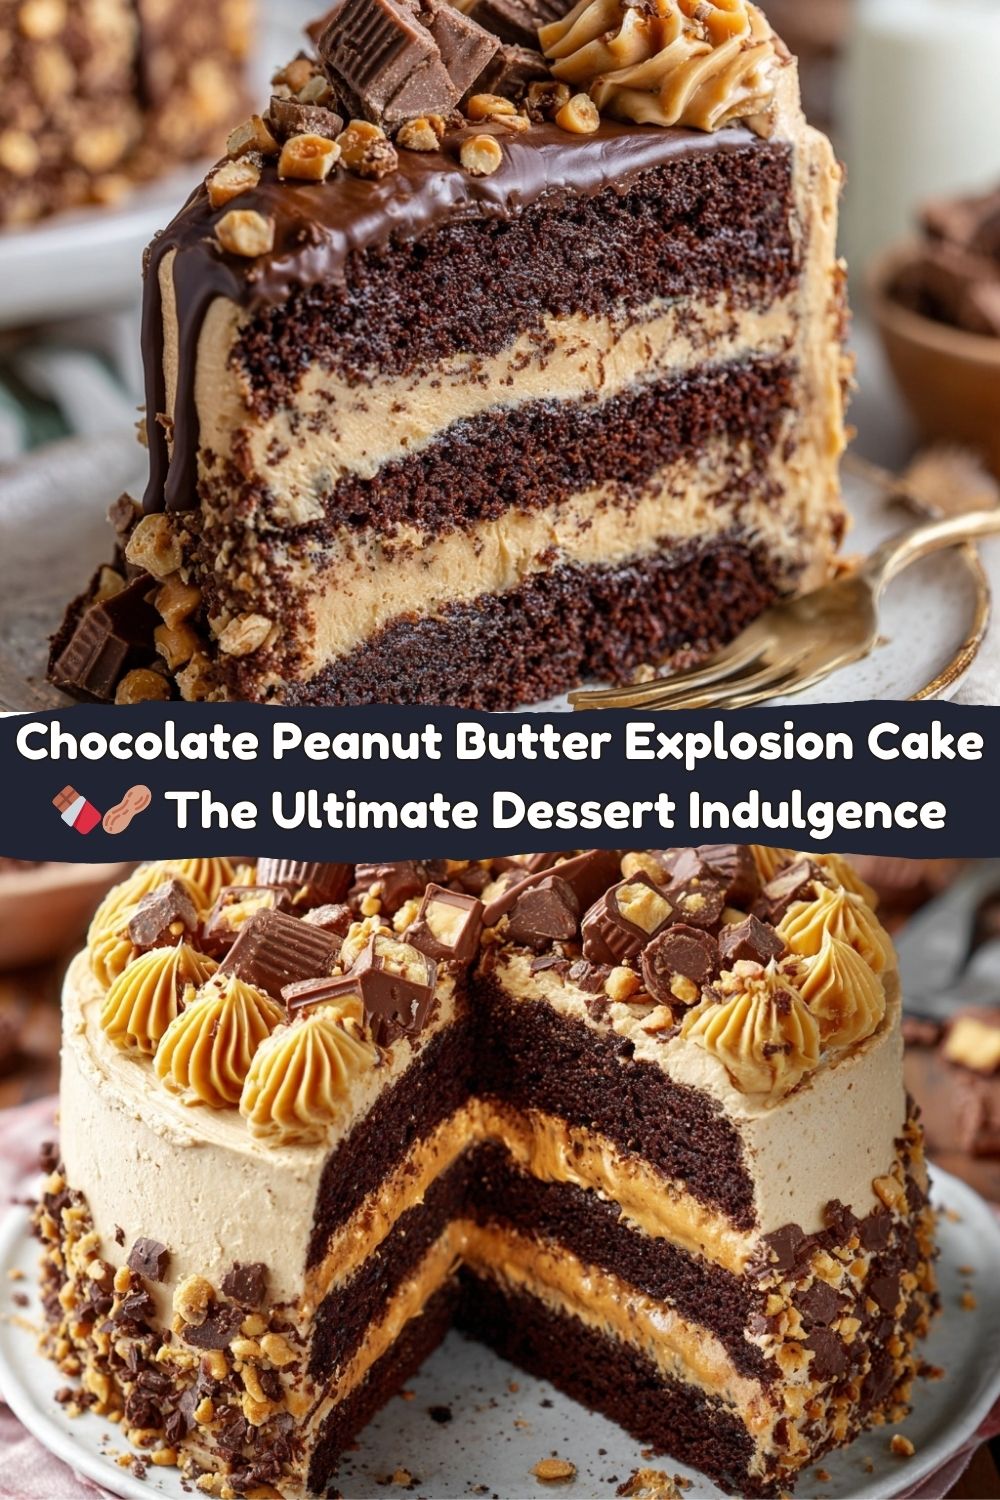
Chocolate Peanut Butter Explosion Cake: Your New Favorite Dessert
Hey friends, Jackson from Food Meld here. Let’s get straight to the point: if you’ve ever found yourself staring into the pantry, caught in that epic tug-of-war between the jar of peanut butter and the bar of dark chocolate, this cake is your ultimate peace treaty. No, scratch that—it’s a full-blown flavor alliance. This is the Chocolate Peanut Butter Explosion Cake, and it’s everything the name promises and more.
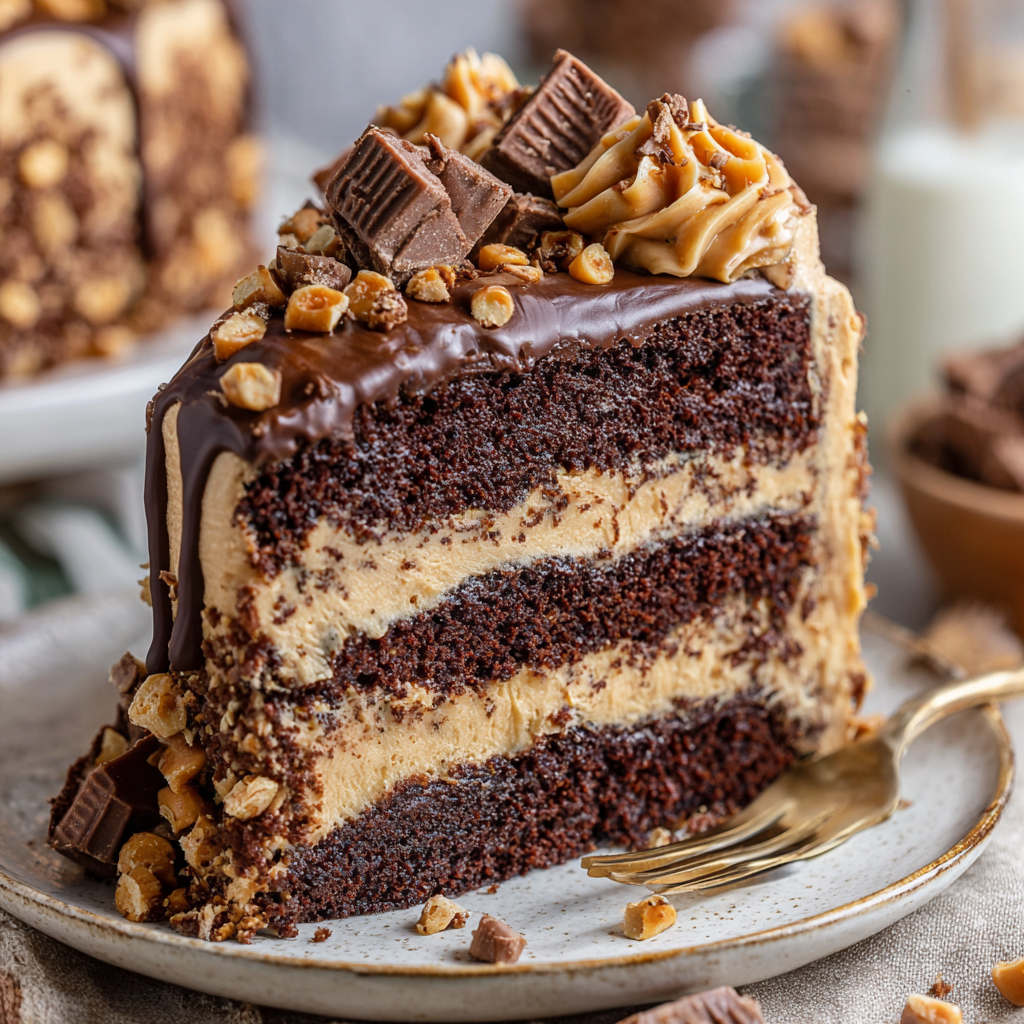
We’re talking about layers of the richest, moistest, “how-is-this-so-chocolatey” chocolate cake you’ve ever made. Sandwiched between those layers? A cloud of the creamiest, dreamiest, slightly-salty peanut butter frosting that’ll make you want to eat it with a spoon straight from the bowl (no judgment here, I do it all the time). And the “explosion” part? That comes from the generous handfuls of chopped Reese’s cups we’re folding and sprinkling everywhere—in the frosting, between the layers, and all over the top for that perfect crunch and sweet, peanutty surprise in every single bite.
This isn’t just a cake; it’s an experience. It’s the show-stopping centerpiece for birthdays, the dessert that gets you invited to every potluck, and the ultimate “I-love-you” or “I-had-a-rough-day” treat. I’ve tested this recipe more times than I can count, and I can promise you: it’s foolproof, fun to make, and delivers that unforgettable, “you’ve gotta try this” moment we’re always chasing here at Food Meld. So, tie on your apron, and let’s cook something awesome together.
A Slice of My Childhood: Where It All Began
This cake takes me right back to my Grandma Mae’s kitchen, a place that always smelled like something wonderful was in the oven. She wasn’t a fancy baker, but she was a genius when it came to making you feel loved through food. Her signature move was a simple, from-a-box chocolate cake, but she’d always, without fail, serve it with a giant spoonful of her homemade peanut butter frosting on the side. It was my favorite part of any visit.
I’d sit at her formica table, watching her whip that frosting, and the second she set the bowl down, I’d swipe a finger through it. She’d pretend to scold me, but her eyes would twinkle. That combination of rich chocolate and salty-sweet peanut butter felt like a secret handshake between us. This Chocolate Peanut Butter Explosion Cake is my grown-up, “what if we tried this?” tribute to her. It’s that same soul-warming combo, but I’ve turned the volume all the way up by baking the peanut butter right into the heart of the experience. Every time I make it, I think of her, and I hope this recipe becomes a part of your own kitchen stories, too.
Gathering Your Flavor Arsenal
Here’s everything you’ll need to create this masterpiece. Don’t stress about fancy ingredients—this is all about bold, comforting flavors. I’ve added a few chef insights and swaps to make it your own.
For the Chocolate Cake:
- 2 cups all-purpose flour: The sturdy foundation of our cake. For a slightly denser, fudgier crumb, you can swap in 1 cup of cake flour, but all-purpose works perfectly.
- ¾ cup unsweetened cocoa powder: This is where the deep chocolate flavor lives! Use a good-quality cocoa powder—it makes a world of difference. I prefer Dutch-processed for its smoother, less acidic taste.
- 1 ½ tsp baking powder & 1 ½ tsp baking soda: Our dynamic leavening duo. The baking powder gives it lift, and the baking soda reacts with the cocoa and buttermilk for a beautiful, tender rise. Make sure they’re fresh!
- ½ tsp salt: Crucial for balancing all that sweetness and making the chocolate flavor pop. Don’t you dare skip it.
- 1 ¾ cups sugar: Sweetens the deal. I use regular granulated sugar here.
- 2 large eggs: They bring structure and richness to the party. Make sure they’re at room temperature for a smoother batter.
- 1 cup buttermilk: The secret weapon for an incredibly moist and tender crumb. No buttermilk? No problem! Make a quick “sour milk” by adding 1 tablespoon of white vinegar or lemon juice to a cup of regular milk and let it sit for 5 minutes.
- ½ cup vegetable oil: Oil keeps this cake supremely moist, even the next day. Canola or a light olive oil work great too.
- 1 cup hot water: This is my little chef hack! The hot water “blooms” the cocoa powder, intensifying its chocolate flavor and helping to create a thin, flowing batter that bakes up beautifully.
- 1 tsp vanilla extract: The flavor enhancer that rounds everything out.
For the Peanut Butter Frosting:
- 1 cup creamy peanut butter: Use a standard, no-stir kind like Jif or Skippy for the creamiest, most stable frosting. Natural peanut butter can be a bit oily and separate.
- ½ cup (1 stick) unsalted butter, softened: Unsalted lets you control the salt level. And “softened” is key! It should be at room temperature so it creams perfectly with the peanut butter.
- 3 cups powdered sugar: This gives our frosting its structure and sweetness. Sift it if you have time to avoid lumps!
- 2–3 tbsp milk or heavy cream: This is for getting the perfect, spreadable consistency. Heavy cream will make it extra rich and decadent.
- 1 tsp vanilla extract: A must for any great frosting.
For the Explosion Topping & Filling:
- 1 cup chopped Reese’s Peanut Butter Cups: The star of the show! I like using the mini cups because they’re easy to chop, but any kind will work. Freeze them for 10 minutes before chopping to make it less messy.
- Optional: Chocolate Ganache Drizzle: For the overachievers (I see you!). Just melt ½ cup of chocolate chips with ¼ cup of heavy cream and stir until smooth.
Let’s Build This Beauty: Step-by-Step
Alright, team, let’s get our hands dirty. This process is simple, but I’m walking you through every step with my favorite kitchen hacks to ensure cake-baking success.
- Preheat and Prep. Fire up your oven to 350°F (175°C). Now, let’s get those pans ready. Grease two 8-inch round cake pans with a little butter or non-stick spray, then line the bottoms with a circle of parchment paper. This is my non-negotiable tip for guaranteeing your cakes will release perfectly. No more cake-wreck heartbreaks!
- Whisk the Dry Team. In a medium bowl, grab your whisk and thoroughly combine the flour, cocoa powder, baking powder, baking soda, and salt. Whisking now ensures all those leaveners are evenly distributed, so you don’t get a bitter bite of baking soda in your slice. Set this bowl aside—this is your dry team.
- Combine the Wet Team. In a large mixing bowl, combine the sugar, eggs, buttermilk, vegetable oil, and vanilla extract. Use an electric mixer on medium speed (or a heck of a lot of elbow grease with a whisk) until it’s smooth and well-blended. Now, carefully stream in the hot water while mixing on low. The batter will be thin—this is totally normal and exactly what we want! Don’t panic.
- Bring the Teams Together. Gradually add your dry ingredients to the wet ingredients, mixing on low speed until *just* combined. Please, I’m begging you, do not overmix! A few small lumps are FINE. Overmixing develops gluten and leads to a tough, dense cake. We want light and tender.
- Bake to Perfection. Evenly divide the batter between your prepared pans. Pop them in the preheated oven and bake for 30-35 minutes. You’ll know they’re done when the tops are springy to the touch and a toothpick inserted into the center comes out with a few moist crumbs, not wet batter. Rotate the pans halfway through for an even bake.
- The Patience Test (Aka Cooling). This is the hardest part. Let the cakes cool in their pans on a wire rack for about 15 minutes. Then, run a knife around the edge, invert them onto the rack, peel off the parchment paper, and let them cool completely. I mean it—completely! Frosting a warm cake is a recipe for a melty, slidey disaster.
- Whip Up That Dreamy Frosting. While the cakes are cooling, let’s make the peanut butter cloud. In a clean bowl, beat the softened butter and peanut butter together on medium-high speed until it’s super smooth and creamy, about 2 minutes. Gradually add the powdered sugar, one cup at a time, on low speed (unless you want a powdered sugar snowstorm in your kitchen). Then, add the vanilla and 2 tablespoons of milk/cream. Beat on high speed for 2-3 minutes until it’s light and fluffy. If it’s too thick, add the extra tablespoon of milk.
- Assemble the Explosion! Place one completely cool cake layer on your serving plate. Spread a generous layer of peanut butter frosting on top. Now, for the magic—sprinkle a hefty handful of those chopped Reese’s cups over the frosting. Gently place the second cake layer on top. Frost the top and sides of the cake with the remaining frosting. Don’t worry about it being perfectly smooth—a few rustic swirls look fantastic. Pile the remaining chopped Reese’s on top of the cake, pressing them gently into the frosting. If you’re going for the ganache drizzle, now’s the time to let it artfully drip down the sides.
How to Serve This Masterpiece
Presentation is part of the fun! For a real “wow” factor, I love serving this on a simple cake stand. When you cut the slices, use a sharp knife that you dip in hot water and wipe clean between cuts—this gives you those gorgeous, clean layers.
This cake is rich, so a modest slice is plenty. I like to serve it with a cold glass of milk, a strong cup of black coffee to cut through the sweetness, or even a scoop of vanilla bean ice cream on the side for the ultimate indulgence. It’s a celebration all on its own, so just gather your favorite people and dig in.
Make It Your Own: Flavor Twists & Swaps
This recipe is a fantastic canvas for your creativity. Here are a few of my favorite ways to mix it up:
- The Salty Sweet Supreme: Use crunchy peanut butter in the frosting and garnish the top with a sprinkle of flaky sea salt along with the Reese’s. Trust me on this one.
- The Cookie Lover’s Dream: Fold ½ cup of crushed Nutter Butter cookies or Oreos into the frosting along with the Reese’s for an extra layer of texture and flavor.
- The Peanut Butter Cup Overload: Go all in! Add a whole layer of mini Reese’s cups in between the cake layers instead of just sprinkling them. It’s a peanut butter cup wall of glory.
- Gluten-Free Friendly: Swap the all-purpose flour for a 1:1 gluten-free baking blend. I’ve had great success with Bob’s Red Mill and Cup4Cup brands.
- Different Candy, Different Vibe: Not a Reese’s fan? (I don’t get it, but I respect it). Swap in chopped Snickers for a caramel twist, or Butterfingers for a crunchy, honey-roasted peanut flavor.
Jackson’s Kitchen Notes & Stories
This cake has been through a few iterations in my kitchen. The first time I made it, I got a little overzealous and added *whole* mini Reese’s inside. Let’s just say the structural integrity was… questionable. It was delicious, but it leaned like the Tower of Pisa. Chopping them is definitely the way to go for both structure and that perfect bit of candy in every forkful.
I also learned the hard way about cooling the cakes completely. I was in a rush for a party once and tried to frost a slightly warm layer. Let’s just say my beautiful two-layer cake turned into a “deconstructed” trifle in a bowl. It still tasted amazing, but it taught me a valuable lesson in patience! The journey is all part of the fun.
Your Questions, Answered
Q: Can I make this cake ahead of time?
A: Absolutely! You can bake the cake layers a day in advance. Let them cool completely, then wrap them tightly in plastic wrap and store at room temperature. You can also make the frosting ahead and store it in an airtight container in the fridge for up to 2 days. Just let it come to room temperature and re-whip it before frosting the cake.
Q: My cake is dense and didn’t rise much. What happened?
A: The most common culprits are old baking powder/soda or overmixing the batter. Always check the expiration date on your leaveners! And remember, mix the dry and wet ingredients until they are *just* combined. A few lumps are your friend.
Q: Can I use natural peanut butter for the frosting?
A: I don’t recommend it. Natural peanut butters tend to be oilier and can separate, leading to a greasy, less stable frosting that might not hold its shape. For the best, creamiest results, stick with a conventional creamy peanut butter like Jif or Skippy.
Q: My frosting is too thick/too thin. How can I fix it?
A> Too thick? Add more milk or cream, one teaspoon at a time, until it reaches your desired consistency. Too thin? Add a little more powdered sugar, a ¼ cup at a time, until it thickens up.
Nutritional Information*
Alright, let’s be real—this is a celebration dessert, not a salad. But I believe in transparency! Here’s a rough breakdown per slice (based on 12 servings).
- Calories: ~580
- Total Fat: 30g
- Saturated Fat: 11g
- Carbohydrates: 72g
- Sugar: 55g
- Protein: 9g
*This is an estimate generated using a nutrition calculator and can vary based on specific ingredients and brands used. So, enjoy every glorious, indulgent bite without guilt!
Final Thoughts
And there you have it — the Chocolate Peanut Butter Explosion Cake, in all its over-the-top, melt-in-your-mouth glory. 🍫🥜 This is the kind of dessert that reminds you why baking is pure joy — a little messy, a little dramatic, and completely worth every minute.
Whether you’re celebrating something big or just need a dose of happiness on an ordinary day, this cake delivers every single time. It’s indulgent without apology, nostalgic with every bite, and guaranteed to spark smiles from anyone lucky enough to grab a slice.
So grab your spatula, turn up the music, and bake your heart out. Because life’s too short not to enjoy cake — especially this one. ❤️


