Let’s Make Some Magic!
Hey friends, Jackson here from Food Meld! Let’s talk about a dessert that’s pure, unadulterated joy. I’m talking about cake pops. But not just any cake pops—we’re making Colorful Chocolate Cake Pops with Cream Cheese Frosting that are so vibrant, so packed with flavor, they’re basically a party on a stick.
Now, I know what some of you might be thinking: “Jackson, cake pops look amazing, but they seem… finicky.” I hear you. The first time I tried to dip one, it was a comedy of errors—cake balls sliding off sticks, clumpy coating, sprinkles everywhere except on the pop. But I’ve been through the messy trials so you don’t have to. I’ve perfected a method that’s simple, reliable, and honestly, a whole lot of fun. We’re using a boxed cake mix as our trusty sidekick (no shame in that game!) and elevating it with a from-scratch cream cheese frosting that is an absolute game-changer. It adds a tangy richness that makes these pops truly unforgettable.
This recipe is your new secret weapon for birthdays, baby showers, holidays, or just a Tuesday that needs a little sparkle. They’re the kind of treat that makes people’s eyes light up. So, grab your apron, and let’s turn simple ingredients into something seriously spectacular. Welcome to Food Meld—where flavor meets fun, and today, we’re meeting it on a stick!
A Sweet Slice of Nostalgia
My love for these little guys goes way back. I remember the first time I truly appreciated a well-made cake pop. It wasn’t in a fancy bakery; it was at my niece’s 5th birthday party. She had chosen a “Rainbow Unicorn” theme, and my sister, in a fit of ambitious inspiration, decided to make a hundred cake pops by herself. I walked into her kitchen, and it looked like a rainbow had exploded. There were bowls of colored candy melts everywhere, and she had this look of determined, flour-dusted exhaustion on her face.
I rolled up my sleeves and jumped in. We spent the next two hours dipping, decorating, and laughing as we tried to out-do each other with the most outrageous sprinkle combinations. The moment of truth came when the birthday girl saw them. Her gasp, that wide-eyed wonder, was everything. It wasn’t just about the sugar; it was the magic we created together. That’s the spirit I want to bring to your kitchen. It’s not about perfection; it’s about the joy of making something beautiful and delicious with your own two hands. Every time I make a batch, I think of that day and smile. Now, let’s create that same magic for you.
Gathering Your Flavor Arsenal
Here’s the lineup. The beauty of this recipe is its flexibility. We’re building a fantastic foundation with a box mix, then making it uniquely ours with that killer frosting and colorful coating.
For the Cake Pops:
- 2 boxes chocolate cake mix – This is our flavor base and a huge time-saver. I like a classic devil’s food for that deep chocolate hit.
- Eggs, oil, and water – As required by your cake mix boxes. This is our “get the party started” trio.
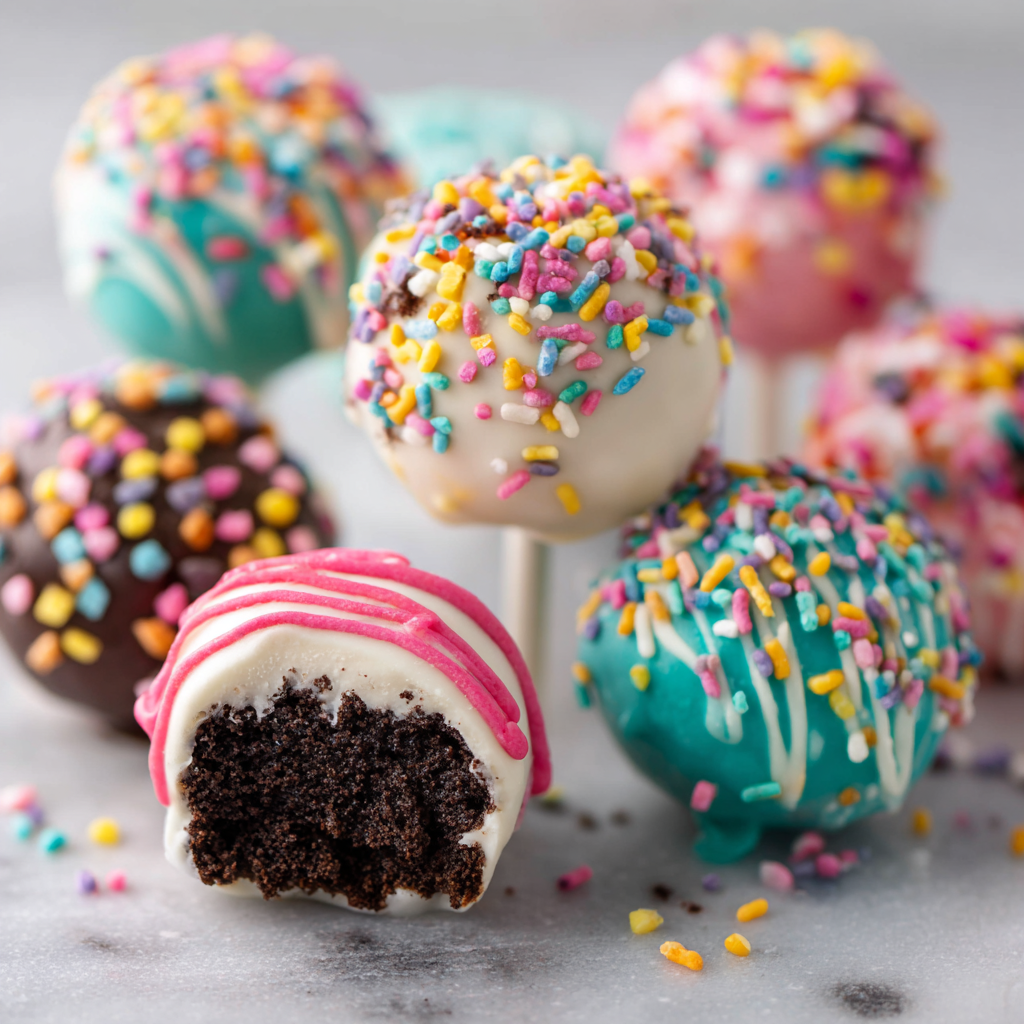
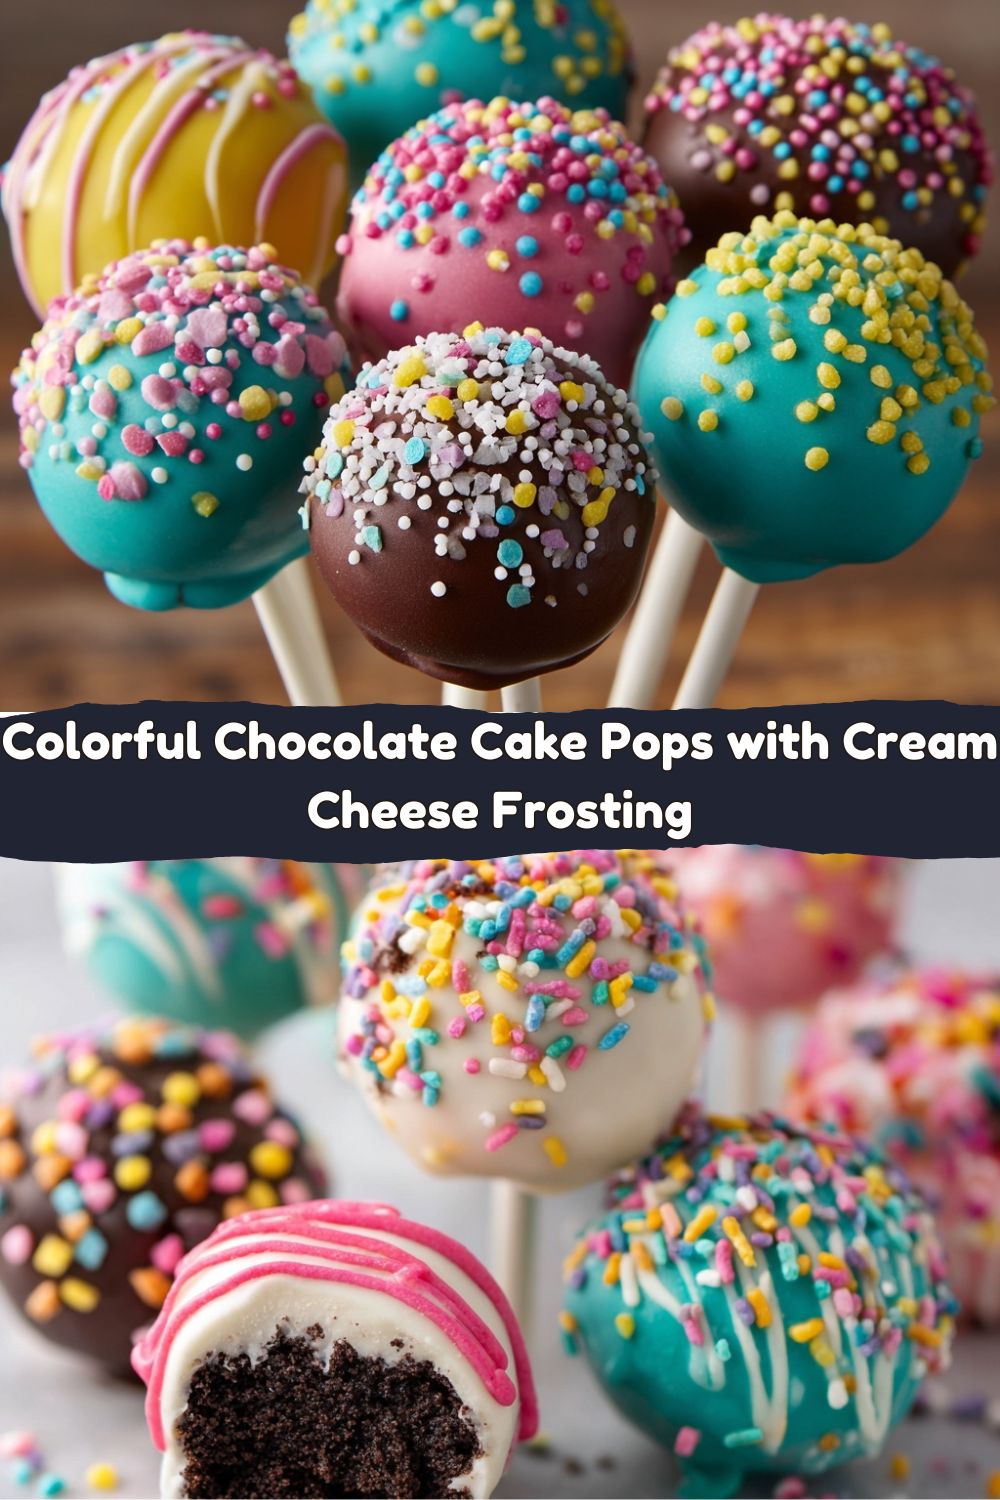
- 24 oz chocolate or colored candy melts – This is where the color magic happens! You can find these in the baking aisle in pink, teal, blue, purple—you name it. I’m using a mix of pink, teal, and white for a really fun, vibrant look.
- Sprinkles in matching colors – The finishing touch! They add texture and that extra “wow” factor.
For the Cream Cheese Frosting (The Secret Weapon!):
- 1 cup salted butter, softened – Chef’s Insight: Using salted butter balances the sweetness perfectly. If you only have unsalted, just add a tiny pinch of salt to the mix.
- 16 oz cream cheese, softened – This is non-negotiable! Make sure it’s at room temperature, or you’ll end up with a lumpy frosting. Trust me, I’ve learned this the hard way.
- 4 tsp vanilla extract – A generous pour adds a beautiful, warm aroma that makes the chocolate sing.
- 6 cups powdered sugar – Substitution Tip: If you want a less sweet frosting, you can start with 4 cups and add more to your desired consistency and taste. We’re looking for fluffy but holdable!
Let’s Get Building: Your Step-by-Step Guide
Okay, team. This is where the fun begins. Follow these steps, and you’ll be a cake pop pro in no time. I’ve included all my little hacks to make sure your pops are sturdy, smooth, and stunning.
- Bake the Cakes. Prepare and bake both cake mixes according to the package directions in two 9-inch round pans. Let them cool completely. I’m talking totally, utterly cool. If they’re even slightly warm, they’ll turn into mush when you mix in the frosting. Chef’s Hack: To speed this up, once the pans are cool to the touch, pop them in the fridge for 30 minutes.
- Whip Up That Frosting. While the cakes are cooling, let’s make the good stuff. In a large bowl, beat the softened butter and cream cheese together with an electric mixer until it’s super smooth and there are zero lumps. Add the vanilla extract and give it a quick mix. Now, with the mixer on low, gradually add the powdered sugar. Once it’s incorporated, crank that mixer to medium-high and beat for 2-3 minutes until it’s light and fluffy. This is your moment to taste-test. You’ve earned it.
- Form the Cake Balls. Here’s the fun, hands-on part. Crumble the completely cooled cakes into a large bowl. You want fine crumbs—no big chunks. Now, start adding the frosting a big spoonful at a time. Use your hands to mix it in! It’s messy, but it’s the best way to feel the texture. Stop adding frosting when the mixture holds together when you squeeze it, like a damp, moldable dough. You may not need all the frosting. Pro Tip: Use a cookie scoop to portion out the mixture for perfectly uniform balls. Roll them between your palms to smooth them out, about 1.5 inches each. Place them on a baking sheet lined with parchment paper.
- The Chill-Out Session. This is the most important step for dip-able pops! Pop the entire baking sheet into the freezer for at least 1 hour. They need to be firm and cold. This keeps them from falling apart when we dip them.
- The Big Dip! Now for the main event. Melt your candy melts in separate microwave-safe bowls according to the package directions. Usually, it’s 30-second intervals, stirring well each time. Chef’s Hack: If your coating seems too thick for dipping, add a teaspoon of coconut oil or shortening to thin it out. It makes for a much smoother, prettier coating. Take a cake pop stick, dip the tip about ½ inch into the melted coating, and then push it into a cake ball about halfway through. This “glues” the stick in place. Now, holding the stick, dip the entire cake ball into the coating. Gently tap your wrist against the side of the bowl to let the excess coating drip off. Do not stir it around! This is the key to a smooth finish.
- Decorate and Set. While the coating is still wet, immediately decorate with your sprinkles. To let them set upright, you can stick them into a block of styrofoam, a cardboard box with holes poked in it, or even an upside-down colander. Get creative! Let them set completely at room temperature.
Showing Off Your Masterpieces
You’ve created edible art—let’s display it that way! For a party, I love sticking a whole bunch of them into a large, decorated styrofoam block in the center of the table. It becomes an instant, gorgeous centerpiece. For a more rustic look, arrange them in mason jars filled with sugar or coffee beans to hold them upright. They also look fantastic laid flat on a beautiful platter, but just be gentle so you don’t mess up that perfect coating.
These pops are rich, so they pair beautifully with a hot cup of coffee to cut the sweetness or a cold glass of milk for the ultimate nostalgic treat. Serve them with a big smile, because you just made something incredible.
Mix It Up! Creative Twists on the Classic
Once you’ve mastered the basic method, the flavor world is your oyster! Here are a few of my favorite ways to mix it up:
- Cookies & Cream: Use a vanilla cake mix and mix in 1 cup of crushed Oreo cookies with the frosting. Dip in white chocolate and sprinkle with more Oreo crumbs.
- Lemon Berry Bliss: Use a lemon cake mix and mix in ½ cup of freeze-dried raspberry powder with the cake crumbs. Dip in white chocolate for a tangy, fruity pop.
- Salted Caramel Pretzel: After dipping your chocolate pops in dark chocolate, drizzle with caramel sauce and immediately press a tiny piece of pretzel on top. The sweet and salty combo is killer.
- Funfetti Surprise: Use a funfetti cake mix and vanilla frosting. Dip in pastel-colored candy melts and go wild with rainbow sprinkles. Pure happiness.
- Dietary Swap – Gluten Free: Super easy! Just use your favorite gluten-free chocolate cake mix and ensure your candy melts are certified gluten-free. The method is exactly the same.
Jackson’s Kitchen Notes
This recipe has evolved so much in my kitchen. The first time, I used canned frosting, and while it worked, the flavor was just… one-note. Switching to my from-scratch cream cheese frosting was the “Aha!” moment. It adds a complexity that makes people go, “Wow, what is *in* these?!”
A funny story: I once decided to make a triple batch for a friend’s wedding. I was so focused, I didn’t realize I had gotten a tiny bit of green candy melt on my nose. I proceeded to film a quick video for my Instagram stories, talking all seriously about the “technique,” completely unaware of my new Shrek-like feature. The comments were… enlightening. So, learn from me—check your reflection before you go on camera after a dipping session!
FAQs & Cake Pop SOS
Hit a snag? Don’t worry. I’ve got your back.
Q: My cake balls are cracking when I dip them! What did I do wrong?
A: This usually means your cake balls are too cold or your coating is too hot. Let the cake balls sit at room temperature for 5-10 minutes before dipping, and make sure your melted candy isn’t piping hot. A slight temperature difference is all it takes.
Q: Why are my cake pops falling off the stick?
A: Two main culprits: 1) You didn’t “glue” the stick in with a dab of coating first. That initial seal is crucial! 2) The cake ball was too heavy because you used too much frosting, making the mixture too soft. The texture should be like Play-Doh, not gooey.
Q: Can I make these ahead of time?
A: Absolutely! They are the perfect make-ahead dessert. Once fully set, store them in a single layer in an airtight container in the fridge for up to a week. You can also freeze them for up to a month! Just thaw in the fridge overnight.
Q: My candy melts are thick and clumpy. How can I fix them?
A: This is super common. Don’t add water or milk! Instead, stir in a teaspoon of coconut oil or vegetable shortening at a time until it reaches a smooth, dippable consistency. It works like a charm.
Nutritional Info (For Your Inner Foodie)
Hey, we’re all about balance here! While these are a treat, it’s good to know what you’re enjoying. This is an approximation per cake pop, but remember, the exact numbers can vary based on the specific brands you use.
Approximate Nutrition Per Pop: 160 calories | 9g fat | 18g carbs | 2g protein
They’re rich, so one is often enough to satisfy that sweet tooth. The protein comes from the eggs in the cake and the cream cheese, giving you a little staying power beyond a pure sugar rush. Enjoy them mindfully and savor every single bite!
You Did It!
Look at you, you cake pop champion! You took a simple box mix and transformed it into a stunning, professional-looking dessert that’s bursting with personality and flavor. That’s what Food Meld is all about—taking the familiar, adding a creative twist and a whole lot of heart, and ending up with something truly special.
I hope you had as much fun making these as I do. Remember, the little imperfections are what make them yours. So the next time you need a show-stopping dessert for a party, or just want to brighten someone’s day, you know exactly what to do. You’ve got this.
Now, I’d love to see your creations! Tag me on Instagram @FoodMeld with your colorful pops. Until next time, keep mixing it up and enjoying every bite. Let’s cook something awesome together again soon!
– Jackson


