Forget the Drive-Thru, Let’s Make Magic!
Hey friends, Jackson from Food Meld here! Ever find yourself standing in that famously long Starbucks line, your eyes drifting towards that little glass case by the register? You know the one. It’s filled with those impossibly cute, perfectly round cake pops, smiling back at you with their pastel coatings and cheerful sprinkles. You grab one, and in three blissful bites, it’s gone—leaving you with a sweet tooth and a slightly lighter wallet.
What if I told you that you don’t need a barista to get your fix? What if you could create a whole *batch* of these sweet, soft, pretty-in-pink delights right in your own kitchen, for a fraction of the cost? And the best part? They’ll taste even better because you made them.
Today, we’re diving headfirst into my copycat Starbucks Cake Pop recipe. This isn’t about complicated pastry techniques or fancy tools. This is about having a blast in the kitchen, getting your hands a little messy, and creating something that’s guaranteed to bring a smile to everyone’s face. We’re talking moist, vanilla cake mixed with creamy frosting, dipped in a sleek pink candy shell, and finished with those iconic white sprinkles. They’re fun to make, absolutely delicious, and perfect for parties, gifting, or just treating yourself after a long day. So, tie on your apron, and let’s cook something awesome together!

The Cake Pop That Started It All
I’ll never forget the first time I truly *saw* a cake pop. It wasn’t at a coffee shop; it was at my niece’s 5th birthday party. She marched right up to me, her face smeared with pink frosting, and shoved this little lollipop-looking thing right under my nose. “Uncle Jack,” she declared, her eyes wide with seriousness, “this is the best thing in the whole world. It’s cake… on a STICK!”
I took a bite, and her logic was flawless. It *was* the best thing. But my chef brain immediately started whirring. “I can make these,” I thought. “I can make them even more ‘you’ve gotta try this!'” My first batch was… well, let’s call it a “learning experience.” They were lumpy, the coating was too thick, and I definitely created a sprinkles avalanche. But seeing the pure, unadulterated joy on my niece’s face when I presented her with a whole plate of them? That was it. That’s the “Food Meld” moment I live for—taking something beloved and making it your own, with a little bit of “what if we tried this?” energy. Now, every time I make these, I think of her, and I know we’re about to create another sweet memory.
Gathering Your Cake Pop Crew
Here’s the beautiful part about this recipe: we’re starting with a simple boxed cake mix. No shame in the game! It’s a fantastic shortcut that guarantees a moist, consistent cake every single time, which is the absolute foundation of a great cake pop. Here’s everything you’ll need:
- 2 boxes vanilla cake mix (plus ingredients listed on box): I like to use a classic vanilla for that authentic Starbucks vibe. The boxes usually call for oil, water, and eggs. Using two boxes might seem like a lot, but trust me, you’ll want a big batch!
- ⅔ cup French vanilla frosting: This is our “glue.” The creamy frosting binds the crumbled cake together, adding moisture and that signature soft, almost truffle-like texture. Chef’s Tip: I find French vanilla has a richer, creamier flavor than straight-up vanilla, but use what you love!
- 2 bags (12 oz each) light pink candy melts: Also called candy wafers, these are the secret to that smooth, snap-able coating. They melt beautifully and set firm. Substitution Savvy: You can use white chocolate chips with a drop of pink food coloring, but you may need to add a teaspoon of coconut oil to help it thin out for dipping.
- White sprinkles (for topping): The classic finishing touch! Nonpareils or jimmies both work perfectly.
- 30 cake pop sticks: You can find these at any craft store or online. They turn cake from a snack into an experience.
- Optional Twist – ¼ tsp almond extract: My little bakery-style secret! Adding a tiny bit of almond extract to the cake or the frosting mixture gives it a deeper, more complex flavor that tastes incredibly professional.
Let’s Build Some Cake Pops!
Okay, team, this is where the fun begins. We’re going to break this down step-by-step. Read through it once, then just go with the flow. Cooking should be fun, messy, and full of those “aha!” moments. Let’s do this.
- Bake the Cakes & Let Them Cool Completely. Prepare and bake both boxes of cake mix according to the package directions, usually in a 9×13 inch pan. Chef’s Hack: I like to bake them the night before and let them cool overnight. A cool cake is much, much easier to crumble! A warm cake will turn into a gummy paste when you mix in the frosting.
- The Great Crumble. Once your cakes are totally cool, crumble them into a large bowl. You can use your hands (my preferred, messy method) or a fork. You want fine, even crumbs—no big chunks! This ensures every single cake pop has a uniform, delightful texture.
- Mix in the Frosting. Now, add your ⅔ cup of French vanilla frosting (and that optional almond extract if you’re using it). Start by mixing it with a spatula, but don’t be afraid to dive in with your hands! You’re looking for a texture that resembles a thick, moist Play-Doh. It should hold together firmly when you pinch it. Pro Tip: You may not need the entire ⅔ cup. Add it gradually until the mixture holds together easily.
- Roll ‘Em Up! Using a small cookie scoop or a tablespoon, portion out the mixture and roll it into smooth, 1-inch balls. Place them on a baking sheet lined with parchment paper. Consistency is key here for that professional look!
- The Chill Factor. This step is NON-NEGOTIABLE. Pop the entire tray of cake balls into the freezer for 30-45 minutes. You want them firm and cold, but not frozen solid. This chilling step is what prevents them from falling apart when you dip them. It’s the difference between a cake pop and a cake flop!
- Melt the Coating. While the balls are chilling, melt your pink candy melts in a microwave-safe bowl. Heat in 30-second intervals, stirring thoroughly each time, until completely smooth. Chef’s Hack: If your coating seems too thick for dipping, stir in a teaspoon of coconut oil or vegetable shortening. This will thin it out to the perfect dipping consistency.
- Stick the Landing. Now for the engineering part! Take your chilled cake balls out of the freezer. Dip the tip of a cake pop stick about ½ inch into the melted coating, then gently push it into a cake ball, going about halfway through. The melted coating acts like edible cement, securing the stick in place. Let them set for 5 minutes so the “glue” can harden.
- The Big Dip. Holding the stick, dip a cake pop straight down into the melted coating until it’s completely submerged. Gently lift it out and, without turning it upside down, softly tap your wrist to let the excess coating drip off. This is the trick to getting a thin, even shell.
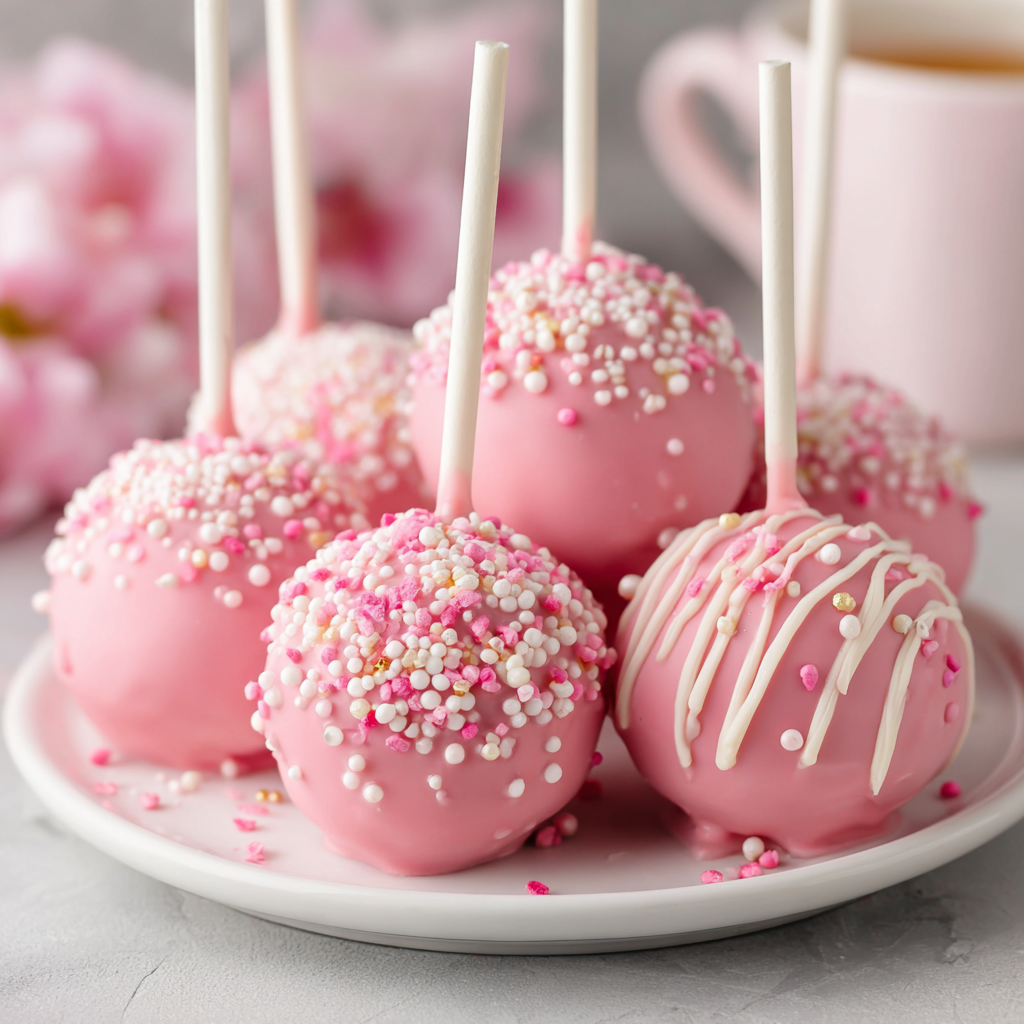
- Decorate & Set. While the coating is still wet, generously sprinkle on your white sprinkles. Then, stand the cake pop upright in a Styrofoam block, a box with holes poked in it, or a proper cake pop stand to dry completely. And voilà! You’ve just made a professional-level cake pop.
Showing Off Your Sweet Creations
You’ve crafted these beautiful little orbs of joy—now let’s present them like the stars they are! Poking them into a simple Styrofoam block works perfectly, but you can also get creative. Arrange a whole “bouquet” of them in a vase filled with sugar or coffee beans for a stunning centerpiece at a baby shower or birthday party.
For gifting, I love wrapping a few in clear cellophane bags tied with a cute ribbon. It makes for a heartfelt, homemade gift that looks like it came from a fancy bakery. And of course, the best way to serve them is right on a big platter, letting people grab their own and watch their faces light up with that first bite. They pair wonderfully with a cold glass of milk, a hot coffee, or just a big ol’ smile.
Mix It Up & Make It Yours!
The basic formula for cake pops is a blank canvas for your creativity. Once you’ve mastered the classic pink vanilla, the “what if we tried this?” world is your oyster. Here are a few of my favorite twists:
- Chocolate Lover’s Dream: Use a chocolate cake mix and chocolate frosting. Dip in dark chocolate coating and roll in crushed Oreos or chocolate sprinkles.
- Funfetti Fiesta: Use a funfetti cake mix and vanilla frosting. Dip in a colorful candy coating and roll in even more rainbow sprinkles for the ultimate party pop.
- Lemon Zing: Use a lemon cake mix and lemon frosting. Add a teaspoon of lemon zest to the mixture for an extra punch. Dip in yellow candy coating and top with yellow sanding sugar.
- Cookies & Cream: Use a vanilla or chocolate cake mix, but mix in ½ cup of crushed Oreos with the frosting. Dip in white coating and roll in fine Oreo crumbs.
- Nut-Free & Allergy-Friendly: Be sure to check your cake mix and frosting labels, but many brands are naturally nut-free. You can also find dairy-free candy melts to accommodate various dietary needs.
A Few Chef’s Secrets from My Kitchen
This recipe has evolved so much since my first lumpy batch! My biggest “aha!” moment was realizing that the freezer is your best friend. I can’t stress it enough—a cold cake ball is a happy cake ball. Another funny story: I once tried to be fancy and drizzle chocolate over the pink coating before it set. Let’s just say it looked more like abstract art than elegant stripes, and my kitchen counter resembled a modern art installation. The beauty is in the imperfect perfection! Don’t worry if your first few aren’t flawless. They will still taste incredible, and with each one, you’ll get into a rhythm. This is a recipe that truly gets better with practice.
Your Cake Pop Questions, Answered!
I’ve gotten a lot of questions about this recipe over the years, so I’ve gathered the most common ones here to help you out.
Q: Why are my cake pops cracking when I dip them?
A: This is almost always a temperature issue! If your cake balls are too cold (frozen solid) or your coating is too hot, the thermal shock can cause cracks. Make sure your balls are just firm from the freezer, not rock-hard, and that your coating is just warm to the touch, not piping hot.
Q: My cake pops are too soft and keep falling off the stick! Help!
A: This usually means one of two things: 1) You added a bit too much frosting, making the mixture too soft. Next time, add the frosting gradually. Or 2) You didn’t chill them long enough. That freezer time is crucial for structural integrity!
Q: Can I make these ahead of time?
A: Absolutely! Once fully set, you can store them in a single layer in an airtight container at room temperature for 2-3 days, or in the fridge for up to a week. They also freeze beautifully for up to 3 months. Just thaw in the refrigerator before serving.
Q: My coating is too thick and clumpy. What did I do wrong?
A: Candy melts can sometimes seize up if overheated. The fix is easy! Stir in a teaspoon of coconut oil or vegetable shortening to the melted coating. This will thin it out to a perfect, dippable consistency.

Starbucks Cake Pop Copycat : Sweet, Soft, and Pretty in Pink
- Total Time: 1 hour 40 minutes
- Yield: 30 Cake pops 1x
Description
These copycat Starbucks cake pops are just like the ones you love—soft vanilla cake mixed with creamy frosting, dipped in smooth pink candy coating, and topped with delicate white sprinkles. They’re cute, crave-worthy, and come together for a fraction of the price. Perfect for parties, gifting, or a fun kitchen project with kids.
Ingredients
2 boxes vanilla cake mix (prepared according to box directions)
⅔ cup French vanilla frosting
2 bags (12 oz each) light pink candy melts
White sprinkles (for topping)
30 cake pop sticks
Optional twist: Add a touch of almond extract to the frosting for a bakery-style flavor or use edible gold dust or heart-shaped sprinkles for a themed twist.
Instructions
Bake both cakes as directed on the box. Let cool completely.
Crumble the cakes into a large bowl using your hands or a fork.
Add frosting and mix until the texture resembles thick dough that holds together when pressed.
Roll into 1-inch balls and place on a parchment-lined tray. Chill in the freezer for 30–45 minutes.
Melt pink candy melts in a microwave-safe bowl in 30-second intervals, stirring until smooth.
Dip each cake pop stick about ½ inch into melted candy, then insert into each ball. Let set for 5 minutes.
Dip cake pops into the melted coating, turning to coat evenly. Gently tap off excess.
Decorate immediately with white sprinkles and place upright in a Styrofoam block or cake pop stand to set.
- Prep Time: 1 hour
- Cook Time: 40 minutes
Nutrition
- Calories: 250 / cake pop
- Sugar: 19g / cake pop
- Fat: 13g / cake pop
- Carbohydrates: 27g / cake pop
- Protein: 2g / cake pop
Let’s Talk Nutrition (The Fun Kind!)
Look, we’re here to make delightful treats, so let’s be real about what we’re creating. This is a dessert, through and through, and it’s meant to be enjoyed as such! The nutritional info below is an estimate per cake pop, but remember, the joy and fun you get from making and sharing them is a nutrient all its own.
Each of these pretty pops comes in at around 250 calories, with about 27g of carbs, 13g of fat, and 19g of sugar. They also have a little bit of protein (about 2g) to help balance it out. My philosophy? Don’t deprive yourself—just enjoy mindfully. Savor each bite with a friend, share them at a celebration, and balance it out with the wholesome, comforting meals we love to make the rest of the time. Life’s all about the meld, right?
You Did It! Welcome to the Cake Pop Club.
And there you have it! You’ve just conquered the Starbucks cake pop, and I have a feeling yours are even better. Look at what you accomplished! You took simple ingredients, added a dash of patience and a whole lot of heart, and created something truly special.
I hope this recipe brings as much fun and flavor to your kitchen as it has to mine. Remember, cooking is an adventure. It’s okay if a few sprinkles hit the floor or if one cake pop is a little lopsided. That’s what gives it character! That’s the “messy” and “fun” I always talk about.
I’d love to see your creations! Tag me on social @FoodMeld with your pink masterpieces. Did you try a fun variation? I want to hear all about it. Until next time, keep mixing it up, making it yours, and enjoying every single bite.
Happy cooking,
Jackson Walker


