Let’s Bake Some Magic: Funfetti Sourdough Bread!
Hey friends, Jackson from Food Meld here! Get ready, because we’re about to take your sourdough game to a whole new level of pure, unadulterated joy. I’m talking about a loaf of bread that looks like it busted out of a birthday party and decided to live its best life in your oven. That’s right, we’re making Funfetti Sourdough Bread.
Now, I know what you might be thinking. “Jackson, sourdough is serious business! It’s all about blistery crusts, open crumb, and… sprinkles?” And to that I say, absolutely! Cooking should be fun, a little unexpected, and always, always packed with flavor. This bread is my ultimate “what if we tried this?” experiment come to life. It’s got that classic, tangy, naturally leavened soul you love, but with a subtle sweetness and those vibrant, confetti-like bursts in every single slice.
This isn’t just a bread; it’s an experience. It’s the star of your brunch table, the most epic base for French toast you’ve ever dreamed of, and the guaranteed smile-inducer for any Tuesday that feels a little too much like a Monday. It proves that artisan baking doesn’t have to be intimidating—it can be playful, colorful, and downright delicious. So, dust off your starter, grab your favorite rainbow sprinkles, and let’s cook something awesome together. Welcome to the most fun you’ll ever have with flour and water.
A Splash of Color & A Dash of Nostalgia
This recipe didn’t come from a fancy cookbook; it was born from a memory. I was about seven years old, “helping” my grandma make my birthday cake. Her kitchen was a whirlwind of flour, and her legendary sourdough starter, “Bubbles,” was always bubbling away on the counter. My job was the best one: pouring in the rainbow sprinkles. I remember being utterly mesmerized as they swirled into the vanilla batter, creating these little pockets of pure happiness.
Years later, as I was feeding my own sourdough starter (a descendant of Bubbles, I might add!), that memory hit me. What if I could capture that childhood magic in a loaf of bread? What if I could merge the comfort of my Southern roots (we love a good, slightly-sweet bread!) with that global-inspired sense of play? The first few test loaves were… colorful, let’s say. But when I finally nailed it, pulling that golden, confetti-speckled boule from my Dutch oven, I felt that same giddy excitement. It was a perfect Food Meld moment—taking a classic technique and giving it a joyful, creative twist that makes people ask, “You can *do* that?!”
Gathering Your Colorful Crew: The Ingredients
This is where the magic starts. The ingredient list is beautifully simple, with one very special guest star. Here’s everything you’ll need and why each one matters.
- 100g Active Sourdough Starter: This is the heart and soul of your loaf! Make sure it’s peppy and has doubled in size after its last feeding. A thick, batter-like consistency is perfect here—no need for precise hydration measurements. If it passes the float test, you’re golden.
- 500g Bread Flour or All-Purpose Flour: Bread flour will give you a slightly chewier, more structured crumb, which I love. But all-purpose flour works wonderfully too, resulting in a softer, more tender bite. Don’t stress; use what you have!
- 350g Water: This creates a hydration of around 70%, which is a great, manageable starting point for a soft, open crumb.
- 10g Salt: Never forget your salt! It’s not just for flavor; it tightens the gluten structure and regulates yeast activity. It’s the quiet director of this whole baking play.
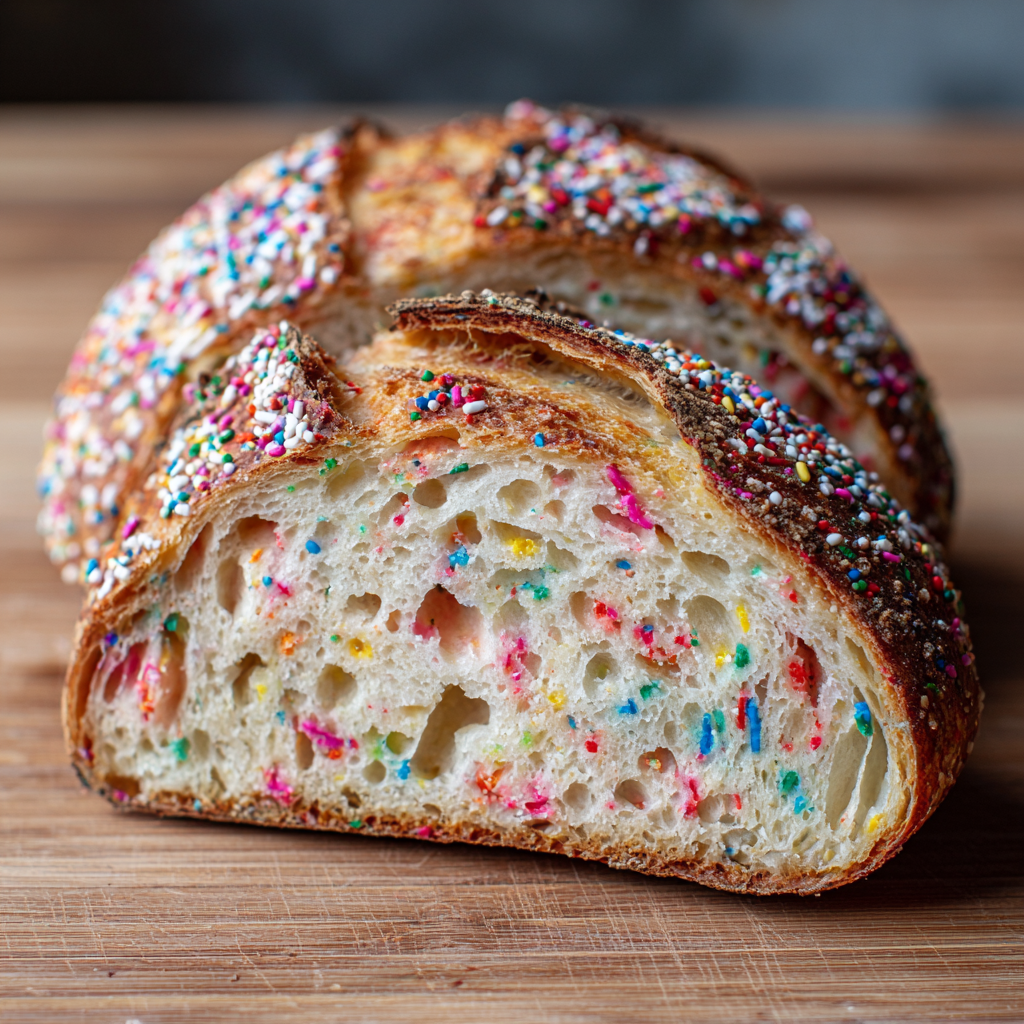
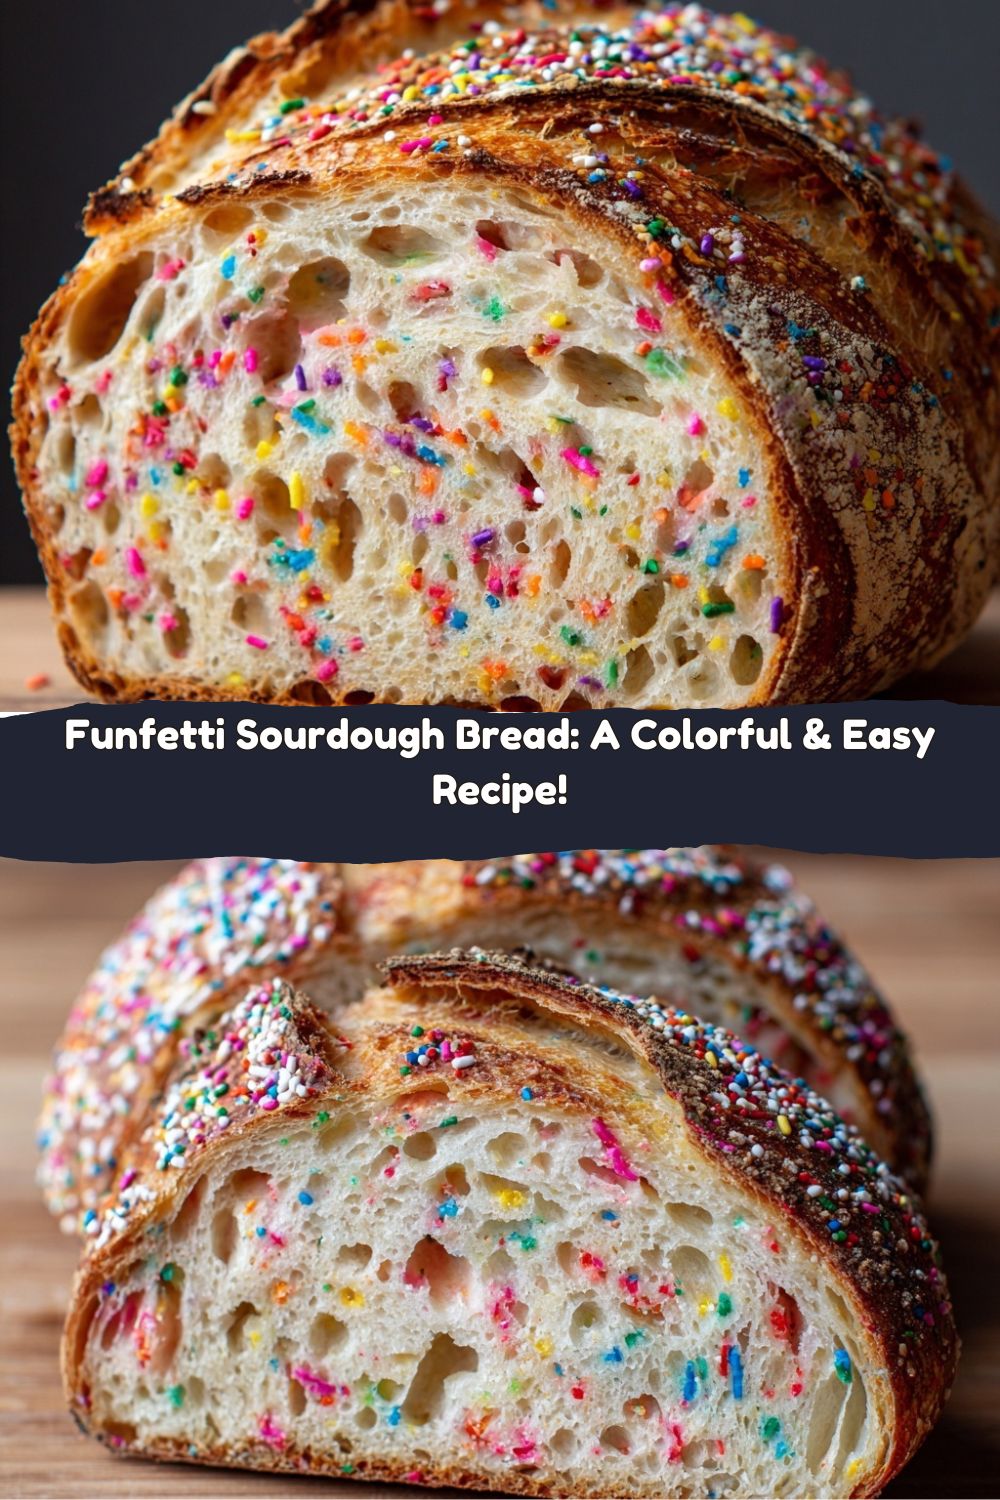
- 75g Rainbow Sprinkles (Jimmies!): Here’s the star of the show! Chef’s Critical Insight: You MUST use “jimmies”—the long, cylindrical sprinkles. Avoid the little round nonpareils at all costs! They bleed their color terribly and will turn your beautiful dough into a muddy, tie-dyed mess. Jimmies hold their color and texture beautifully through the fermentation and baking process.
The Funfetti Sourdough Dance: Step-by-Step
Alright, let’s get our hands dusty (and a little colorful). I’ll walk you through every step. Remember, sourdough is a dance, not a race. Let the dough guide you.
Step 1: The Autolyse & Mix (Around 5:00 PM)
In a large bowl, combine your 500g of flour and 350g of water. Mix it with your hands or a spatula until no dry bits of flour remain. It’ll be a shaggy mess—that’s perfect! Now, walk away. Let it rest, covered, for 30 minutes. This autolyse period allows the flour to fully hydrate, making the gluten development much easier and giving you a better final texture. Chef Hack: I use this time to clean up and make sure my starter is ready to rock.
Step 2: Bring in the Team
After the 30-minute rest, add your 100g of active starter and 10g of salt to the bowl. Now, get in there with wet hands (this prevents sticking!) and squish, fold, and turn the dough until the starter and salt are fully incorporated. It will feel slimy at first, but after a minute or two, it will start to smooth out and come together as one cohesive mass.
Step 3: The Stretch & Fold Sessions (Over the next ~2 hours)
Over the next couple of hours, we’re going to build strength in our dough through a series of “stretch and folds.” Every 30 minutes, with wet hands, reach under one side of the dough, stretch it up, and fold it over the top. Give the bowl a quarter turn and repeat three more times (so you’ve done north, south, east, west). You’ll feel the dough transform from loose and slack to tight and strong. Chef Commentary: This is my favorite part—you can literally feel the gluten developing!
Step 4: The Grand Sprinkles Entrance (During the Last Fold, ~7:30 PM)
During your final set of stretch and folds, it’s time for the main event! Gently sprinkle your 75g of rainbow jimmies over the surface of the dough. As you do your folds, gently incorporate them. Don’t overwork it! We want colorful streaks and pockets, not a uniformly pink dough. A light touch is key here.
Step 5: The Overnight Bulk Ferment
Once the sprinkles are mixed in, cover your bowl tightly with a lid or plastic wrap and let it rest in a warm spot in your kitchen. Let it do its thing overnight, for about 10-12 hours. By morning, it should look puffy, bubbly, and have grown by about 30-50%.
Step 6: Shape & Cold Proof (Morning, ~7:00 AM)
Lightly flour your counter and gently turn out your dough. Shape it into a tight boule (round) or batard (oval). Be gentle to preserve those precious air bubbles. Place it seam-side up in a proofing basket (banneton) or a cloth-lined bowl dusted with rice flour. Now, pop it in the fridge, uncovered for 30 minutes then covered, for a long cold proof. This can be anywhere from 12 to 36 hours. This slow fermentation builds incredible flavor and makes the dough easier to score.
Step 7: Bake to Perfection (Next Day)
Preheat your oven to 450°F (230°C) with your Dutch oven inside for a full hour. Carefully take your dough straight from the fridge, turn it out onto parchment paper, and score the top with a sharp blade or lame. I like a simple “X” or one long slash. Pro Tip: Baking straight from the fridge makes scoring so much easier! Carefully place the dough (on the parchment) into the screaming hot Dutch oven, put the lid on, and bake for 35 minutes. Then, remove the lid and bake for another 20 minutes to get that gorgeous, deep golden-brown crust.
How to Serve Your Masterpiece
Hearing that crackle as your bread cools is a sound of pure triumph. Let it cool completely on a wire rack before you slice into it—I know, it’s hard to wait, but it’s crucial for the perfect texture!
Now, for the fun part. Thick, generous slices are the way to go. Toast them lightly and slather with creamy salted butter, watching it melt into all the nooks and crannies. For the ultimate experience, this bread makes the most INSANE French toast you will ever have. The slight tang from the sourdough and the sweet, colorful confetti inside is a flavor combination that will blow your mind. It’s also a show-stopper on a brunch board, paired with fresh fruit, yogurt, and a drizzle of honey. Or, just eat a slice plain, standing over the cutting board. I won’t tell.
Make It Yours: Funfetti Variations
Once you’ve mastered the base recipe, the playground is yours! Here are a few of my favorite twists:
- Cake Batter Bliss: Add a teaspoon of vanilla extract and two tablespoons of white sugar to the initial mix. Replace 50g of the water with milk for an even softer, cake-like crumb.
- Chocolate Confetti: Swap out 50g of the flour for 50g of high-quality cocoa powder. You’ll get a deep, chocolatey loaf with rainbow surprises—it’s like a party in a brownie!
- Seasonal Sprinkles: Use holiday-themed jimmies! Red and green for Christmas, pastels for Easter, or red, white, and blue for the Fourth of July.
- “Everything But the Confetti” Bagel Twist: Feeling savory-sweet? After scoring, brush the top with water and sprinkle on Everything Bagel seasoning. The combination of sesame, poppy seeds, garlic, and onion with the sweet, colorful interior is bizarrely delicious.
- Gluten-Free Funfetti: Use a reliable 1:1 gluten-free bread flour blend and add 1 tsp of xanthan gum if it’s not already included. The process remains exactly the same!
Jackson’s Kitchen Notes & Stories
This recipe has evolved so much since that first “what if” moment. The first time I made it, I used nonpareils (the little round ones) and created a loaf that looked like it had a bad case of the measles. It was tasty, but not pretty! That’s how I learned the hard way about the jimmies rule.
I also don’t stress about taking the dough’s temperature or having a perfectly controlled proofing box. My kitchen is my lab, and room temperature has worked beautifully every time. The key is watching the dough, not the clock. See those bubbles? Feel that airy jiggle? That’s your dough telling you it’s ready. Trust yourself, trust the process, and have fun with it. After all, it’s bread with sprinkles—how can you not smile?
Your Funfetti Questions, Answered!
Q: My sprinkles still bled a little color. What happened?
A: A tiny bit of color transfer is normal, especially with very vibrant jimmies. The key is to avoid over-mixing once they’re in. Gently fold them in during that last set, and you’ll minimize bleeding. And remember, NO nonpareils!
Q: My dough didn’t rise much overnight. What went wrong?
A: This almost always points to a starter that wasn’t active enough. Make sure your starter is at its peak—bubbly, domed, and passing the float test—before you use it. The temperature of your kitchen also plays a role; if it’s chilly, it will just take longer.
Q: Can I shorten the overall time?
A: You can try a same-day bake by doing a shorter, warmer bulk ferment (4-6 hours) until doubled, then a shorter cold proof (4-6 hours). But for the best, most complex flavor, I highly recommend the long, slow, overnight ferment. The wait is worth it!
Q: My bread is very dense. Help!
A: Density usually comes from one of three things: 1) Under-proofing (let it bulk ferment longer), 2) Over-proofing (the dough collapses), or 3) Handling the dough too roughly after the bulk ferment, knocking out all the gas. Be gentle during the shaping stage!
Nutritional Information (Estimated)
Okay, let’s be real—we’re not eating Funfetti Sourdough because it’s a health food. We’re eating it for the soul! But here’s a rough estimate per slice (assuming you get 12 thick slices from one loaf). Remember, this can vary based on your specific ingredients.
- Calories: ~150
- Carbohydrates: 28g
- Protein: 4g
- Fat: 1g
It’s a naturally leavened bread, so it may be easier to digest for some people compared to commercial yeast breads. But mostly, it’s a celebratory treat to be enjoyed with butter, laughter, and good company.
Your New Favorite Loaf Awaits
And there you have it! Your guide to creating a loaf of bread that’s as fun to make as it is to eat. This Funfetti Sourdough is everything I love about cooking: it’s creative, a little bold, deeply comforting, and guaranteed to create those “you’ve gotta try this!” moments we live for at Food Meld.
Don’t be afraid to make this recipe your own. That’s the whole point! Tag me on Instagram @FoodMeld when you bake yours—I absolutely love seeing your colorful creations. Now, go preheat that oven, wake up your starter, and let’s fill our kitchens with the smell of baking bread and a whole lot of rainbow fun. Happy baking!


