
The Dessert That’s Basically a Chocolate Hug
Hey friends, Jackson from Food Meld here. Let’s be real for a second. Some days call for a simple chocolate chip cookie, and other days demand a dessert that looks you dead in the eye and says, “I see your chocolate craving, and I’m here to obliterate it.” This Brownie Mousse Trifle is that dessert. We’re talking about layers upon layers of fudgy brownie chunks, a silky-smooth chocolate mousse that’s almost too easy to make, billowy clouds of whipped cream, and a generous scattering of mini chocolate chips for that perfect little crunch.
This isn’t just a dessert; it’s an experience. It’s the show-stopping centerpiece for your holiday table, the guaranteed crowd-pleaser at your summer potluck, and the ultimate “I-deserve-this” treat for a cozy night in. The best part? You don’t need to be a pastry chef to pull this off. We’re using some simple, smart shortcuts to create a dessert that tastes like you spent all day in the kitchen, but secretly comes together with a whole lot of “what if we tried this?” energy. So, grab your favorite trifle bowl (or that big glass bowl you use for everything), and let’s cook something awesome together.
The Trifle That Stole the Show
This recipe takes me right back to my cousin’s wedding potluck a few summers ago. My whole family was there, and let me tell you, the Southern aunts do not play around when it comes to potlucks. The tables were groaning with heirloom dishes—perfect fried chicken, mac and cheese with a crust you could hear from across the yard, and at least seven different types of potato salad. I wanted to bring something that could hold its own in that lineup. I decided to take my grandma’s classic brownie recipe and “meld” it with a chocolate mousse I’d been experimenting with.
I remember layering it all up in my mom’s giant, somewhat-dusty-from-the-attic trifle dish, not entirely sure how it would be received. Well, let’s just say the fried chicken had some serious competition. I watched as spoonful after spoonful disappeared, and my cousin, the groom, literally hugged the bowl at one point. It was one of those messy, fun, “you’ve gotta try this” moments that I live for. That’s the magic of this trifle—it’s not just about the flavors, it’s about the memories you make while sharing it.
Gathering Your Chocolate Arsenal
Here’s the beautiful lineup of ingredients you’ll need. This is where we keep it simple but smart. I’ve included my favorite chef insights and swaps so you can make this trifle your own.
- 1 Box Brownie Mix (plus ingredients to prepare it) – This is our foundation. I go for a “fudge” or “dark chocolate” style mix. Why? We want those dense, chewy chunks to stand up to the creamy layers. Chef’s Insight: Don’t overbake them! A slightly under-baked brownie is a trifle’s best friend. It stays extra moist and fudgy.
- 1 Box (3.9 oz) Chocolate Pudding Mix – This is the secret weapon for our mousse base. Instant pudding is key here—we’re not cooking it, we’re using its magical thickening powers to create structure and deep chocolate flavor.
- ½ Cup Cold Water – It has to be cold! This helps activate the pudding mix quickly and efficiently, giving us that perfect mousse texture.
- 1 Can (14 oz) Sweetened Condensed Milk – This is what transforms the pudding from just… pudding… into a rich, velvety, and sweet mousse. It adds a gorgeous creaminess that’s just irresistible.
- 2–3 Tubs (8 oz each) Whipped Topping (like Cool Whip), thawed – We’ll use one tub folded into the mousse to make it light and airy, and the rest for our fluffy whipped cream layers. Substitution Tip: You can absolutely use an equal amount of freshly whipped heavy cream sweetened with a little powdered sugar! It’ll be a bit less sweet and have a fantastic fresh cream flavor.
- 1-2 Cups Mini Chocolate Chips – These little guys are essential for texture! They add tiny bursts of chocolate and a slight crunch in every bite. I use semi-sweet to balance the sweetness, but dark chocolate chips are a fantastic grown-up twist.
Let’s Build Some Chocolate Magic
Okay, team, this is where the fun begins. We’re building layers of awesome. Put on some good music, and let’s get layering.
- Bake and Conquer the Brownies. First things first, preheat your oven and prepare your brownie mix according to the package directions for a 9×13 inch pan. My pro-tip? Line the pan with parchment paper with a little overhang. This lets you lift the entire brownie slab out in one piece after it cools, making it a breeze to cut into perfect, neat chunks. Bake them, but lean towards the lower end of the baking time. You want a toothpick to come out with a few moist crumbs, not completely clean. Let them cool completely—I mean it! Warm brownies will melt our mousse and make a soupy mess. Chef’s Hack: Once cooled, use a serrated knife to cut the brownies. It saws through without squishing them!
- Whip Up the “No-Fuss” Mousse. In a large mixing bowl, grab a whisk and combine the dry chocolate pudding mix and the ½ cup of cold water. Whisk it until it’s smooth and starting to thicken slightly—this should only take a minute. Now, pour in that entire can of sweetened condensed milk and whisk it again until it’s completely smooth, rich, and delicious. Here’s the magic step: take one tub of your thawed whipped topping and gently fold it into the chocolate mixture. “Folding” is just a fancy way of saying, “be gentle so you don’t deflate all the air.” Use a spatula and cut through the middle, scoop underneath, and turn it over. Repeat until no white streaks remain. Voilà! You just made an incredible chocolate mousse.
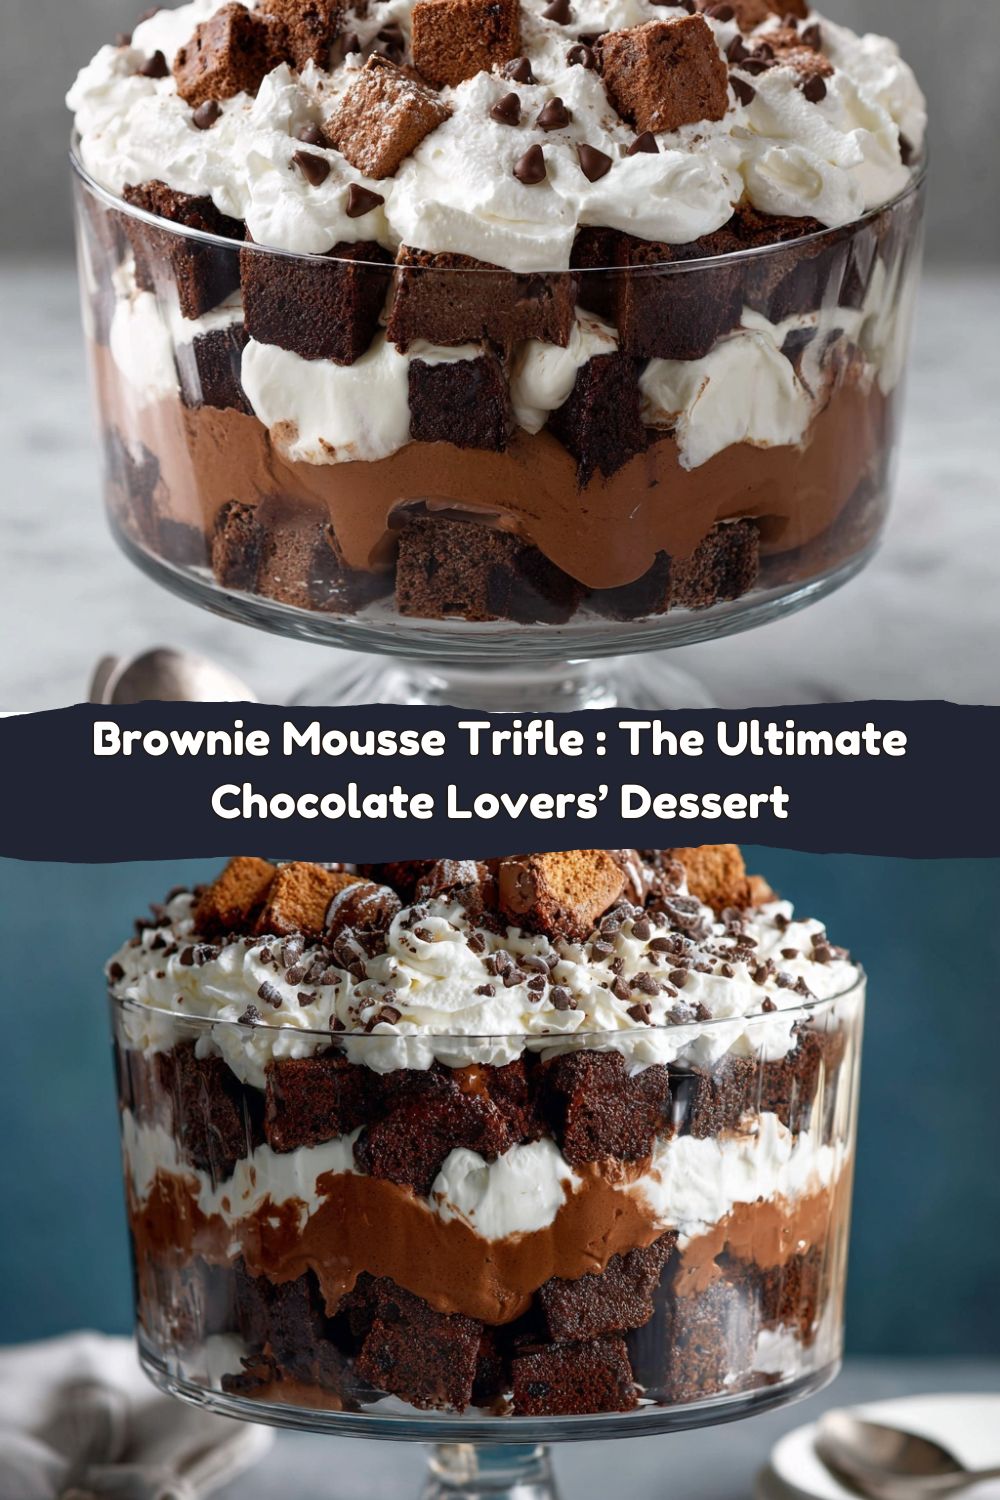
- The Grand Layering Finale. Now for the artistic part! Grab your trifle dish or a large glass bowl. We’re building from the bottom up.
- Layer 1: Start with a third to half of your brownie chunks. Press them down gently to create a solid base.
- Layer 2: Spoon a thick layer of plain whipped topping (from your second tub) over the brownies. Use the back of your spoon to spread it to the edges of the bowl so you get a beautiful white ring when you look from the side.
- Layer 3: Now, add half of your chocolate mousse, spreading it evenly.
- Layer 4: The texture touch! Sprinkle a generous handful of mini chocolate chips over the mousse.
Now, repeat the layers! Brownies, whipped cream, mousse, chocolate chips. When you get to the top, finish with a final, glorious layer of whipped topping. Decorate the top with a artful shower of mini chocolate chips. It should look like a chocolate dream cloud.
- The Patience Pays Off Chill. This is the hardest step, I know. But you must cover the trifle and refrigerate it for at least 2 hours, though 4 or even overnight is even better. This chill time allows the flavors to meld together and the layers to set up perfectly, so when you scoop it, you get a beautiful, clean bite of every single component.
How to Serve This Masterpiece
When it’s finally time to serve, you want to do it right. Use a large, sturdy spoon to dig all the way down to the bottom to get every single layer in one perfect scoop. I like to serve it in clear glasses or bowls if I have them—it really shows off all that beautiful layering work you did.
Want to take it over the top? Here are my favorite garnishes right before serving:
- A light dusting of cocoa powder for a bittersweet touch.
- Fresh raspberries or strawberries on the side—the tart fruit cuts through the richness beautifully.
- Crumbled up chocolate-covered espresso beans for a mocha kick and serious crunch.
- A drizzle of salted caramel sauce. Trust me on this one. Salted caramel and chocolate are a match made in heaven.
Make It Your Own: Creative Twists
This recipe is a fantastic canvas for your creativity. Here are a few of my favorite ways to mix it up:
- Cookies & Cream Trifle: Swap the brownies for a layer of crumbled Oreo cookies. Use chocolate pudding, but fold in some extra crushed Oreos into the mousse layer. It’s a cookies and cream lover’s dream.
- Peanut Butter Cup Explosion: Before you layer, drizzle some warm peanut butter over the brownie chunks. Then, fold 1 cup of chopped peanut butter cups into the mousse and use them as a topping along with the chocolate chips.
- Mint Chocolate Chip: Use a mint chocolate chip brownie mix or add 1 tsp of peppermint extract to your standard brownie batter. You could even use a box of mint chocolate pudding if you can find it!
- Rocky Road: Fold mini marshmallows and chopped almonds into the mousse along with the chocolate chips. It’s a classic flavor combo that never fails.
- Dietary Swap (Dairy-Free): You can make this dairy-free! Use a dairy-free brownie mix, a can of coconut sweetened condensed milk, and dairy-free whipped topping. It works like a charm.
Jackson’s Kitchen Notes
This recipe has evolved so much since that first potluck. I used to make every component from scratch, which was delicious but honestly, a project. One day, I was in a pinch and used the pudding/sweetened condensed milk trick, and it was a total game-changer. The texture is spot-on, and it saves so much time and effort. That’s the Food Meld philosophy—delicious, bold flavor without the intimidating process.
A funny story: I once tried to make individual trifles in fancy glasses for a date night. I was so focused on making them look perfect that I completely forgot to add the sweetened condensed milk to the mousse. Let’s just say we ended up with very dense, very bitter chocolate layers and ordered pizza instead. Always taste as you go, folks!
Your Questions, Answered
Q: Can I make this trifle ahead of time?
A: Absolutely! This is one of its best features. You can assemble it completely up to 24 hours in advance. Just keep it tightly covered in the fridge. The layers might soften a tiny bit, but it will still be incredibly delicious.
Q: My mousse seems runny. What happened?
A: The most common culprit is not using cold water, or not letting the pudding mix thicken for a minute before adding the condensed milk. Also, make sure your whipped topping is fully thawed but still cold. If it’s a little soft, pop the whole bowl of mousse in the fridge for 20-30 minutes to firm up before layering.
Q: I don’t have a trifle dish. What can I use instead?
A: No problem! A large glass bowl, a 9×13 inch baking dish, or even individual parfait glasses or mason jars work perfectly. The goal is to see the layers, so clear is best, but taste is what matters most!
Q: Can I use homemade whipped cream?
A: 100% yes! Whip 2 cups of heavy cream with ¼ cup of powdered sugar and 1 tsp of vanilla extract until you get stiff peaks. Use this in place of the whipped topping tubs. It’ll be a bit less stable for making days in advance, but the flavor is phenomenal.
Let’s Talk Nutrition (The Fun Kind)
Look, we’re all here for a good time, and this is a celebratory dessert. I’m a big believer in enjoying real, flavorful food without guilt. That said, I know some folks like to have a general idea of what they’re eating. The nutritional info below is an estimate based on the ingredients and will vary depending on the specific brands you use.
This trifle serves a crowd (about 10-12 people), so a little goes a long way! It’s rich, decadent, and satisfying. The beauty of a layered dessert like this is that you’re getting a perfect balance of textures and flavors in every single bite, making it a truly fulfilling end to any meal. So serve yourself a scoop, enjoy every mouthful, and share the chocolatey joy with people you love.
You’ve Got This!
And there you have it—the Brownie Mousse Trifle that’s going to make you a legend at your next gathering. It’s proof that you don’t need fancy skills to create something truly unforgettable. It’s about having fun in the kitchen, layering with love, and creating those “you’ve gotta try this” moments that I live for.
I hope this recipe becomes a new favorite in your home, just like it is in mine. If you make it (and you totally should), I’d love to see your creation! Tag me on social @FoodMeld so I can share in the chocolatey glory. Now go forth, mix it up, make it yours, and enjoy every single bite. Let’s cook something awesome together!
Cheers,
Jackson


