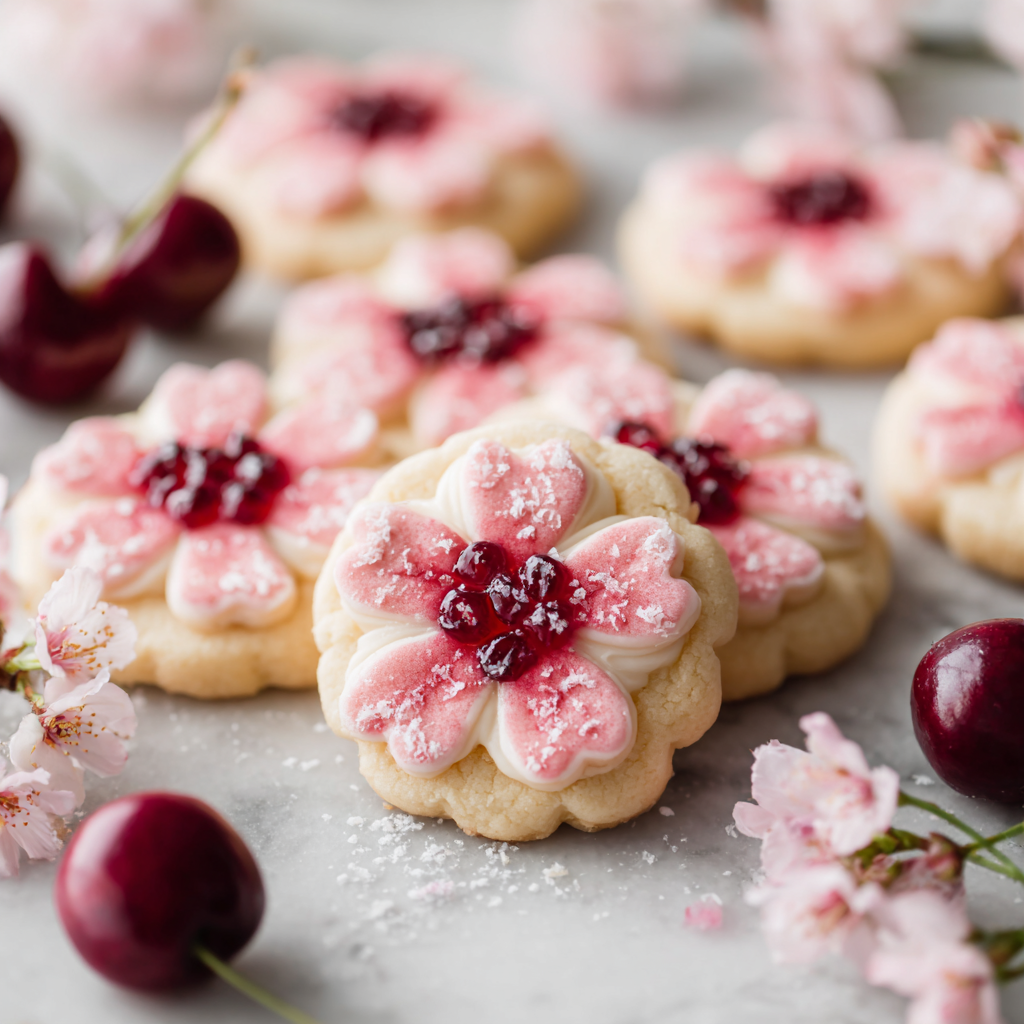
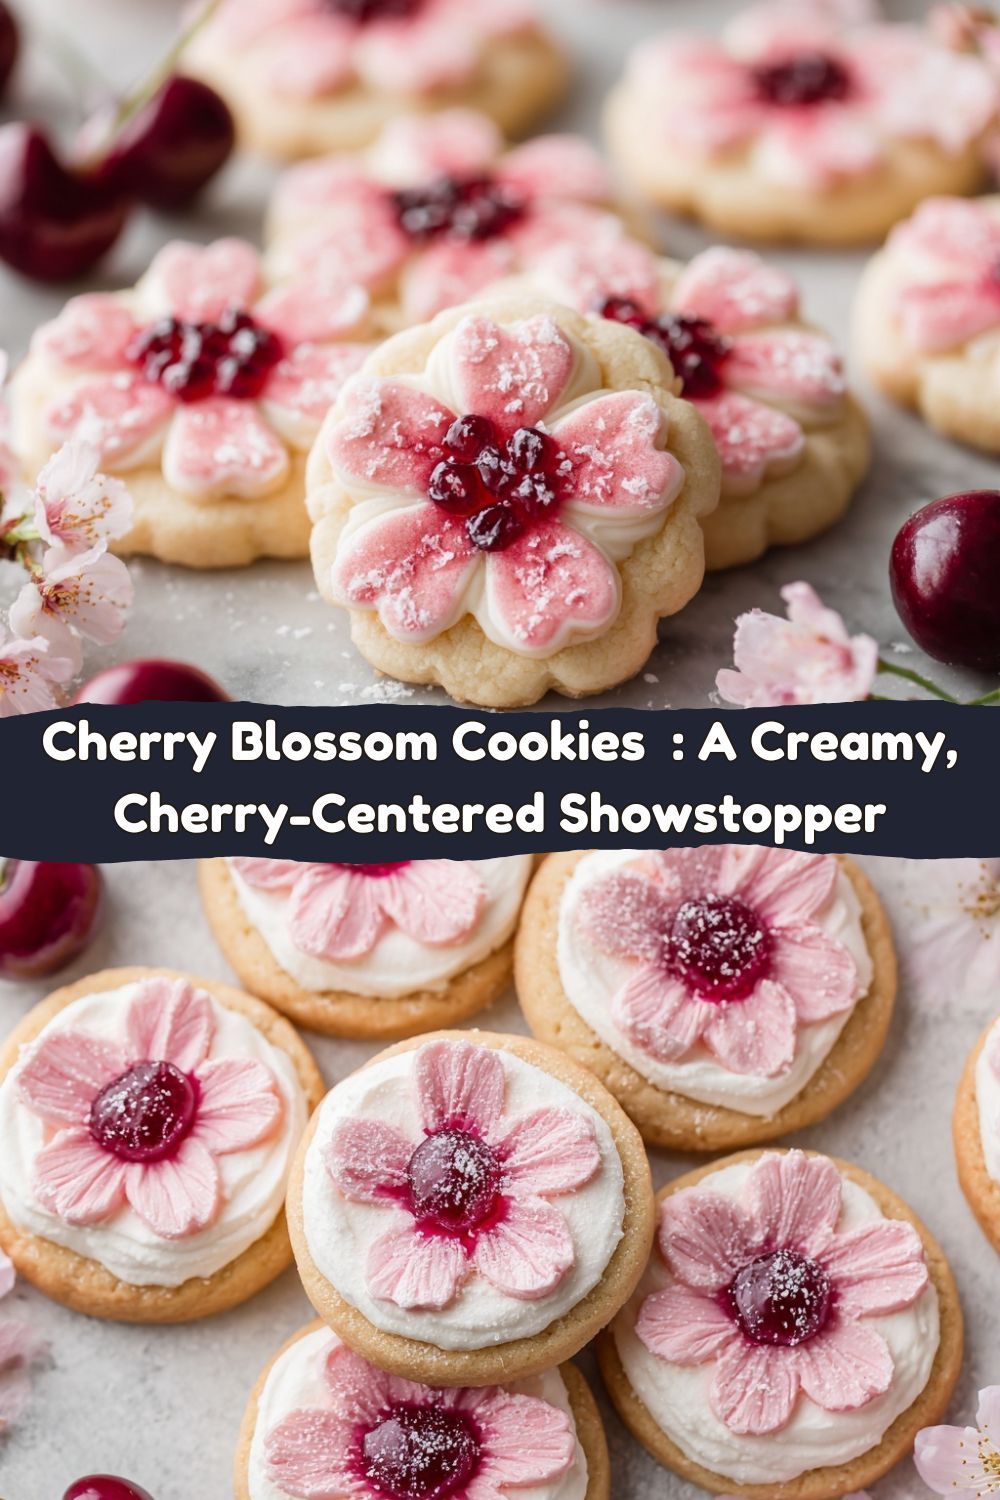
Cherry Blossom Cookies – Cream Cheese Filled Butter Cookies with Maraschino Cherries
Hey friends, Jackson from Food Meld here. Let’s talk about a cookie that’s not just a dessert—it’s an experience. I’m telling you, the first time you pull a tray of these Cherry Blossom Cookies out of the oven, you’ll feel like a kitchen wizard. We’re talking about delicate, buttery cookies designed to look like blooming flowers, each one cradling a velvety cream cheese center and a gorgeous, sweet cherry heart.
Now, I see you. You might be looking at that description and thinking, “Jackson, that sounds incredible, but also… complicated.” I get it. But trust me on this one. This recipe is my kind of cooking through and through: it looks impressive as all get-out, but the process is straightforward, fun, and honestly, a little bit therapeutic. We’re taking simple, beautiful ingredients and “melding” them into something truly unforgettable. It’s that perfect project for a lazy weekend or when you want to show someone you care with a homemade treat that straight-up wows them. So, tie on your apron, put on some good music, and let’s cook something awesome together. These creamy, cherry-centered showstoppers are waiting for us.
A Cookie That Blooms with Memories
This recipe takes me right back to my Grandma Lou’s kitchen. She wasn’t a fancy pastry chef, but she had a way of making simple things feel like a celebration. One rainy spring afternoon, she decided we were going to make “flower cookies.” I was maybe eight years old, covered in flour, and completely mesmerized. Her version was a simple sugar cookie dough, but the act of carefully snipping the edges and tucking a bright red cherry in the center felt like pure magic. It was our little “what if we tried this?” moment. We made a huge batch, and I remember the proud, beaming smile on my face when I presented the slightly lopsided, cherry-leaking “blossoms” to my family after dinner. That’s the spirit I want to bring to you with this recipe. It’s not about perfection; it’s about the joy of creating something beautiful and delicious with your own two hands. It’s a little bite of nostalgia, packed with flavor and fun.
Gathering Your Flavor Arsenal
Alright, let’s get our mise en place—that’s just a chef-y way of saying “get everything in its place.” It makes the whole process smoother and way more enjoyable. Here’s what you’ll need to create this cookie masterpiece.
For the Cream Cheese Filling:
- 4 oz cream cheese, softened: This is the base of our luscious filling. Full-fat is best here for that rich, tangy flavor and creamy texture. Make sure it’s truly softened to room temp so it whips up smooth without any lumps.
- ¼ cup sugar: Just enough to sweeten the deal and balance the tang of the cream cheese.
- ½ tsp vanilla or almond emulsion: I’m a huge fan of emulsions over extracts for baking because they hold their flavor better under heat. Almond emulsion pairs perfectly with cherry, but vanilla is a classic, delicious choice.
- 1 large jar maraschino or candied cherries, drained and dried: The star of the show! After draining them, be sure to pat them dry thoroughly with a paper towel. A wet cherry will make your dough soggy, and we want a perfect bake.
For the Cookie Dough:
- 2½ cups all-purpose flour: The backbone of our cookie. It gives structure so our flower petals hold their shape.
- ¼ cup cornstarch: This is my secret weapon for an incredibly tender, melt-in-your-mouth texture. It lightens up the flour and makes the cookie beautifully delicate.
- 1 tbsp vanilla powder (or substitute 2 tsp vanilla extract added with the wet ingredients): Vanilla powder gives a more intense, pure vanilla flavor without adding extra liquid. If you can’t find it, no sweat! Just add an extra 2 tsp of vanilla extract when you add the egg.
- Dash of salt: Never, ever skip the salt! It’s the flavor enhancer that makes the sweet, buttery notes really pop.
- ½ cup unsalted butter, softened: For that unbeatable, rich flavor. Using unsalted lets you control the salt level in the dough.
- 4 oz cream cheese, softened: Yes, more cream cheese! This in the dough itself is what makes it so uniquely soft, tender, and slightly tangy.
- 1 cup granulated sugar: For sweetness and that perfect, slight crisp on the edges.
- 1 large egg: Our binder, bringing everything together.
- 1 tsp vanilla extract: Because you can never have too much vanilla.
- ½ tsp coconut emulsion (optional but recommended): This is my “creative twist.” You won’t taste overt coconut, but it adds a wonderful, subtle tropical depth that makes people go, “Wow, what is that amazing flavor?”
Let’s Build Some Blooms: Your Step-by-Step Guide
Ready to get your hands dirty? Let’s do this. I’ll walk you through every step with all my favorite chef hacks to ensure your success.
Step 1: Make the Cream Cheese Filling
In a medium bowl, beat the 4 oz of softened cream cheese and the ¼ cup of sugar together until it’s completely smooth and silky. No sugar granules should be left! Then, mix in your chosen emulsion. Scoop this deliciousness into a piping bag or a small zip-top bag (you can snip a corner off later). Pop it in the fridge to firm up a bit while you work on the dough. A firmer filling is easier to control when piping.
Chef Hack: No piping bag? No problem. You can also use a small cookie scoop or just a spoon to portion the filling. We’re keeping it real here!
Step 2: Create the Cookie Dough
First, let’s whisk together our dry ingredients: the flour, cornstarch, vanilla powder (if using), and that all-important dash of salt. Whisking ensures everything is evenly distributed, so you get a consistent texture in every single cookie.
Now, in a larger bowl, it’s time to cream the ½ cup butter, 4 oz cream cheese, and 1 cup of sugar. Use an electric mixer on medium-high speed and beat it for a good 2-3 minutes, until it’s pale, fluffy, and beautiful. This step is crucial—it incorporates air into the dough, making it lighter. Scrape down the sides of the bowl, then beat in the egg, vanilla extract, and coconut emulsion (if using) for another 2 minutes.
With your mixer on low, gradually add the flour mixture. Mix until *just* combined. Don’t overmix! Overworking the dough leads to tough cookies, and we want tender, delicate blossoms. The dough will be soft. Divide it into thirds, flatten each piece into a disc, wrap tightly in plastic wrap, and chill for at least 1 hour, or even overnight.
Chef Hack: Chilling is non-negotiable. It firms up the butter and cream cheese, making the dough much easier to roll out and shape. A soft dough is a nightmare to work with, so patience is key!
Step 3: Assemble Your Cherry Blossoms
This is the fun part! Take one disc of dough out of the fridge at a time. Roll it out between two sheets of parchment paper to about ¼-inch thickness. Using a 2 to 2½-inch round cookie cutter, cut out your circles.
Chef Hack: Rolling between parchment completely eliminates the need for extra flour, which can dry out your cookies. It’s a game-changer!
Now, for the transformation! Take a round of dough and, using a sharp knife or a bench scraper, make four slits halfway into the circle to create four petals. Imagine you’re making a plus sign (+) but don’t cut all the way through the center.
Pipe (or spoon) a small mound of the chilled cream cheese filling right into the center. Place a well-dried cherry firmly on top of that filling.
Here’s the magic: lightly dab a tiny bit of water on one pair of opposite petals. This acts as your “glue.” Gently fold those two petals up and over the cherry, pinching the tips together lightly. Now, dab the other two opposite petals with water and fold them up, pinching all the tips together to seal your blossom. It should look like a beautiful flower with a cherry peeking out from the center! Repeat with the remaining dough rounds. If the dough gets too soft and sticky, just pop the whole baking sheet back in the fridge for 15-20 minutes to firm up.
Once all your cookies are assembled on a parchment-lined baking sheet, give them a final chill for 30-60 minutes before baking. This ensures they hold their perfect shape in the oven.
Step 4: Bake to Golden Perfection
Preheat your oven to 350°F (175°C). Bake the cookies for 8-12 minutes. You’re looking for the edges to just barely start turning a light golden brown. The centers might still look a little soft—that’s perfect! They will continue to firm up as they cool. Let them cool on the baking sheet for 5 minutes before transferring them to a wire rack to cool completely.
Optional Glamour Shot: For an extra sparkle, you can brush the cooled petals with a simple glaze (just mix a little powdered sugar with milk or water) and then dip them in sparkling sugar, or simply dust the whole cookie with powdered sugar for a snowy, elegant look.
Showing Off Your Edible Bouquet
Presentation is part of the fun! These cookies are so beautiful on their own, you don’t need to do much. I love arranging them on a simple white platter or a rustic wooden board, maybe with a few sprigs of fresh mint or real cherry blossoms if it’s the season. They look like a gorgeous, edible flower arrangement. They’re the ultimate treat for a bridal shower, a spring tea party, or as a stunning addition to your holiday cookie tray. Serve them with a cold glass of milk, a hot cup of coffee, or even a sweet dessert wine. Watch as your friends and family’s eyes light up when they see them—and then wait for the “Mmmms” that follow the first bite.
Make It Yours: Fun Flavor Twists
One of my favorite parts of cooking is playing with flavors. Once you’ve mastered the classic, try one of these fun variations!
- Chocolate Blossoms: Substitute ¼ cup of the flour in the dough with unsweetened cocoa powder for a rich chocolate base. It pairs amazingly with the cherry.
- Lemon-Zested Sunshine: Add the zest of one lemon to the cookie dough and use lemon emulsion or extract in the filling for a bright, zingy, and totally refreshing twist.
- Nutty Delight: Mix a couple of tablespoons of finely chopped toasted almonds or pecans into the cookie dough for a lovely crunch and nutty flavor.
- Jam-Filled Fun: Out of cherries? No worries! Use a small dollop of thick, high-quality raspberry jam or apricot preserves in the center instead of the cream cheese and cherry. It’s a simpler but equally delicious version.
- Dairy-Free Swap: Use your favorite plant-based butter and cream cheese alternatives. The texture might be slightly different, but you’ll still end up with a fantastic cookie!
Jackson’s Kitchen Confidential
This recipe has evolved so much since those first lopsided cookies with Grandma Lou. I’ve probably made a hundred batches, tweaking and testing until it was just right. The addition of cornstarch and cream cheese in the dough was a total “aha!” moment that took them from good to “you’ve gotta try this” incredible. And don’t be discouraged if your first few blossoms are a little… abstract. My first batch after developing this version looked more like angry starfish than flowers! The dough is forgiving. If a petal tears, just press it back together. The beauty is in the homemade charm. The most important ingredient is always the fun you have making them.
Your Questions, Answered
I’ve gotten a lot of questions about these cookies over the years, so here are the answers to the most common ones.
Q: My dough is too sticky to work with! What did I do wrong?
A: You likely just need to chill it more. This is a soft, rich dough, and warmth is its enemy. If it’s sticky during rolling, pop it back in the fridge. If it gets too soft while assembling, chill the whole baking sheet. Patience and a cold dough are your best friends here.
Q: Can I make these cookies ahead of time?
A> Absolutely! You have a couple of great options. You can make the dough discs and keep them in the fridge for up to 3 days, or freeze them for up to 3 months. You can also assemble the unbaked cookies and freeze them solid on the baking sheet before transferring to a freezer bag. Bake straight from frozen, adding a minute or two to the baking time.
Q: My cream cheese filling leaked everywhere while baking. How do I prevent that?
A> This usually happens for two reasons: 1) The filling was too warm/soft when piped. Make sure it’s nice and chilled. 2) The blossom wasn’t sealed properly. Make sure you’re pinching the petal tips together firmly and that you’ve used the water as a “glue” to help seal them.
Q: Can I use fresh cherries instead of maraschino?
A> I wouldn’t recommend it for this specific recipe. Fresh cherries contain too much water and will release it during baking, making the center soggy. Maraschino or candied cherries have the right texture and sweetness to hold up beautifully.
Let’s Talk Ingredients & Balance
Look, I’m all about bold, comforting flavor, and that often means using real, quality ingredients like butter, cream cheese, and sugar. These Cherry Blossom Cookies are a special occasion treat, a moment of pure indulgence, and they are 100% worth it. Each cookie is a little bundle of joy, and they’re rich enough that one is often perfectly satisfying.
Based on the ingredients used, here’s a general nutritional breakdown per cookie (assuming a yield of about 3 dozen):
- Calories: ~110 kcal
- Fat: 5g
- Carbohydrates: 13g
- Protein: 1g
My philosophy? Enjoy every single bite mindfully and without guilt. Life’s too short not to enjoy a beautiful, homemade cookie.
You’ve Got This!
And there you have it! Your complete guide to creating these stunning, delicious Cherry Blossom Cookies. Remember, cooking and baking are journeys, not destinations. Don’t stress about perfection. Embrace the messy, fun process of creating something with your hands. Whether you’re making these for a special someone or just to treat yourself, you’re not just baking cookies—you’re creating a moment, a memory, and a seriously unforgettable flavor experience.


