
Heart-Shaped Mini Pavlovas: Where Crispy Meringue Meets a Cloud of Cream
Hey friends, Jackson here from Food Meld. Let’s talk about a dessert that’s pure magic. I’m not talking about a fussy, complicated pastry that has you sweating over a hot oven for hours. I’m talking about a dessert that looks like it came from a fancy patisserie but is secretly one of the most fun, forgiving, and downright impressive things you can make. I’m talking about these Heart-Shaped Mini Pavlovas.
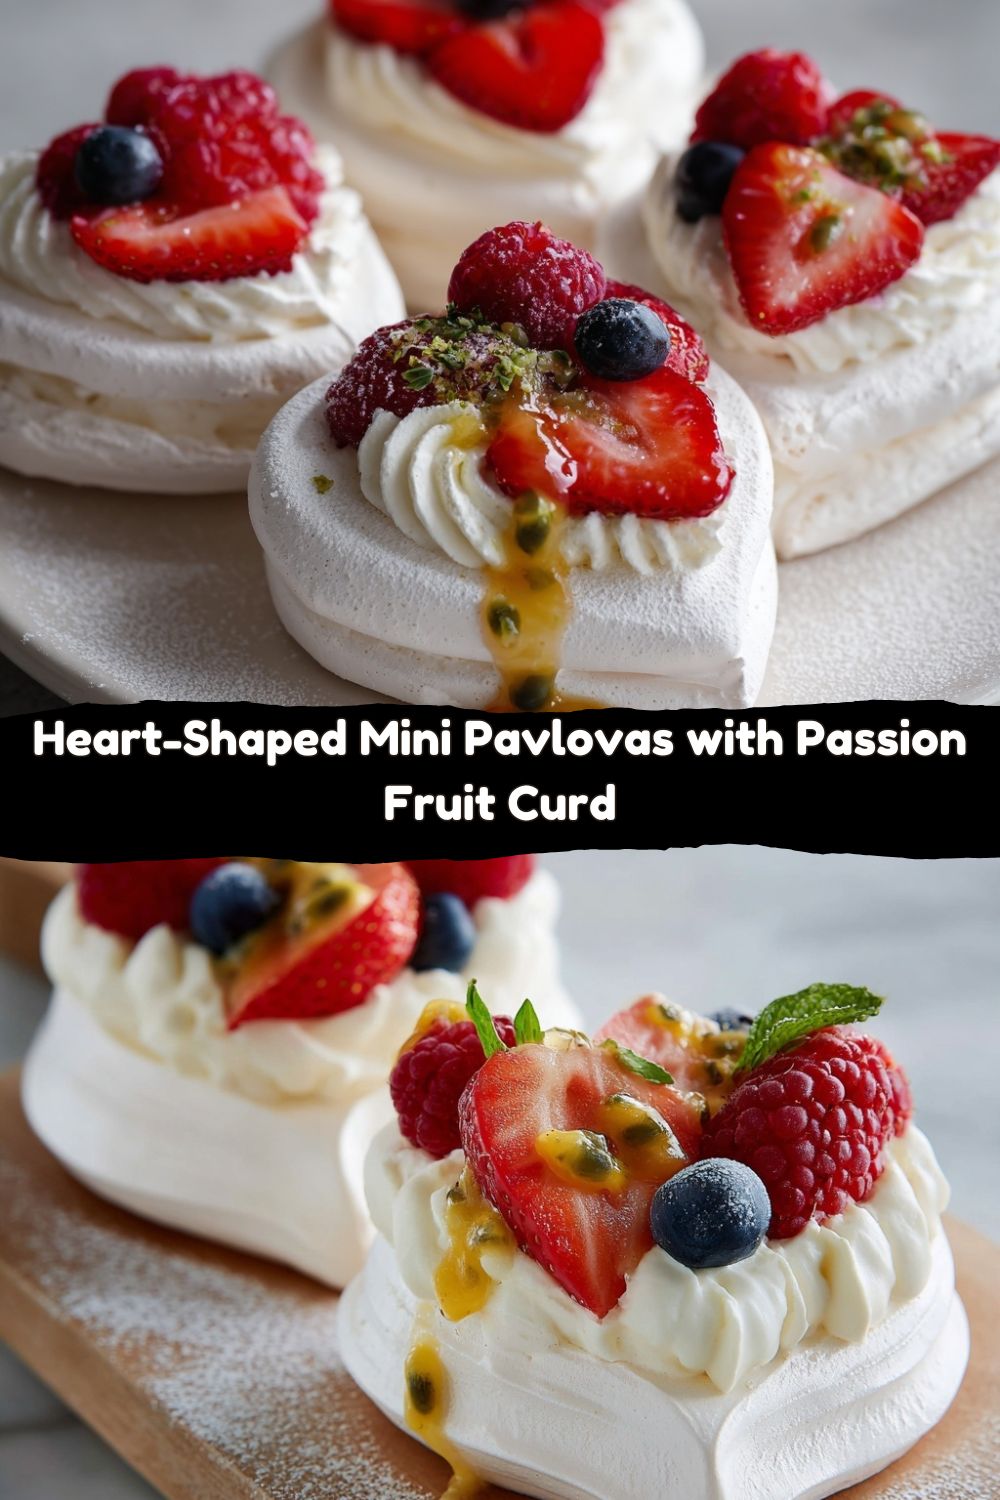
Imagine this: a crisp, shatteringly delicate meringue shell that gives way to a soft, marshmallow-y center. We top that cloud-like base with a generous dollop of lightly sweetened whipped cream, a tumble of juicy, fresh berries, and a vibrant, tangy drizzle of passion fruit curd that cuts through the sweetness perfectly. Each bite is a textural dream—crisp, creamy, and juicy all at once.
Now, I know what some of you might be thinking. “Meringue? Jackson, that sounds… precise. And intimidating.” I hear you! But trust me, this is where the Food Meld philosophy shines. We’re taking a classic and giving it a fun, approachable twist—literally! By shaping them into hearts, we’re not just making dessert; we’re making a memory. These mini pavlovas are perfect for Valentine’s Day, an anniversary, a Galentine’s brunch, or just a Tuesday when you want to tell someone they’re special. So, grab your bowl and whisk (or that trusty stand mixer!), and let’s create some kitchen magic that’s as fun to make as it is to eat.
A Sweet Memory: My First Pavlova Fiasco
My first encounter with a pavlova was… well, let’s call it a delicious disaster. It was my first year of really getting into cooking, and I decided to impress my entire family at a summer BBQ. I went for a giant, classic pavlova. I was so proud, piping this huge, beautiful circle. But I got impatient. I didn’t let the meringue cool slowly in the oven. I whipped it out, beaming with pride, and… *CRACK*. A huge fissure ran right through the center of my beautiful creation.
My heart sank. But my Grandma Lou, the wisest cook I know, just chuckled and said, “Honey, that’s just more room for the cream and berries.” She was right. We piled on the toppings, and no one cared about the crack. They only cared about the incredible, melt-in-your-mouth texture and the burst of fresh flavor. That’s the beauty of pavlova—it’s wonderfully forgiving. These mini hearts are even more so! Smaller size means less stress, and even if one cracks a little, you just cover it with a strategically placed strawberry and a whole lot of love. It taught me that in the kitchen, and in life, sometimes the “imperfections” are what make things truly memorable.
Gathering Your Pavlova Party Ingredients
Here’s your shopping list for this edible elegance. The ingredient list is short and sweet, but each one plays a starring role. Let’s break it down.
For the Meringue Hearts:
- 4 large egg whites, at room temperature: This is non-negotiable! Room temp egg whites whip up much higher and fluffier than cold ones. Chef’s Tip: Separate your eggs when they’re cold (it’s easier), then let the whites sit on the counter for 30 minutes to warm up.
- 1 cup granulated sugar: Superfine or caster sugar is fantastic here as it dissolves faster, but regular granulated works perfectly fine. We’re adding it slowly to create that stable, glossy structure.
- 1 tsp cornstarch: This is our secret weapon! It helps stabilize the meringue and gives it that signature soft, marshmallow-y interior. Don’t skip it!
- 1 tsp white vinegar: Another stabilizer that works with the cornstarch to give the pavlova its perfect texture. It also helps create a crisp crust. You won’t taste it, I promise.
- 1 tsp vanilla extract: For that warm, beautiful flavor base. Feel free to use the seeds from a vanilla bean for those gorgeous little specks!
For the Toppings:
- 1 cup heavy whipping cream: We’re making our own lightly sweetened whipped cream. It’s so much better than the canned stuff and takes two minutes.
- 1 tbsp powdered sugar: For sweetening the cream. Powdered sugar incorporates smoothly and doesn’t grain.
- 1 cup mixed berries: I love a mix of sliced strawberries, raspberries, and blueberries for color and flavor. Use what’s fresh and beautiful!
- ¼ cup passion fruit curd: This is our “creative twist.” The tropical, tangy punch is incredible with the sweet meringue and cream. Substitution Tip: No passion fruit curd? A drizzle of melted dark chocolate, a raspberry coulis, or even a lemon curd would be absolutely divine.
Let’s Build These Edible Hearts: A Step-by-Step Guide
Okay, team. Let’s do this. Read through all the steps once before you start—it’s like scoping out the trail before a hike. You’ll feel more confident, I promise.
- Prep Your Stage. Preheat your oven to 250°F (120°C). This is a low-and-slow situation. Line a large baking sheet with parchment paper. Pro Hack: Dot a little meringue under each corner of the parchment to glue it to the pan. This prevents it from sliding around when you’re piping. If you’re feeling fancy, you can even lightly trace six 4-inch heart shapes on the parchment as a guide, then flip the paper over.
- Whip It Good. In a scrupulously clean, dry bowl of a stand mixer (or using a hand mixer), beat your room-temp egg whites on medium speed until they become frothy and form soft peaks. You’ll know you have soft peaks when you lift the whisk and the peaks curl over at the top. Why a clean bowl? Any trace of grease or yolk can prevent the egg whites from whipping up properly. We’re building a strong, airy structure here!
- The Slow Sugar Rush. Now, here’s the most crucial part. With the mixer on medium-high speed, start adding your sugar, one tablespoon at a time. Let each spoonful incorporate fully before adding the next. This patience is what gives you that thick, glossy, stiff meringue that doesn’t weep. Once all the sugar is in, keep beating for another 2-3 minutes until the meringue is thick, glossy, and holds stiff, upright peaks. To test, rub a little meringue between your fingers—it should feel smooth, not gritty. If it’s gritty, keep beating until the sugar dissolves.
- The Gentle Fold. Sprinkle the cornstarch over the meringue. Add the vinegar and vanilla. Now, with a spatula, gently fold these ingredients in. We’re not stirring! We’re carefully cutting through the center and folding the meringue over itself to incorporate everything without deflating all that beautiful air we just whipped in. Be gentle but thorough.
- Pipe with Love. Spoon your meringue into a piping bag fitted with a large round tip (or just snip the end off a zip-top bag). Pipe your heart shapes onto the prepared baking sheet. Start by piping a “V” shape for the top of the heart, then fill in the sides and bottom to create the classic heart shape. Don’t worry about perfection! Rustic is charming. Chef’s Insight: Make sure the edges of your hearts are a little higher than the center, creating a slight well to hold all that delicious cream and fruit later.
- The Long Bake & The Patient Cool. Place the baking sheet in the preheated oven and bake for 1 hour. DO NOT open the oven door during this time! After the hour is up, turn off the oven. Now, here’s the second most important step: let the pavlovas cool completely inside the oven with the door slightly ajar. I prop mine open with a wooden spoon. This slow, gradual cooling is what prevents cracking and gives you that perfect crisp-yet-chewy texture. This takes about an hour, so go watch an episode of your favorite show.
- The Grand Finale: Toppings! Once the meringue hearts are completely cool, it’s time to dress them up. Whip the heavy cream and powdered sugar together until you have soft peaks. Just before serving, top each heart with a generous cloud of whipped cream, a artful pile of those gorgeous berries, and a final, dramatic drizzle of that vibrant passion fruit curd.
How to Serve These Stunning Mini Pavlovas
Presentation is part of the fun! I love serving these on a beautiful, large wooden board or a simple white platter to let the colors of the berries and passion fruit really pop. Arrange them with a little space between each one so they look like individual works of art.
For a real “wow” moment, bring the components to the table separately and let everyone build their own. Set out the plain meringue hearts, the bowl of whipped cream, a platter of berries, and the little pitcher of passion fruit curd. It’s interactive, fun, and ensures that last-minute crispness. These are best enjoyed the day they are assembled, ideally within an hour or two of adding the cream, to keep that beautiful textural contrast. They’re the star of the show, so pair them with a simple cup of coffee, a glass of sparkling wine, or a floral tea.
Mix It Up! Creative Twists on the Classic
One of my favorite things about this recipe is how adaptable it is. Don’t be afraid to make it yours! Here are a few ideas to get those creative juices flowing:
- Chocolate Orange Dream: Fold 1 tbsp of unsweetened cocoa powder and the zest of one orange into the meringue at the end. Top with whipped cream and chocolate shavings.
- Tropical Vacation: Swap the mixed berries for a combo of diced mango, toasted coconut flakes, and a drizzle of the passion fruit curd. Instant beach vibes!
- Lemon Blueberry Bliss: Use lemon curd instead of passion fruit and top with fresh blueberries and a sprig of mint. A classic for a reason.
- Peppermint Mocha (for the holidays!): Fold 1 tsp of instant espresso powder into the meringue. Top with whipped cream, crushed peppermint candies, and a dark chocolate drizzle.
- Dairy-Free Delight: Use chilled coconut cream (the solid part from a can of full-fat coconut milk) whipped with a little maple syrup instead of traditional whipped cream.
Jackson’s Chef Notes & Kitchen Confessions
This recipe has become my go-to for “I need something impressive, stat!” moments. Over the years, I’ve learned a few things. Humidity is meringue’s nemesis—try to avoid making these on a really rainy day if you can. If you don’t have a piping bag, no sweat! A couple of spoons can be used to shape the hearts just fine. Embrace the rustic look.
And a funny story: I once was so focused on not cracking the pavlovas that I forgot to add the sugar to the whipped cream. We served them with plain, unsweetened cream. My friend took a bite, paused, and said, “Wow, Jackson, this is… so… subtle.” We all had a good laugh, then passed around the powdered sugar shaker. It was a great reminder that even the “mistakes” are usually pretty darn tasty. The goal is to have fun and share something made with love.
Your Pavlova Questions, Answered!
Let’s tackle some common questions head-on so you feel totally confident.
Q: My meringue is weeping (a sticky liquid on the surface). What happened?
A: Weeping is usually caused by undissolved sugar or humidity. Make sure you add the sugar slowly enough for it to fully dissolve, and try to make these on a dry day. A little bit of stickiness is normal, but a thorough, slow bake and cool should prevent major weeping.
Q: Can I make the meringue shells ahead of time?
A: Absolutely! This is a fantastic make-ahead trick. Once the meringue shells are completely cooled, store them in an airtight container at room temperature for up to 2-3 days. Just wait to add the toppings until right before you serve.
Q: My pavlovas cracked! Are they ruined?
A: Not at all! Welcome to the club. Cracking is very common and usually happens from a too-rapid temperature change. Remember my first pavlova story? The toppings are your best friend and will hide any and all cracks. They will still taste incredible.
Q: Can I make one big pavlova instead of minis?
A> You bet. Pipe or spread the meringue into one large 8-inch circle on the parchment. You’ll need to bake it a bit longer, about 1 hour and 15-20 minutes, followed by the same slow cool in the oven.
A Quick Note on Nutrition & Dietary Info
While I’m all about the flavor first, it’s nice to know what you’re enjoying! These Heart-Shaped Mini Pavlovas are naturally gluten-free, which is a great bonus for friends with dietary needs. They are also relatively low in fat, with most of the calories coming from the natural sugars in the meringue and fruit. The whipped cream adds a bit of dairy fat, but you can control that by how much you use. Each serving (one fully dressed pavlova) comes in at around 180 calories, making it a relatively light yet utterly satisfying dessert. It’s a treat you can feel good about sharing.
You’ve Got This!
And there you have it! My complete guide to creating these stunning, delicious, and fun Heart-Shaped Mini Pavlovas. Remember, cooking is an adventure. It’s about the joy of creating something with your own hands, the stories you collect along the way (even the fiascoes!), and the smiles you get to share around the table.
So don’t be intimidated by the meringue. Embrace the process, pipe those hearts with confidence, and get ready for the “oohs” and “aahs.” You are about to create something truly unforgettable. Now, I’d love to see your creations! Tag me @FoodMeld on social media so I can celebrate with you. Let’s cook something awesome together.


