
Let’s Make Some Sweet, Crunchy Magic: Valentine Rice Krispie Hearts!
Hey friends, Jackson from Food Meld here. Let’s be real for a second. Valentine’s Day can sometimes feel like a whole lot of pressure, right? Fancy dinners, expensive chocolates, reservations you have to book in October… it’s a lot. But you know what I think the day should really be about? Fun, laughter, and sharing something made with your own two hands. That’s where the magic happens. And that’s exactly why I’m so pumped to share this recipe with you today.
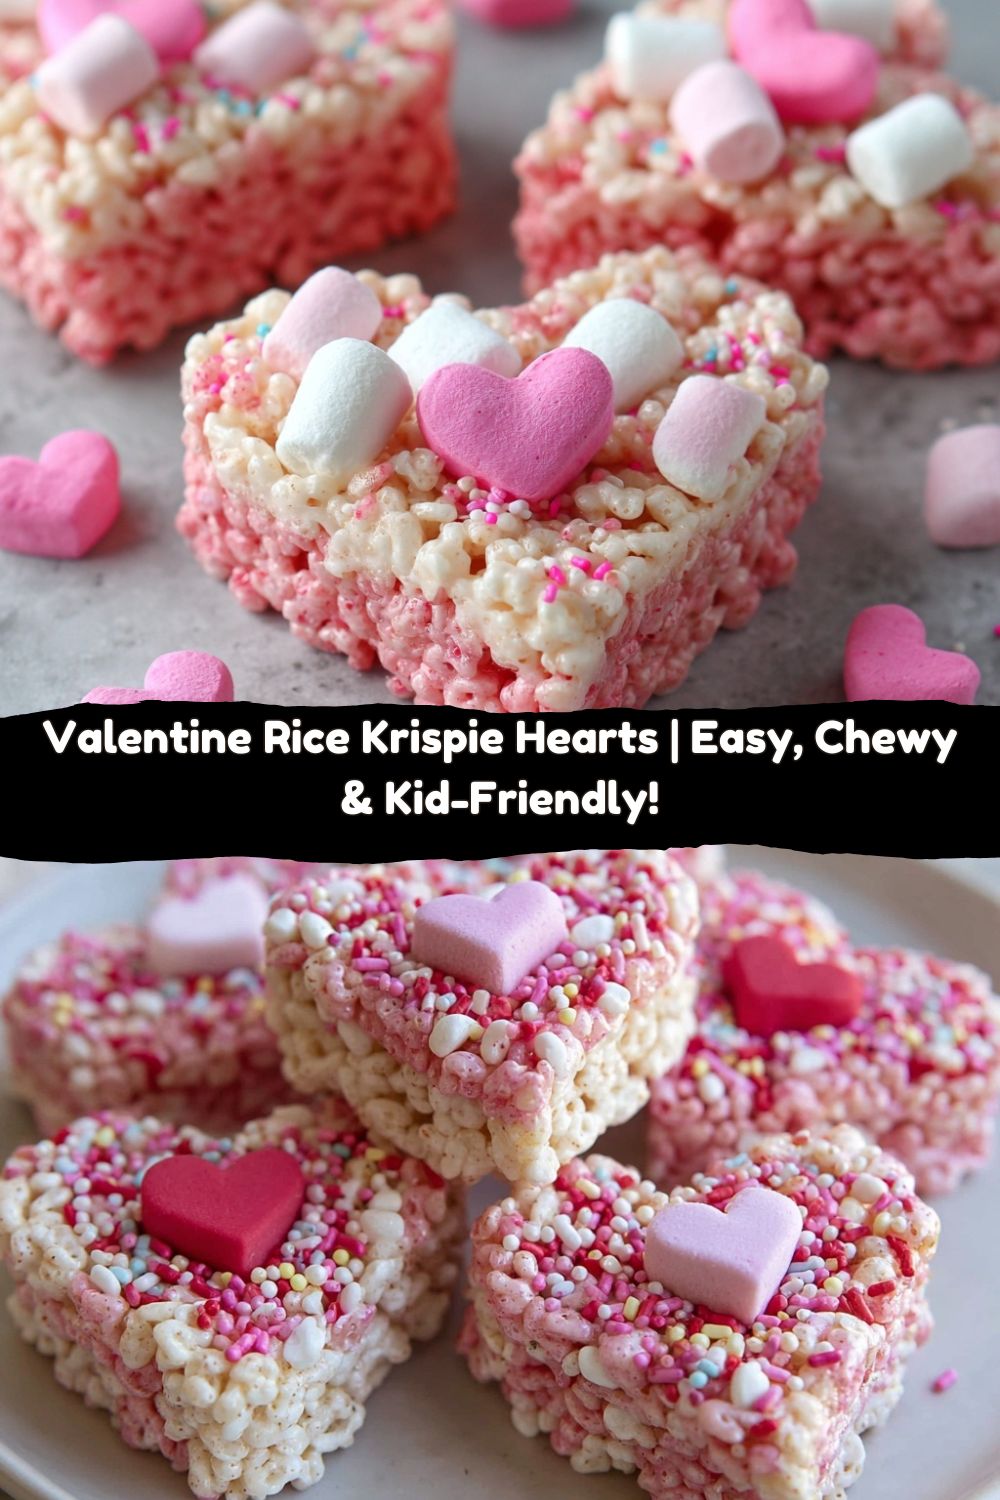
We’re taking a classic, the one treat that probably brings back a flood of happy childhood memories, and giving it a major dose of love. We’re making Valentine Rice Krispie Hearts! Now, before you think, “Jackson, I’ve made Rice Krispie treats a million times,” hear me out. This isn’t just about slapping some pink dye into melted marshmallows. We’re going to create the chewiest, most perfectly textured treats you’ve ever had, then cut them into adorable, shareable hearts that are guaranteed to bring a smile to anyone’s face.
This is the perfect project to do with your kids, your partner, or just by yourself with some good music blasting. It’s forgiving, it’s fast, and the result is pure, unadulterated joy in edible form. So, grab your biggest saucepan and your favorite heart-shaped cutter. We’re about to cook up some awesome, messy, and totally unforgettable fun. Welcome to Food Meld, where flavor meets fun, and today, where crunch meets cute!
A Little Story Behind the Crunch
This recipe always takes me right back to my grandma’s linoleum-floored kitchen. Every year for my school’s Valentine’s Day party, she’d help me make a giant batch of these. But back then, we didn’t have fancy heart cutters. We’d press the warm, sticky mixture into a pan, let it cool, and then we’d go at it with a butter knife, free-handing the most wonky, lopsided hearts you’ve ever seen. Some looked more like blobs, others like apples, but we didn’t care. We’d pile them high on a paper plate, and I’d march into school feeling like a culinary champion.
Those lumpy, pink hearts were always the first thing to disappear from the class snack table. It wasn’t about perfection; it was about the love and the little bit of mess we made together. That’s the spirit I want you to bring to your kitchen today. Don’t stress if your hearts aren’t bakery-perfect. It’s the homemade charm and the fun you had making them that truly makes them special. Now, let’s get to the good stuff!
Gathering Your Sweet Supplies
Here’s the beautiful part: you only need a handful of simple ingredients to create something truly magical. This is all about quality, not complexity.
- 3 tbsp Unsalted Butter: This is our flavor foundation. Using unsalted lets you control the salt level, but salted works in a pinch for a sweet-and-salty vibe! Pro-tip: Don’t sub margarine; the water content can mess with our perfect chewy texture.
- 4 cups Mini Marshmallows: Mini marshmallows melt faster and more evenly than the big guys, which is key for a smooth, lump-free base. If you only have large, just give them a rough chop before melting.
- 6 cups Rice Krispies Cereal: The star of the show! That iconic snap, crackle, and pop is what we’re after. Make sure your box is fresh for the best crunch.
- Red or Pink Food Coloring: Gel food coloring is my secret weapon here. It gives you a vibrant pink color without adding extra liquid that can make your treats soggy. Liquid works too, just use it sparingly!
- Heart-Shaped Cookie Cutter: The tool that makes the magic happen! A 2-3 inch cutter is the perfect, bite-sized sweet spot.
- Sprinkles, Melted Chocolate, or Candy Melts (Optional): This is where you get to be an artist. Raid your baking cupboard and have fun! A little drizzle of dark chocolate can balance the sweetness beautifully.
Let’s Build These Beautiful Hearts: A Step-by-Step Guide
Okay, team. This is where the fun begins. I’ll walk you through every step, and I’m throwing in all my favorite chef hacks to guarantee your success. Read through once, then let’s get cooking!
- Prep Your Pan & Tools: Before you even turn on the stove, grease a 9×13 inch baking pan with a little butter or non-stick spray. Also, grab your spatula and give it a quick buttering, too. Trust me, this pre-game ritual is the difference between a sticky nightmare and a dream release later. Chef’s Hack: Lining the pan with parchment paper and leaving an overhang on two sides is a game-changer. You can just lift the whole slab out once it’s cooled!
- Melt the Butter: Grab your largest saucepan and place it over low heat. Add your 3 tablespoons of butter and let it melt gently. We’re not trying to brown it here, just get it liquid and happy. Low and slow is the name of the game—we don’t want any scorching.
- Melt the Marshmallows: Once the butter is melted, dump in all 4 cups of mini marshmallows. Keep that heat on low and stir constantly with a sturdy spatula. You’ll watch them go from fluffy white puffs to a smooth, glorious, lava-like goo. This should take about 5-7 minutes. Chef’s Hack: Remove the pan from the heat just before the last marshmallow fully melts. The residual heat will finish the job, preventing you from overcooking the sugar.
- Add the Pink Power! Now, take your pan off the heat. This is the moment! Add your red or pink food coloring. I recommend starting with 3-4 drops of gel color (or 6-8 drops of liquid) and stirring it in. You can always add more to reach your desired shade of Valentine fabulousness.
- The Great Cereal Mix-In: Immediately pour all 6 cups of Rice Krispies cereal into the marshmallow mixture. Now, work quickly and decisively! Use your buttered spatula to fold and stir until every single piece of cereal is coated in that pink, gooey goodness. You’ll hear the symphony of crackles—it’s the sound of success!
- Press with Purpose: Quickly transfer the mixture into your prepared pan. Now, here’s the secret to the perfect texture: don’t press down too hard! Use your buttered spatula or a sheet of wax paper to gently press the mixture into an even layer. If you compact it, you’ll get a hard, dense brick. We want a light, chewy, airy treat. A gentle press is all it needs.
- The (Brief) Waiting Game: Let the pan sit at room temperature to cool and set. This usually takes about 10-15 minutes. You want it to be firm enough to hold its shape but still slightly warm so it’s easier to cut. Chef’s Hack: Resist the urge to put it in the fridge! Rapid cooling can cause the treats to sweat and get sticky.
- Cut Out the Hearts! Now for the most satisfying part! Take your heart-shaped cookie cutter and press it firmly straight down into the treats. Don’t twist it, just push down and pull straight up. This gives you the cleanest edges. Re-roll the scraps to cut out more hearts until you’ve used all the mixture.
- Deck Them Out (Optional but Awesome): Once all your hearts are cut, it’s time to decorate! Melt some chocolate or candy melts, grab your sprinkles, and go wild. A simple zig-zag drizzle or a quick dip in chocolate followed by a sprinkle shower makes them look professional and extra special.
How to Serve Up These Sweethearts
Presentation is part of the fun! You don’t need anything fancy to make these treats look incredible. Pile them high on a rustic wooden board for a charming, homemade feel. For a super cute gift, stack a few in a clear cellophane bag, tie it with a pretty ribbon, and you’ve got a present that’s straight from the heart (pun totally intended).
These are the ultimate lunchbox surprise. Tuck one into your kid’s lunch (or your partner’s!) for a mid-day smile. They’re also the star of any party platter. Arrange them on a plate with some fresh berries and other sweet treats for a beautiful, colorful spread. However you serve them, just be ready for the “oohs” and “aahs” and the inevitable question: “Can I have the recipe?”
Mix It Up! Creative Twists on the Classic
Once you’ve mastered the basic recipe, the playground of possibilities opens up! Here are a few of my favorite ways to mix it up and make these hearts your own.
- Chocolate-Dipped Dream: Melt 1 cup of semi-sweet or white chocolate chips with a teaspoon of coconut oil. Dip half of each heart into the chocolate, let the excess drip off, and place on parchment paper to set. Instant elegance!
- Fruity Pebbles Swirl: Replace 1 cup of the Rice Krispies with 1 cup of Fruity Pebbles cereal. You’ll get a gorgeous, confetti-like color and a fun fruity flavor. No extra food coloring needed!
- Peanut Butter Lover’s Delight: Stir ½ cup of creamy peanut butter into the melted marshmallow mixture right before adding the cereal. It adds a rich, salty depth that is absolutely irresistible.
- Confetti Sprinkle Fun: After mixing in the cereal, fold in ¼ cup of Valentine-themed sprinkles or rainbow jimmies. This gives the inside of the hearts a fun, confetti-filled look!
- “Gourmet” Brown Butter Version: For a more grown-up twist, start by browning your butter in the first step. Let it melt and then continue to cook until it smells nutty and you see little brown bits at the bottom. This adds an incredible, deep, toffee-like flavor that is just next-level.
Jackson’s Chef’s Notes & Kitchen Confessions
This recipe has been through a lot of testing in the Food Meld kitchen. My first-ever batch was a complete disaster—I cranked the heat to high to melt the marshmallows faster and ended up with a pan of hard, caramel-colored rocks. Lesson learned: patience is a virtue, especially with sugar!
Over time, I’ve found that the brand of marshmallow can make a subtle difference in gooey-ness, and a pinch of flaky sea salt sprinkled over the top right after pressing it into the pan is a revelation. Don’t be afraid to play and make it yours. The best recipes are the ones that evolve with you in your own kitchen.
Your Questions, Answered!
I’ve gotten a lot of questions about this recipe over the years, so I’ve gathered the most common ones here to help you out.
- Q: My treats came out really hard. What did I do wrong?
A: The most common culprit is overcooking the marshmallows. Keep that heat on low and take the pan off the heat as soon as they’re just melted. Also, avoid compacting the mixture too hard when you press it into the pan.
- Q: My treats are too sticky and messy to handle. Help!
A: This usually means the mixture needed a bit more time to set. Let them cool for a full 15-20 minutes. If you’re in a hurry, 10 minutes in the fridge can help, but no longer! Also, using a well-buttered spatula and hands when pressing and cutting is key.
- Q: Can I make these ahead of time?
A: Absolutely! They are best enjoyed within 24 hours, but they will keep just fine in an airtight container at room temperature for 2-3 days. If you’ve decorated with chocolate, they might last a day longer in the fridge.
- Q: I don’t have a heart-shaped cutter. What can I use instead?
A: No problem! Get creative. You can use any shaped cutter you have. No cutters? Let the mixture cool completely, then simply use a sharp knife to cut them into squares or bars. They’ll be just as delicious!
Nutritional Info (For the Curious!)
Okay, let’s keep it real—these are a treat, through and through! But I believe in transparency, so here’s a general breakdown per heart (assuming you get about 12 from the batch). Remember, these numbers can vary based on the specific brands you use and your decorations.
- Calories: ~130
- Sugar: 10g
- Fat: 3g
- Carbohydrates: 24g
This is a fun, occasional indulgence to share with loved ones. The joy and connection you get from making them together is the real nutritional value here!
Final Thoughts from My Kitchen to Yours
And there you have it! You’re now fully equipped to spread some serious, homemade Valentine’s cheer. I hope this recipe brings as much laughter and joy to your kitchen as it has to mine over the years. Remember, cooking is about the experience—the little bit of mess, the smell of toasting marshmallows, and the pride of creating something delightful to share.
So, don’t wait for a special occasion to make someone’s day. Whip up a batch of these Valentine Rice Krispie Hearts for your neighbors, your coworkers, your family, or just for you. Because you deserve a sweet, chewy, pink heart, too.
I’d love to see your creations! Tag me on social @FoodMeld so I can share in the fun. Now go on, let’s cook something awesome together!
With love and a full spatula,
Jackson


