The Viral Taco Wrap Hack That’s Breaking the Internet (And Your Boring Dinner Routine)
Hey, friends! Jackson from Food Meld here. Have you ever been scrolling through your feed, seen one of those incredibly satisfying food videos, and just had to stop everything and make it? You know the ones—where something simple gets folded, twisted, or hacked into a perfect, golden package of deliciousness? Yeah, me too. And let me tell you, this Creamy Taco Tortilla Wrap Hack is one of those “drop everything and head to the kitchen” kind of recipes.
We’re talking about everything you love about taco night—the savory, perfectly seasoned meat, the gooey, melting cheese, the cool, creamy toppings—all rolled (or, more accurately, folded) into one handheld masterpiece. But we’re not stopping there. We’re adding a secret weapon: an unbeatable, satisfying CRUNCH from everyone’s favorite chip. It’s the textural surprise that takes this from a great wrap to a legendary one.
I live for recipes like this. They’re fun, they’re a little messy, and they’re guaranteed to create those “you’ve gotta try this!” moments I’m always chasing. This isn’t about fancy techniques or hard-to-find ingredients. It’s about taking bold, comforting flavors and presenting them in a new, creative, and utterly addictive way. So, if you’re ready to break out of your dinner rut and cook something that’s equal parts fun and flavor-packed, you’re in the right place. Let’s grab our skillets and make some magic happen.

More Than a Hack: A Trip Down Memory Lane
This recipe instantly takes me back to my grandma’s kitchen table after a big high school football game. My friends would pile into her house, starving and buzzing with energy, and she’d have a massive spread laid out: a huge bowl of taco meat, shredded cheese, sour cream, salsa, and—this is the crucial part—a giant bag of Nacho Cheese Doritos. We’d build these monstrous, overstuffed, and completely unstable soft tacos that would inevitably crumble all over our plates.
The best part, though, was always the very last bite. You’d scoop up all the fallen bits of meat, cheese, and broken chip pieces with your fork. That final, glorious forkful had every single component in perfect harmony—creamy, crunchy, savory, and cheesy all at once. This wrap hack? It’s that perfect final bite, engineered into every single section. It’s my culinary homage to those messy, happy, and deeply comforting Friday nights. It’s the taste of community, laughter, and my grandma’s unwavering rule: no one leaves her table hungry.
Gathering Your Flavor Arsenal
Here’s your grocery list for greatness. Don’t be shy—this is where the fun begins!
- 1 lb Ground Beef (80/20 blend is perfect): This is our flavor foundation. The little bit of extra fat in an 80/20 blend keeps the meat juicy and flavorful. Feel free to swap in ground turkey, chicken, or even a plant-based crumble for a fantastic twist!
- 1 Packet Taco Seasoning (or 2-3 tbsp of your favorite homemade blend): This is our shortcut to big, bold flavor. I’m a fan of the classic packet for its convenience, but if you have a homemade mix (a little chili powder, cumin, paprika, garlic powder), this is the time to use it!
- 4 Large Burrito-Size Flour Tortillas: The bigger, the better! We need that real estate to create our four quadrants. The pliable, soft texture is key for a perfect, non-cracking fold.
- ½ block (4 oz) Cream Cheese, softened: This is our first layer of creamy magic. Mixing it right into the taco meat creates an incredibly rich and velvety base. Pro tip: let it sit on the counter for 30 minutes before you start—it’ll blend in seamlessly.
- 1 cup Shredded Velveeta or Cheddar Cheese: Velveeta is my go-to for that iconic, super-melty, creamy-cheese pull. But a good sharp cheddar will give you a more pronounced cheesy flavor. You can’t lose either way.
- ½ cup Sour Cream: This brings the cool, tangy creaminess that balances the spice from the taco seasoning. Greek yogurt is a great substitute if that’s what you have on hand.
- ¼ cup Taco Sauce or your favorite Salsa: A little extra moisture and a punch of zesty flavor. I love a smoky chipotle sauce here, but a classic red taco sauce works perfectly.
- 1 cup Crushed Nacho Cheese Doritos: The star of the show! This is what gives you that iconic CRUNCH. Regular tortilla chips work too, but the seasoned flavor of Doritos really takes it over the top.
- Olive Oil Spray or Butter for the Pan: For achieving that gorgeous, golden-brown, crispy exterior. Butter will give you a richer flavor, but spray is super easy and effective.
Let’s Build Our Flavor Masterpiece: A Step-by-Step Guide
Okay, team. Let’s get our hands dirty. Follow these steps, and you’ll be a wrap-hacking pro in no time.
Step 1: Cook the Creamy Taco Meat
Grab your trusty skillet—I live in mine—and set it over medium-high heat. Crumble in that ground beef and let it get a beautiful brown sear, breaking it up as it cooks. Once it’s no longer pink, drain off any excess grease. Now, sprinkle over that taco seasoning and add a splash of water (about ¼ cup). Let it bubble and simmer for a minute until it’s fragrant. Reduce the heat to low, and here’s the game-changer: plop in that softened cream cheese. Stir, stir, stir until it’s completely melted and has created the most luscious, creamy coating on the beef. Take it off the heat. Chef’s Hack: The cream cheese not only adds richness but also helps bind the meat, making the wrap less likely to fall apart later.
Step 2: Prep Your Tortilla “Canvas”
Lay one of your large flour tortillas flat on a cutting board. Now, imagine it’s a clock. Take a sharp knife and make one single cut, starting from the very center and going straight down to the bottom edge (so from 12 o’clock to 6 o’clock). You’ve just divided your tortilla into four imaginary quadrants! Repeat with the remaining tortillas.
Step 3: The Quadrant Method – Layer It Up!
This is the fun, assembly-line part. Working clockwise from your cut, we’re going to build our flavors in four distinct sections. Don’t spread the ingredients to the very edge—leave about a ½-inch border.
- Bottom-Left Quadrant: Sprinkle a generous handful of your Velveeta or cheddar cheese. This is our primary melty layer.
- Top-Left Quadrant: Spread a few tablespoons of sour cream evenly over this section. Hello, cool creaminess!
- Top-Right Quadrant: Spoon a hearty portion of your creamy taco meat. Press it down gently so it stays in place.
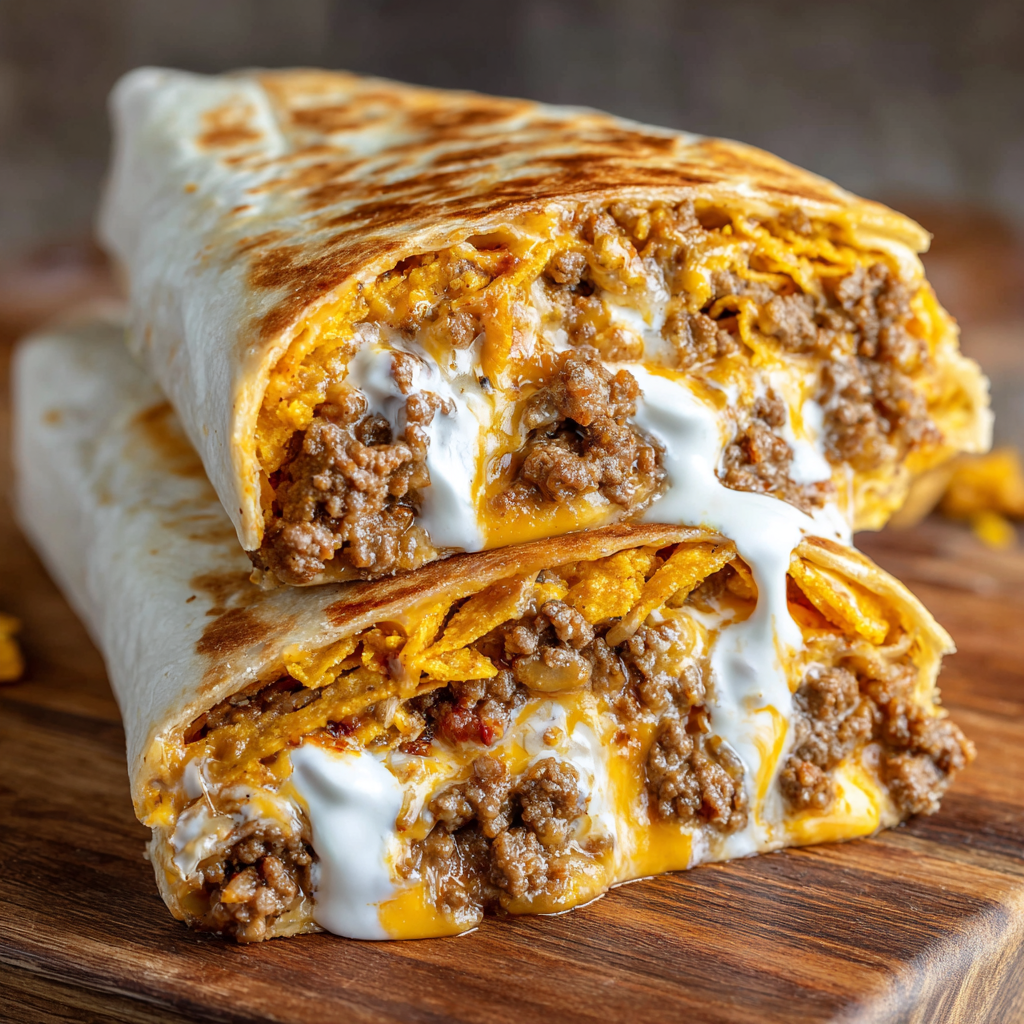
- Bottom-Right Quadrant: This is where the magic happens! Scatter a small handful of your crushed Doritos. This is our crunch quadrant!
Step 4: The Perfect Fold
Now for the origami! We’re going to fold this into a neat, layered triangle. Start with the bottom-left quadrant (the one with the cheese). Fold it up and over onto the top-left quadrant (the sour cream one). You should now have a semi-circle. Next, fold that semi-circle to the right, onto the top-right quadrant (the taco meat). Almost there! Finally, fold this now-thick wedge down and onto the final quadrant (the glorious Doritos). You should end up with a perfect, stuffed triangle. Press down gently to seal the deal. Chef’s Hack: If your tortilla feels like it’s resisting, give it a quick 10-second zap in the microwave first. A warm tortilla is a flexible tortilla!
Step 5: Pan-Fry to Golden Perfection
Wipe out your skillet (or grab a clean one) and set it over medium heat. Give it a good spray with olive oil or melt a pat of butter. Carefully place your folded wrap in the pan. Let it cook for 2-3 minutes, until the bottom is golden brown and beautifully crisp. This is where the texture goes from good to mind-blowing. Using a spatula, carefully flip it over. Cook for another 2-3 minutes on the second side until it’s equally golden and you can see the cheese starting to ooze out the sides. That’s the signal of success! Repeat with the remaining wraps.
How to Serve This Handheld Hero
You can absolutely just grab this and take a big, happy bite straight from the skillet—no judgment here! But if you want to make it a full meal or serve it to guests, here are my go-to moves.
First, let it rest for a minute after it comes out of the pan. This allows the molten cheese to set just a tiny bit so it doesn’t all come rushing out on the first bite. Then, I love to slice it in half diagonally, right through the center. This reveals all those beautiful, colorful layers and makes it easier to handle.
Serve it with a vibrant side salad to cut through the richness, or a big bowl of tortilla soup for the ultimate comfort food duo. And of course, don’t forget the dipping squad! Put out little bowls of extra salsa, a big scoop of guacamole, a dollop of cool sour cream, and your favorite hot sauce. Let everyone customize their dipping experience. It’s all about that interactive, fun Food Meld energy!
Make It Your Own: Endless Flavor Twists
The beauty of this hack is its versatility. Once you master the basic fold, the flavor world is your oyster! Here are a few of my favorite spins:
- The Buffalo Chicken Swap: Use shredded rotisserie chicken tossed in buffalo sauce instead of taco meat. Swap the cheddar for blue cheese crumbles, and use cool ranch Doritos for the crunch. Incredible.
- Breakfast-for-Dinner Delight: Fill it with scrambled eggs, cooked breakfast sausage, cheddar cheese, and a layer of crispy tater tots. Serve with salsa for dipping.
- Fully Loaded Veggie Style: Sauté bell peppers, onions, black beans, and corn with taco seasoning. Use this as your base instead of meat, and maybe add a spicy pepper jack cheese for kick.
- The “Pizza-rito”: Spread a layer of marinara sauce, then pepperoni, cooked Italian sausage, and a mix of mozzarella and parmesan. Use garlic butter to pan-fry for an extra flavor punch.
Jackson’s Kitchen Notes & Stories
I can’t tell you how many times I’ve tested this recipe. The first time, I got a little *too* enthusiastic with the filling and tried to fold what was essentially a small mountain. Let’s just say the structural integrity was… lacking. A delicious, cheesy, meaty landslide all over the skillet. A tasty mess, but a mess nonetheless! The lesson? Don’t overstuff. A generous but sensible amount in each quadrant is the key to a perfect fold.
This recipe has also become my secret weapon for game day. I’ll prep a whole platter of them, keep them warm in the oven, and watch them disappear faster than you can say “touchdown.” They’re the ultimate crowd-pleaser and proof that the best food is often the most fun to eat.
Your Questions, Answered!
Q: My wrap keeps falling apart when I flip it! What am I doing wrong?
A: Ah, the classic flip-fail! This usually comes down to two things: 1) Overstuffing – remember, less is more when you’re learning the fold. 2) Not getting a good sear on the first side. Make sure your pan is properly preheated and you’re letting the first side get truly golden and crisp before you even think about flipping. A confident, quick flip with a good spatula is your best friend.
Q: Can I make these ahead of time?
A: You can absolutely assemble them ahead of time! Wrap them tightly in plastic wrap and refrigerate for up to 4 hours. When you’re ready, just pan-fry them straight from the fridge. You might need to add an extra minute to the cooking time since they’ll be cold. I don’t recommend freezing them, as the tortilla can get soggy.
Q: The chips got soggy. How do I keep the crunch?
A: Great question! The key is to create a barrier. Make sure you have a good layer of cheese or sour cream between the hot taco meat and the chip quadrant. Also, don’t let the assembled wraps sit for too long before cooking—get them into the pan pronto! The quick cook time seals the deal and preserves that perfect crunch.
Q: Can I bake these instead of pan-frying?
A> For sure! For a slightly lighter option, preheat your oven to 400°F (200°C). Place the assembled wraps on a baking sheet lined with parchment paper, spray the tops with olive oil, and bake for 10-15 minutes, flipping halfway through, until golden brown and crispy.
Let’s Talk Nutrition & Balance
Look, I’m all about balance. This creamy taco wrap is the definition of a bold, comforting indulgence. It’s packed with protein from the ground beef to keep you full and satisfied, and the carbs from the tortilla give you that energy boost. It’s a hearty, fulfilling meal.
If you’re looking to lighten it up a bit, you absolutely can! Use 93% lean ground beef or ground turkey, light sour cream, and reduced-fat cream cheese. You can also find lower-carb tortillas that work wonderfully. But sometimes, your soul needs that full-fat, melty, cheesy experience, and that’s more than okay. Food is joy, and this recipe is pure, unapologetic joy. Listen to your body, and enjoy every single bite without guilt.
Your New Go-To Recipe Awaits
And there you have it, friends! My take on the viral taco wrap hack that’s as fun to make as it is to eat. This is what Food Meld is all about: taking those familiar, beloved flavors and presenting them in a way that feels new, exciting, and totally shareable.
I hope this recipe brings as much laughter and satisfaction to your kitchen table as it has to mine. Don’t be afraid to get a little messy, to experiment with your own fillings, and to make it truly yours. That’s where the best cooking memories are made.
So, what are you waiting for? Grab those tortillas and let’s cook something awesome together. And when you make it, be sure to tag me @FoodMeld online—I love seeing your creations!
Until next time, keep melding those flavors!
– Jackson


