When a Pie is More Than Just Dessert
Hey friends, Jackson here from Food Meld. Let me ask you a question: have you ever had a dessert so simple, so unassuming, that it completely disarms you with its sheer, unadulterated deliciousness? I’m talking about the kind of treat that doesn’t need fancy piping, a long list of ingredients, or a culinary degree to pull off. The kind of dessert that feels like a warm, chocolatey hug from the inside out.
That, my friends, is the magic of Old-Fashioned Fudge Pie. This isn’t just a recipe; it’s an heirloom. It’s the pie you find tucked away in recipe boxes, written on faded index cards in beautiful cursive handwriting. It’s the dessert that grandmas have been whipping up for generations when they need to say “I love you” without actually saying a word. With a crisp, buttery crust and a filling that’s rich, fudgy, and gloriously gooey, this pie is a testament to the power of simple, honest ingredients.
And the best part? It comes together in one bowl with about five minutes of active effort. If you can stir, you can make this pie. It might not win a beauty contest—it’s a humble, homely pie that cracks and settles—but I promise you, the second that first bite of warm, chocolate-packed goodness hits your tongue, you’ll understand. You’ll understand why this pie has stood the test of time. So, let’s ditch the intimidation, get a little messy, and cook something awesome together. Welcome to Food Meld, where flavor meets fun, starting with this timeless classic.
A Slice of Sweet Memory
This pie takes me right back to my Aunt Carol’s kitchen in Georgia. It was always a whirlwind of noise, laughter, and the most incredible smells. One sweltering summer afternoon, after we’d all been running around her backyard, she called me over and handed me a bowl and a whisk. “Jackson,” she said, her eyes twinkling, “you’re old enough to learn the secret now.” The “secret” was this fudge pie. She guided my small hands, showing me how to stir the glossy, chocolate-brown batter until it was perfectly smooth. I remember the anticipation as it baked, the entire house filling with the scent of melting chocolate and butter. When she finally pulled it from the oven, it was puffed and dramatic. We didn’t even wait for it to cool properly before she cut a still-steaming slice, plopped a scoop of vanilla bean ice cream on top, and handed it to me. That first bite—the contrast of the cold ice cream with the warm, almost brownie-like filling—was a core memory. It was my first real “you’ve gotta try this” moment, and it’s the feeling I try to recreate with every recipe I share.
Gathering Your Flavor Arsenal
One of the best things about this pie is its short, sweet ingredient list. You probably have most of this in your pantry right now! Here’s what you’ll need and my quick chef insights on each one.
- 1 cup granulated sugar: This is the sweet heart of the pie. It not only provides sweetness but also helps create that delicate, crackly top crust as it bakes. For a deeper flavor, you could swap half of it for light brown sugar.
- 1 stick (1/2 cup) unsalted butter, melted: Butter is non-negotiable for that rich, classic flavor. I use unsalted so I can control the salt level, but if salted butter is all you have, just skip the pinch of salt later. Melt it and let it cool slightly so it doesn’t cook the eggs when you mix it in.
- 4 tablespoons unsweetened cocoa powder: This is where your pie gets its chocolate soul! Don’t skimp on quality here. Use a natural, unsweetened cocoa powder for that classic, old-fashioned taste. Dutch-processed will work, but it will have a milder, less tangy flavor.
- 4 tablespoons all-purpose flour: This is the structural backbone that holds our fudgy center together without turning it into cake. Just a little bit is all we need. For a gluten-free version, a 1:1 GF baking blend works perfectly.
- 2 large eggs: Our binding agents! They give the filling structure and a wonderfully rich texture. Make sure they’re at room temperature to help everything emulsify into a silky-smooth batter.
- 1 teaspoon pure vanilla extract: The flavor enhancer. It rounds out the chocolate and adds a warm, aromatic depth. Imitation vanilla just won’t give you the same magic.
- 1 (9-inch) unbaked pie shell: You can absolutely use a store-bought shell to keep things easy—no judgment here! If you’re using a frozen one, let it thaw first. Or, if you’re feeling ambitious, whip up your own from scratch. Either way, make sure it’s unbaked.
- A pinch of salt: If you’re using unsalted butter, this tiny pinch is crucial. Salt makes the chocolate flavor pop and balances the sweetness beautifully.
Let’s Build Some Magic: The Step-by-Step
Alright, let’s get to the fun part. Preheat that oven to 350°F (175°C) and let’s make some magic happen. This is where we turn simple ingredients into a legendary dessert.
- Prep Your Station: First things first, get that pie shell out and ready on a baking sheet. This makes it easier to move in and out of the oven and catches any potential drips. No need to grease it or do anything fancy—just have it waiting. Chef’s Hack: Lining your baking sheet with a piece of parchment or foil is a lifesaver for easy cleanup, just in case any filling bubbles over.
- The One-Bowl Wonder: Grab a medium-sized mixing bowl. Add the sugar, melted (and slightly cooled) butter, and cocoa powder. Whisk it together. You’ll see it start to form a thick, glossy paste. This is a good sign! You’re building the chocolate base. Chef’s Insight: Whisking the butter and cocoa first helps “bloom” the cocoa, deepening its flavor before we add the other ingredients.
- Incorporate the Eggs & Vanilla: Crack in the two eggs and add that teaspoon of vanilla. Now, whisk with passion! You want to beat it until the mixture is completely smooth, with no streaks of egg visible. This is where you’re creating the silky texture of the final filling. It should look like a rich, dark chocolate sauce.
- Bring It All Together: Sprinkle the flour and that all-important pinch of salt over your chocolate mixture. Switch to a spatula or just keep whisking gently until the flour just disappears. Don’t overmix! We’re not making bread; we just want everything combined. The batter will be thin, like a thick pancake batter. That’s exactly what you want.
- Bake to Gooey Perfection: Carefully pour your beautiful batter into the waiting pie shell. Gently slide the baking sheet into your preheated oven. Now, the hardest part: wait. Bake for 25-30 minutes. You’re looking for the edges to be set and the top to have a thin, matte crust that might have a few cracks. The center will still have a slight jiggle—that’s your gooey prize waiting inside. Chef’s Pro-Tip: Set a timer for 25 minutes and check it. An overbaked fudge pie loses its magic. A toothpick inserted near the edge should come out mostly clean, but one inserted in the center should have moist crumbs attached.
- The Cool Down (If You Can Wait!): Remove the pie from the oven and place it on a wire rack. I know, the temptation is real. But let it cool for at least 20-30 minutes. This allows the filling to set up enough so you can slice it without it running everywhere. It will deflate and crack as it cools—that’s its character showing!
How to Serve This Southern Star
Presentation is key, even for a humble pie. Here’s how to turn this delicious dessert into a full-blown experience.
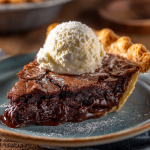
The absolute, non-negotiable, best way to serve this pie is warm. The filling is at its peak gooeyness, and the crust is still wonderfully crisp. My move is to reheat individual slices in the microwave for about 15 seconds before serving.
Now, for the accompaniments. You have options, but my gold standard is a generous scoop of high-quality vanilla bean ice cream melting slowly over the warm slice. The hot-and-cold contrast is a classic for a reason—it’s pure bliss. If ice cream isn’t your thing, a huge dollop of freshly whipped cream is a close second. For a little grown-up flair, add a pinch of cinnamon or a splash of bourbon to the cream before whipping it.
Feeling fancy? A light dusting of powdered sugar or a drizzle of salted caramel sauce takes it to the next level. And for the true chocolate purist? A simple, unadorned slice and a tall glass of cold milk is all you need.
Make It Your Own: Flavor Twists & Swaps
Once you’ve mastered the classic, it’s time to play! This recipe is a fantastic canvas for your creativity. Here are a few of my favorite twists.
- The Mocha Marvel: Add 1-2 teaspoons of instant espresso powder to the dry ingredients. It won’t make your pie taste like coffee; it will just make the chocolate flavor taste deeper, richer, and more complex.
- The Nutty Professor: Fold in 3/4 cup of chopped toasted pecans or walnuts into the batter right before pouring it into the shell. The toasty, crunchy texture against the fudgy filling is a match made in heaven.
- The Peanut Butter Cup: Dot the top of the filled pie with 1/2 cup of peanut butter chips before baking. As it bakes, they’ll melt into glorious pockets of peanut butter goodness.
- The Salted Caramel Swirl: Drizzle 1/4 cup of thick salted caramel sauce over the batter in the pie shell. Use a knife or toothpick to gently swirl it in for a beautiful marbled effect and a sweet-and-salty kick.
- The Mint Chocolate Chip: Replace the vanilla extract with 1/2 teaspoon of peppermint extract and fold in 1/2 cup of dark chocolate chips. It’s like a sophisticated, grown-up version of your favorite ice cream flavor.
Jackson’s Kitchen Notes
This recipe has been a staple in my life for so long, it feels like an old friend. I’ve made it in tiny city apartments, in my mom’s kitchen for holidays, and now in the Food Meld test kitchen. Over the years, I’ve learned a few things. First, don’t panic when it puffs up like a chocolate volcano and then deflates as it cools. That’s just science and it’s supposed to happen! The cracks and settles are part of its rustic charm. Second, I once accidentally used self-rising flour (it was a long day!) and the pie turned out a bit more cake-like, but still delicious. So if that’s all you have, don’t stress—just know the texture will be a little different. This pie is resilient and forgiving, just like a good friend should be.
Your Fudge Pie Questions, Answered!
I get a lot of questions about this pie, so I’ve gathered the most common ones here to help you out.
- My pie cracked a lot. Did I do something wrong? Not at all! In fact, significant cracking is a sign of a properly baked, wonderfully fudgy pie. It happens as the center cools and contracts. We call those “flavor cracks.” Embrace them!
- Can I make this ahead of time? You can! Bake it, let it cool completely, and then cover it tightly and store it at room temperature for a day. For the best experience, I highly recommend reheating slices before serving to bring back that gooey, fresh-from-the-oven texture.
- The center is still really liquid after 30 minutes. What now? Ovens can vary. If the center is still visibly jiggly and liquid, give it another 5-10 minutes. The very center should be *set* but still soft, not liquid. If the edges are starting to get too dark, you can tent the pie loosely with foil for the remainder of the baking time.
- What’s the best way to store leftovers? Cover the cooled pie with plastic wrap or foil and store it at room temperature for up to 2 days. For longer storage (up to 5 days), keep it in the fridge, but be sure to warm up those slices before eating!
Old-Fashioned Fudge Pie : Rich, Gooey & Timeless
- Yield: 8 Slices 1x
Description
This classic Southern fudge pie is pure nostalgia. With a crisp buttery crust and a rich, gooey chocolate filling, it’s a no-fuss dessert that’s been passed down for generations. Best served warm with a scoop of vanilla ice cream or a dollop of whipped cream. It might not win a beauty contest—but it will win over every chocolate lover at the table.
Ingredients
1 cup sugar
1 stick butter, melted
4 tablespoons cocoa powder
4 tablespoons all-purpose flour
2 large eggs
1 teaspoon vanilla extract
1 (9-inch) unbaked pie shell
Instructions
Preheat oven to 350°F (175°C).
In a medium bowl, mix together sugar, melted butter, cocoa powder, flour, eggs, and vanilla until smooth and well combined.
Pour the mixture into the unbaked 9-inch pie shell.
Bake for 25–30 minutes, or until the center is set and the top has formed a slight crust.
Allow to cool slightly before serving.
Tips:
Serve warm for an ultra-gooey center.
Store leftovers covered at room temperature for 2 days or in the fridge for up to 5.
Try adding a pinch of instant espresso for an extra chocolate kick.
Nutrition
- Calories: 300 / Pie
- Fat: 18g / Pie
- Carbohydrates: 35g / Pie
- Protein: 3g / Pie
Nutritional Info (For Your Inner Food Scientist)
Okay, let’s be real—this is a decadent dessert, not a salad! But I know many of you like to keep track, so here’s a general breakdown. Please remember, this is just an estimate and can vary based on specific ingredients and brands you use.
Per slice (assuming 8 slices per pie):
- Calories: ~300
- Protein: 3g
- Fat: 18g
- Carbohydrates: 35g
The majority of the calories come from the butter and sugar, which is what makes this pie such a rich, special treat. My philosophy? Enjoy a slice mindfully, savor every single bite, and balance it out with the rest of your day. Life’s too short not to enjoy a piece of incredible fudge pie.
Your New Go-To Dessert Awaits
And there you have it! The legendary, soul-warming, incredibly simple Old-Fashioned Fudge Pie. This is more than just a recipe; it’s a piece of culinary history you get to recreate in your own kitchen. It proves that you don’t need complicated techniques or expensive ingredients to make something truly unforgettable.
I hope this recipe brings as much joy to your kitchen as it has to mine over the years. I want to see your creations! Did you add nuts? Try the espresso powder? Tag me on social @FoodMeld and show me your beautiful, cracked, gloriously imperfect pies. Now, go preheat that oven, grab a bowl, and let’s cook something awesome together. Happy baking!


