Toffee Cookies: The Crispy, Buttery Dream You Deserve
Hey friends, Jackson here from Food Meld. Let’s get real for a second. Is there anything better than that moment you bite into a cookie that’s just… perfect? I’m not talking about a fancy, five-day, fermented-dough situation. I’m talking about the kind of cookie that feels like a warm hug. The kind that’s crispy around the edges, tender in the middle, buttery through and through, and finished with a slick of melted chocolate and a shower of crunchy nuts.
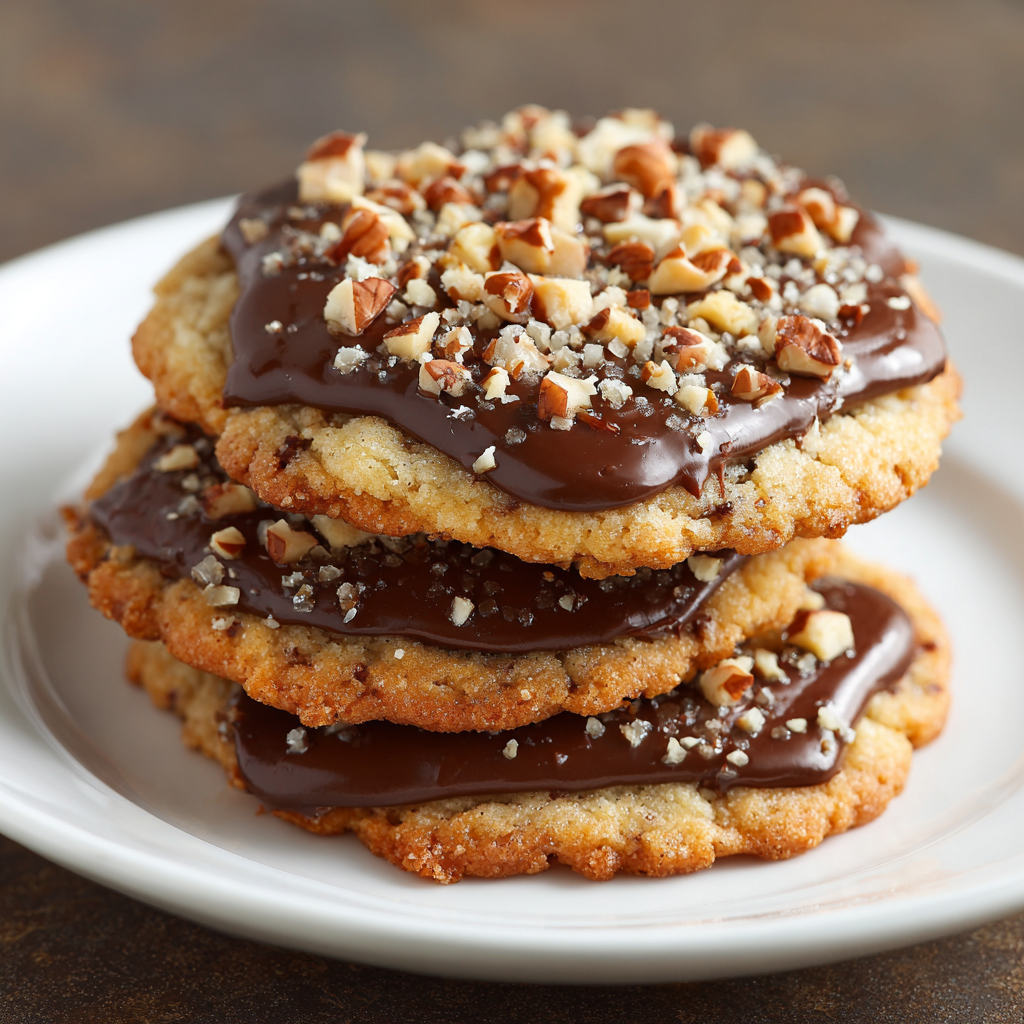
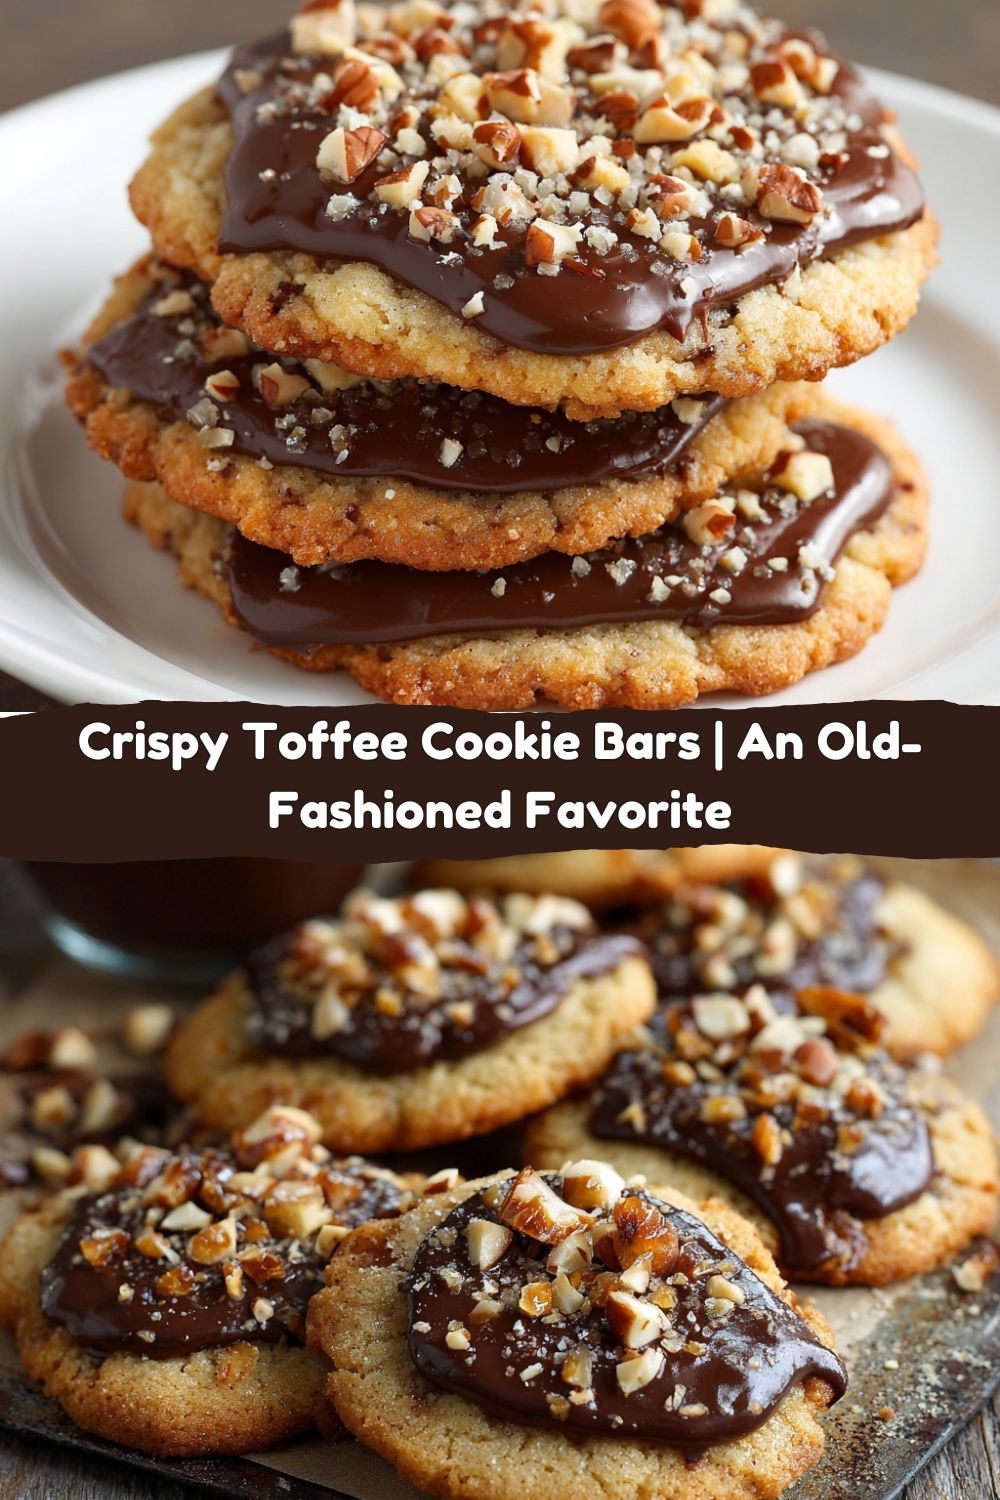
That’s the magic of these old-fashioned Toffee Cookies. They’re a bar cookie, which means you press the dough into a pan, bake it once, and get a whole batch of incredible treats with minimal fuss. They’re the ultimate “looks like you slaved away, but secretly took 10 minutes to throw together” dessert. We’re talking serious payoff for very little effort, which is my absolute favorite kind of kitchen project.
This recipe is a beautiful relic—the kind you’d find on a faded, butter-splattered index card in your grandma’s recipe box. It’s simple, it’s honest, and it delivers a flavor that’s straight-up unforgettable. If you’ve been stuck in a rut of the same old chocolate chip cookies (which I love, don’t get me wrong!), this is your sign to mix it up. So, tie on your apron, grab your favorite bowl, and let’s bake a batch of these ridiculously good toffee bars together. Your kitchen is about to smell incredible, and your friends are definitely going to be asking for the recipe.
A Pan of Pure, Buttery Nostalgia
This recipe takes me right back to my Aunt Carol’s kitchen. It was always a whirlwind of laughter, loud stories, and the most incredible smells. She wasn’t a fancy chef; she was a “feed an army with a smile” kind of cook. One rainy afternoon, I was “helping” her—which mostly meant sneaking bits of chocolate chips—when she pulled out this very recipe.
She called them her “Emergency Cookies.” Unexpected guests? Make the toffee bars. Someone having a bad day? Toffee bars. Just felt like something sweet? You get the idea. I remember watching her spread that simple dough across the pan with her hands, her movements quick and confident. The smell of brown sugar and margarine toasting in the oven was intoxicating. But the real magic happened when she pulled the golden sheet out of the oven and immediately spread that melted chocolate over the top. It melted into a perfect, glossy sheet, and she’d let me sprinkle the nuts, creating our little masterpiece. That combination of warm cookie, melting chocolate, and salty nuts… it was pure joy in a 2-inch square. It taught me that the best food isn’t always the most complex—it’s the food made with love and a desire to share something delicious.
Gathering Your Flavor Arsenal
One of the best things about this recipe is its beautiful simplicity. You probably have most of this in your pantry right now! Here’s the lowdown on what we’re using and why. I’ve also included some of my favorite chef hacks and substitutions so you can make this recipe your own.
- 1 cup Allsweet Margarine (or any margarine): Now, I know some of you are raising an eyebrow. “Jackson, a chef using margarine?” Hear me out! This is one of those rare cases where margarine is the secret weapon. It gives these cookies their signature crispy, almost shortbread-like texture and that nostalgic flavor. Using butter will make them richer and softer, which is delicious, but it changes the classic texture. If you want the true, old-school experience, go with the margarine! For a butter version, see the variations below.
- 1 cup packed brown sugar: Pack it in there, friends! The molasses in the brown sugar is what gives these bars their deep, caramel-like “toffee” flavor and that beautiful chewy-softness. It’s the soul of the cookie.
- 1 egg (Swift’s Brookfield or regular): The egg acts as our binder, holding everything together and adding a little richness. Any large egg will do the trick perfectly.
- 1 tsp vanilla: The flavor enhancer! A good vanilla extract rounds out the sweetness and adds a warm, aromatic depth. Don’t skip it!
- 2 cups sifted flour: Sifting the flour first might seem like an extra step, but it’s crucial here. It prevents lumps and ensures our dough bakes up light and tender, not dense. I just whisk it in a bowl for a minute to aerate it.
- 6 oz semisweet chocolate chips: The classic choice. The slight bitterness of semisweet chocolate is the perfect counterpoint to the sweet, buttery base. Feel free to use dark chocolate chips for an even richer flavor!
- ½ cup chopped nuts (your choice): This is where you can get creative! Walnuts or pecans are the traditional picks and add a fantastic toasty crunch. But if you’re nut-free, see my suggestions in the variations section.
Let’s Build These Toffee Cookie Bars: A Step-by-Step Guide
Ready to make some magic? This process is so straightforward and satisfying. I’m walking you through each step with all my favorite tips to ensure your bars are absolute perfection.
- Preheat & Prep: First things first, get that oven preheating to a nice 350°F (175°C). This is our sweet spot for getting a golden-brown, crispy base without burning the bottom. While it’s warming up, grab your 14×17 inch cookie sheet (a standard half-sheet pan). Chef Hack: I don’t usually grease the pan for this recipe. The fat in the margarine does the job! But if you’re nervous, a very light coating of butter or a quick swipe with baking spray won’t hurt.
- The Creaming Method is Key: In a large bowl, we’re going to “cream” the margarine and brown sugar together. This isn’t just mixing—it’s about beating air into the fat and sugar until it’s light, pale, and fluffy. I use a hand mixer for about 2-3 minutes. This step is non-negotiable for that perfect texture!
- Incorporate the Wet Team: Beat in the egg and vanilla until the mixture is completely smooth and silky. You’ll see it come together beautifully. Scrape down the sides of the bowl to make sure everything is fully incorporated.
- Bring in the Flour: Now, add your pre-sifted flour. Mix on low speed just until the flour disappears and a soft dough forms. Pro-Tip: Don’t overmix! Once you stop seeing dry flour, you’re done. Overmixing can make the cookies tough.
- Spread it Like You Mean It: This is the fun, hands-on part. Turn your dough out onto your ungreased cookie sheet. Now, using your fingers or the back of a spoon, press and spread the dough into a rectangle that’s about 13×15 inches and, most importantly, an even ¼ inch thick. Getting the thickness consistent is the secret to even baking!
- Bake to Golden Perfection: Slide that pan into your preheated oven and bake for 15 minutes. You’re looking for a lovely golden brown color across the top and the edges might be just a touch darker. Your kitchen will smell absolutely heavenly.
- The Chocolate Operation: While the cookie base is baking, get your chocolate ready. The recipe calls for a double boiler (a heatproof bowl set over a pot of simmering water), which is foolproof. But my quick hack? Microwave the chocolate chips in a microwave-safe bowl in 20-second bursts, stirring vigorously after each burst, until smooth. Just be careful not to overheat it!
- The Grand Finale: As soon as the cookie sheet comes out of the oven, it’s go-time! Immediately pour and spread the melted chocolate over the hot cookie base. The residual heat will help the chocolate melt into a perfectly smooth layer. Working quickly, sprinkle the chopped nuts evenly over the chocolate, gently pressing them in so they stick.
- The All-Important Cut: Let the pan cool for about 5-10 minutes, just until the chocolate has started to set but isn’t fully hard. This is the ideal time to score or cut your bars into 2-inch squares. If you wait until everything is completely cool, the chocolate might crack when you cut it. A sharp pizza cutter works wonders for this!
How to Serve & Savor Your Masterpiece
Okay, you’ve survived the hardest part—waiting for them to cool enough to eat! Now, how do you serve these beauties?
These toffee bars are fantastic all on their own, still slightly warm with a glass of cold milk. That’s a top-tier experience right there. But if you want to dress them up a little, here are a few ideas. For a party, I love stacking them on a rustic wooden board for a casual, “help yourself” vibe. If you’re going for something a little more elegant, place one bar on a small plate and dust it with a tiny bit of flaky sea salt or even a light sprinkle of cocoa powder. The salt really makes the toffee and chocolate flavors pop!
They are the ultimate potluck or bake sale star because they travel like a dream and don’t need any refrigeration. And let’s be honest, nothing says “I’m a baking rockstar” quite like handing someone a homemade treat that looks and tastes this good.
Make It Yours: Creative Twists on the Classic
Once you’ve mastered the classic, it’s time to play! This recipe is a fantastic canvas for your own creative flavors. Here are a few of my favorite twists:
- The Butter Lover: Swap the 1 cup margarine for 1 cup (2 sticks) of unsalted butter, softened. The flavor will be richer and more decadent, and the texture will be slightly more tender and less crispy.
- Salty-Sweet Sensation: Before baking, sprinkle the pressed-out dough with a light scattering of flaky sea salt. Then, after you sprinkle the nuts, add another tiny pinch of salt on top of the chocolate. Trust me on this.
- Nut-Free & Fancy: Not a nut family? No problem! Swap the ½ cup of nuts for an equal amount of toasted coconut, crushed pretzels, or even a mix of seeds like pumpkin and sunflower for a great crunch.
- Double Chocolate Toffee: For the chocoholics, replace ¼ cup of the flour with ¼ cup of unsweetened cocoa powder for a chocolate base. Then top with the melted chocolate as usual. It’s a chocolate-lover’s dream!
- Espresso Kick: Add 1-2 teaspoons of instant espresso powder to the flour mixture. It won’t make the cookies taste like coffee, but it will deepen the chocolate and toffee flavors incredibly.
Jackson’s Kitchen Notes & Stories
This recipe has evolved a bit in my kitchen over the years. I used to be so impatient, I’d try to cut the bars immediately and end up with a gooey, delicious mess. Learning to wait that crucial 5-10 minutes was a game-changer for clean cuts.
One time, I was filming a reel for these and, in my rush, I accidentally used powdered sugar instead of flour. Let’s just say it created a puddle of buttery, sugary lava that was… not the intended result. We had a good laugh and ordered pizza. The point is, don’t be afraid of a little kitchen chaos! Even the “mistakes” can be fun (and sometimes still tasty). This recipe is forgiving, so just relax and enjoy the process.
Your Toffee Bar Questions, Answered!
I’ve made these a zillion times, and I’ve heard all your questions. Here are the answers to the most common ones.
Q: My dough is really sticky and hard to spread. What did I do wrong?
A: This usually happens if your margarine/butter was a bit too soft or the kitchen is very warm. No worries! Just place the whole pan (with the dough on it) in the fridge for 15-20 minutes before baking. This will firm up the fat, making it easier to handle and helping the cookies hold their shape better in the oven.
Q: Can I make these gluten-free?
A> Absolutely! I’ve had great success using a 1:1 gluten-free all-purpose flour blend. Just make sure your blend includes a binder like xanthan gum. The texture will be slightly more crumbly but still utterly delicious.
Q: My chocolate seized up and got grainy when I melted it. Help!
A> Ah, the dreaded seize! This happens when a tiny bit of water gets into the chocolate. When using a double boiler, make sure the bottom of your bowl isn’t touching the water. If microwaving, make sure your bowl is completely dry. To fix it, you can try stirring in a tiny amount of flavorless oil (like vegetable or coconut) to smooth it out.
Q: How should I store these, and how long do they last?
A> Store them in an airtight container at room temperature for up to 5 days. They can be stacked with layers of parchment paper in between. For longer storage, you can freeze them for up to 3 months! Just thaw at room temperature when the craving hits.
Nutritional Information*
Okay, let’s talk real talk. This is a dessert, and it’s meant to be enjoyed as a delightful treat! Here’s a rough nutritional breakdown per bar (assuming you get 48 bars from the batch). Remember, these are estimates and can vary based on your specific ingredients.
- Calories: 130
- Fat: 7g
- Carbohydrates: 15g
- Sugar: 9g
- Protein: 1g
*This information is provided as a courtesy and is an estimate only. For precise dietary needs, it’s best to calculate using the specific brands and ingredients you use at home.
Your New Go-To Cookie Recipe
And there you have it! The full, delicious story of my all-time favorite Toffee Cookies. This recipe is more than just a list of ingredients; it’s a passport to a simpler, butter, and more joyful time in the kitchen. It’s proof that you don’t need a pantry full of obscure ingredients to create something truly special and shareable.
I hope you bake these, share them, and create your own messy, fun, and “you’ve gotta try this” moments around them. Food is about connection, and this pan of cookies is one of the best connectors I know.
So tell me, did you make them? What twists did you try? Tag me on social @FoodMeld so I can see your beautiful creations! Now, go forth and bake something awesome.
With flavor and fun,
Jackson


