Grinch Heart Sugar Cookies: The Ultimate Whoville Treat!
Hey friends, Jackson from Food Meld here! Is there anything better than that moment in the kitchen when a simple recipe just clicks? You know the one—when the butter and sugar cream up into a cloud of perfection, when the scent of vanilla and baking cookies fills the air, and you just know you’re about to create something magical. That’s the exact feeling I get every single time I whip up a batch of these Grinch Heart Sugar Cookies.
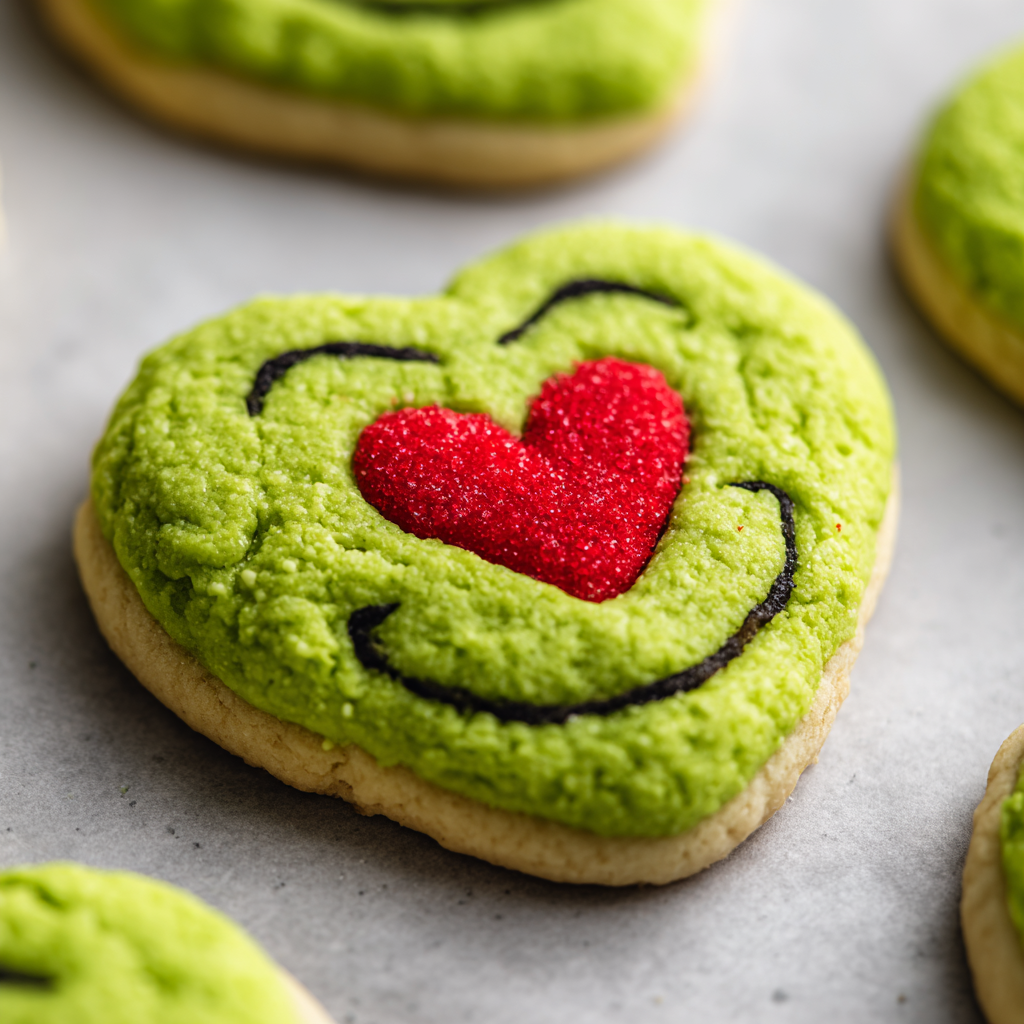
We’re talking about the softest, chewiest, most buttery sugar cookies you’ve ever sunk your teeth into, blasted with a vibrant, mischievous green and crowned with one perfect red candy heart. They’re fun, they’re festive, and they tell a story in every single bite. This isn’t just a cookie; it’s a tiny, edible tribute to the grump who taught us that the holidays aren’t about the gifts and the noise, but about the love and connection we share. And honestly, what says connection better than sharing a plate of incredible homemade cookies?
I designed this recipe to be foolproof. Whether you’re a baking newbie who gets nervous at the sight of a rolling pin or a seasoned pro looking for a fun, fast project to do with the kids, you’ve got this. We’re skipping the fussy chilling and intricate decorating. This is all about bold flavor, a playful spirit, and that “you’ve gotta try this” moment I’m always chasing. So, preheat your ovens, grab your favorite mixing bowl, and let’s cook something awesome together that’s guaranteed to make your heart—and your taste buds—grow three sizes.

The Christmas I Almost Stole the Cookies
This recipe takes me right back to my grandma’s kitchen, circa 1998. Every year, we’d have a massive holiday cookie baking marathon, and my job was always the sugar cookies. But one year, I decided to get creative. Inspired by the annual TV special we all gathered to watch, I dumped an entire bottle of green food coloring into a batch of dough. I’m talking a shockingly green, almost neon dough that stained my hands for two days. My grandma took one look at my creation, shook her head with a laugh, and said, “Well, you’ve gone and made a whole batch of Grinch cookies!”
They were a hit. My little cousins devoured them, declaring them the best “monster cookies” they’d ever had. But they were missing something. The next year, I added the red candy heart, and the story was complete. That little twist transformed them from just green cookies into a conversation piece, a tradition. It reminds me that the best recipes aren’t just about perfect measurements; they’re about the memories we fold into the dough and the joy we share when we pull them out of the oven.
Gathering Your Whoville-Worthy Ingredients
Simple ingredients, incredible results—that’s the Food Meld promise. Here’s everything you’ll need to bring these Grinchy delights to life. I’ve also included some of my favorite chef insights and substitutions so you can make this recipe your own.
- 1 cup (2 sticks) unsalted butter, softened – This is the soul of your cookie. “Softened” is key here! You want it at cool room temperature so it creams beautifully with the sugar, creating a light and tender crumb. If you forget to take it out, chef hack: cut it into tablespoons and microwave for 5-second bursts until it gives slightly to pressure.
- 1 cup granulated sugar – For that classic, sweet sugar cookie taste. It also helps create a slightly crisp edge while the center stays wonderfully soft.
- 1 large egg – Our binding agent, bringing everything together and adding richness. Make sure it’s at room temperature to prevent the butter from seizing up.
- 1 ½ tsp vanilla extract – Don’t be shy! A good quality vanilla adds a warm, complex depth that takes these from “good” to “unforgettable.”
- 2 ½ cups all-purpose flour – The structure of our cookie. For the chewiest results, fluff your flour with a spoon before measuring, then level it off. No packing it down!
- ½ tsp baking soda – Our little leavening helper, giving the cookies just the right amount of puff and spread.
- ½ tsp salt – The secret weapon! Salt balances the sweetness and makes all the other flavors pop. Trust me on this.
- Green gel food coloring – Go for gel! Liquid food coloring can add too much moisture and result in a paler color. Gel coloring gives you that bold, vibrant Grinchy green without altering the dough’s texture.
- Red candy hearts (or red cinnamon imperials) – The iconic, tiny-Sindy heart! Cinnamon imperials (the Red Hots candies) work perfectly if you can’t find the plain candy hearts. They add a little spicy kick that’s amazing with the sweet dough.
Let’s Make Some Magic: The Step-by-Step
Ready? Let’s do this. I’ll walk you through each step with all my favorite tips and tricks to ensure cookie perfection.
- Preheat and Prep. Fire up your oven to 350°F (175°C) and line your baking sheets with parchment paper. This isn’t just for easy cleanup; it prevents the bottoms from over-browning. No parchment? A light coating of butter or non-stick spray works in a pinch.
- Creaming is Key. In a large bowl, beat the softened butter and granulated sugar together on medium-high speed for a good 2-3 minutes. We’re not just mixing here; we’re creaming. You’ll know it’s ready when the mixture turns pale yellow and becomes wonderfully light and fluffy. This step incorporates air, which is what gives us that dreamy, soft texture.
- Bring in the Wet Team. Crack in the egg and add that glorious vanilla extract. Mix on medium until everything is fully combined and smooth. Scrape down the sides of the bowl with a spatula to make sure no pockets of butter are hiding out.
- Whisk the Dry Ingredients. In a separate bowl, whisk together the flour, baking soda, and salt. Why whisk? It evenly distributes the baking soda and salt so every cookie bakes up consistently. Now, gradually add these dry ingredients to the wet mixture, mixing on low speed just until the flour disappears. Pro-tip: Don’t overmix! Overworking the dough after the flour is added can lead to tough cookies.
- Get Your Grinch On! Now for the fun part! Add your green gel food coloring. Start with a small amount—you can always add more. I usually use about ½ teaspoon of gel to get that perfect, bold green. Mix until the color is uniform throughout. Your dough should be soft but not sticky.
- Scoop and Roll. Use a tablespoon-sized cookie scoop or a regular spoon to portion out the dough. Roll each portion between your palms to form a smooth ball. This gives you that perfect, bakery-style dome.
- Give It Heart. Place the dough balls on your prepared baking sheet, about 2 inches apart. Gently flatten each ball just slightly with your palm or the bottom of a glass. Then, firmly press one red candy heart right into the center of each cookie.
- Bake to Perfection. Bake for 8-10 minutes. The cookies will still look soft in the middle, and the edges will be just set. They might even look a tiny bit underdone—that’s exactly what we want! This is the secret to a super soft, chewy cookie. They’ll continue to set up as they cool.
- The Cool Down. Let the cookies cool on the hot baking sheet for 5 minutes. This allows them to firm up enough to handle. Then, transfer them to a wire rack to cool completely. Try to resist eating one straight from the pan… though I won’t judge if you do!
How to Serve These Whoville Wonders
Presentation is part of the fun! For a truly festive spread, pile these emerald beauties high on a rustic wooden board or a bright red platter. They’re the star of the show, so let them shine. I love serving them with a tall glass of cold milk for the classic combo, or with a mug of rich hot chocolate for the ultimate cozy holiday moment.
These cookies are the perfect edible centerpiece for your movie night while watching How the Grinch Stole Christmas!. They also make fantastic additions to cookie swap parties—trust me, you’ll be the most popular person there. And don’t forget to pack a few in a cute cellophane bag tied with a ribbon for a heartfelt, homemade gift for neighbors, teachers, or your mail carrier. It’s a small gesture that truly spreads the holiday spirit.
Mix It Up! Creative Grinch Cookie Twists
Once you’ve mastered the classic, feel free to get creative and make it yours! Here are a few of my favorite spins on this recipe:
- “Grinch-Kissed” Chocolate Version: Replace ¼ cup of the flour with ¼ cup of unsweetened cocoa powder for a chocolate sugar cookie base. The green color will be darker, but the chocolate-green combo is divine.
- Peppermint Grinch Hearts: Add ½ teaspoon of peppermint extract along with the vanilla for a cool, festive twist. The peppermint and the red candy heart feel like Christmas in every bite.
- Lemon-Zested Zing: Add the zest of one lemon to the dough when you cream the butter and sugar. The bright, citrusy notes cut through the sweetness and pair surprisingly well with the green color.
- Gluten-Free Joy: No problem! Use a 1:1 gluten-free all-purpose flour blend. My favorite brands are Bob’s Red Mill or King Arthur. The texture comes out perfectly.
- “Grinch Finger” Variation: For a fun shape, roll the dough into log shapes instead of balls before baking. Press a slivered almond at one end for the “fingernail” and a candy heart in the center. A hilarious and slightly spooky twist!
Jackson’s Chef Notes & Kitchen Stories
This recipe has been a work in progress since that first neon-green batch in my grandma’s kitchen. The biggest lesson I learned? The power of not over-baking. Taking them out when they still look a little soft in the middle was a total game-changer for texture.
One year, I was in such a hurry to get to a party that I used liquid food coloring. The dough was so wet and sticky I had to add way more flour, which led to dense, cakey cookies. It was a delicious failure, but it taught me to always, always use gel coloring! Another time, my nephew decided to “help” by pressing not one, but five candy hearts into a single cookie. We called it the “Super-Grinch Heart” cookie, and it became his special creation. That’s the beauty of cooking—sometimes the happy accidents become the best memories.
Your Grinch Cookie Questions, Answered!
Let’s tackle some common questions to make sure your baking experience is smooth sailing.
Q: My cookies spread too much and came out flat. What happened?
A: This is almost always a butter issue! If your butter was too warm or melted, it will cause excessive spreading. Make sure it’s just softened, not greasy. Also, double-check that your baking soda is fresh. An old leavener won’t do its job properly.
Q: Can I make the dough ahead of time and chill it?
A> You can, but it’s not necessary for this no-chill recipe! If you do need to make it ahead, wrap the green dough tightly in plastic wrap and refrigerate for up to 2 days. Let it sit at room temperature for 20-30 minutes before scooping and rolling, as it will be quite firm.
Q: My cookies are tough, not soft and chewy. Why?
A: The most likely culprit is overmixing once the flour was added. When you mix the flour, just go until the streaks disappear. Also, be careful not to over-measure your flour. Spoon and level for the perfect amount every time.
Q: The candy hearts melted/sank. How can I prevent that?
A> This can happen if the dough is too soft or the candy is pressed in too deeply. Make sure you’re just pressing it in enough so it’s secure, but not so it’s submerged. Using a firmer candy, like a cinnamon imperial, can also help.
Nutritional Info (Because We’re All Friends Here)
Let’s keep it real—this is a treat, and it’s meant to be enjoyed! Here’s a rough breakdown per cookie (assuming you get 24 cookies from the batch). Remember, this is an estimate and can vary based on specific ingredients you use.
Per Cookie: Calories: ~130 | Fat: 6g | Carbs: 17g | Sugar: 8g | Protein: 1g
My philosophy has always been about balance. Enjoy a cookie (or two!) with a glass of milk, savor every bite, and focus on the joy of baking and sharing. Life’s too short not to enjoy a good cookie.
Final Thoughts from My Kitchen to Yours
And there you have it! My go-to recipe for cookies that are as fun to make as they are to eat. I hope this recipe brings as much laughter and light to your kitchen as it has to mine over the years. Remember, cooking is an adventure. It’s okay if your green isn’t the exact same shade as mine, or if one cookie has a slightly lopsided heart. That’s what makes them yours.
So, from my Food Meld family to yours, I hope you have a wonderful, flavor-filled holiday season. If you make these (and I really hope you do), tag me on social @FoodMeld! I love seeing your creations. Now, let’s get out there and make some unforgettable food memories.
Happy Baking,
Jackson


