Let’s Make Some Candy Counter Magic!
Hey friends, Jackson from Food Meld here. You ever have one of those food memories that just sticks with you? For me, it’s the classic candy counter at this old-fashioned soda shop my grandpa used to take me to. The air was thick with the smell of chocolate and sugar, and behind that glass case was a world of wonder. But the treat I always, always went for was the Cherry Mash.
You know the one—that perfect, slightly messy combo of a sweet cherry center and a crunchy chocolate shell. It’s a flavor that feels like a hug from the past. But I’m a firm believer that you shouldn’t have to hunt down a specialty candy shop to get that feeling. The best flavors belong right in your own kitchen.
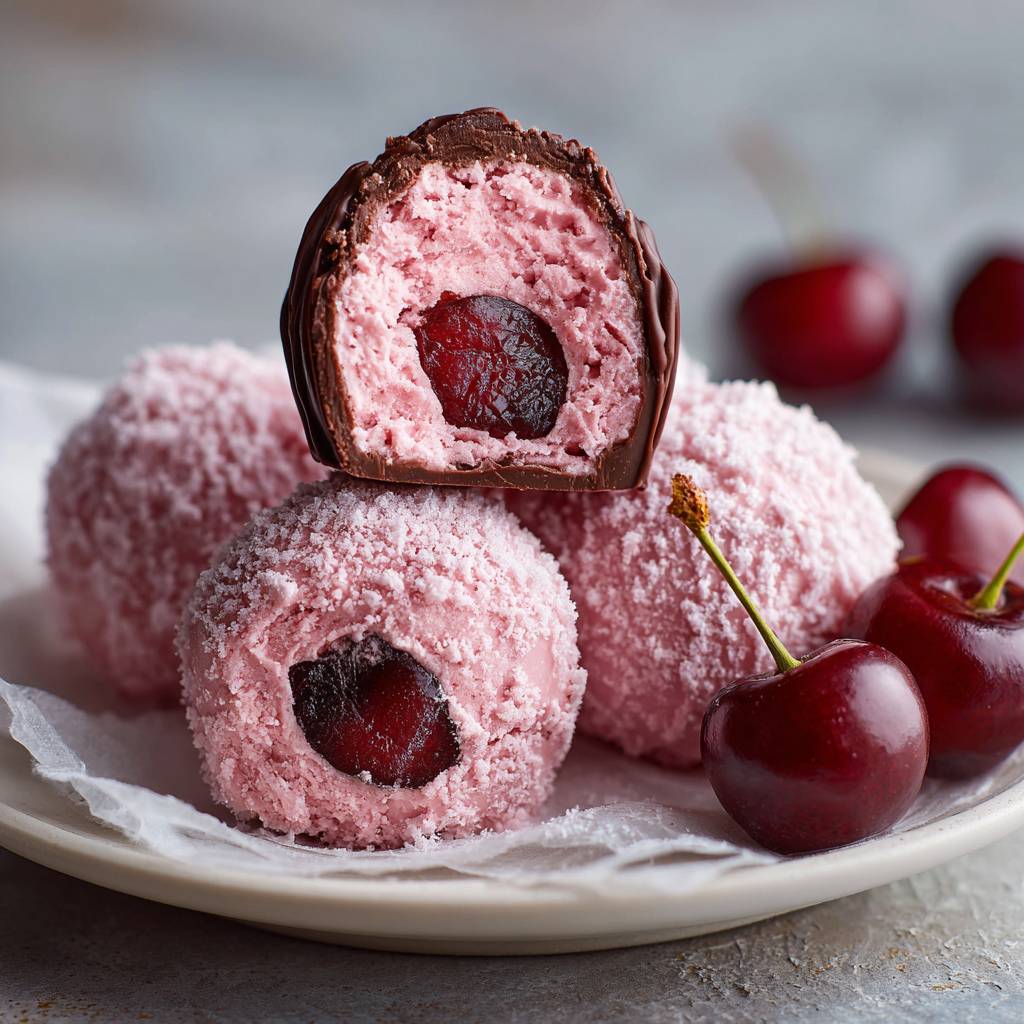
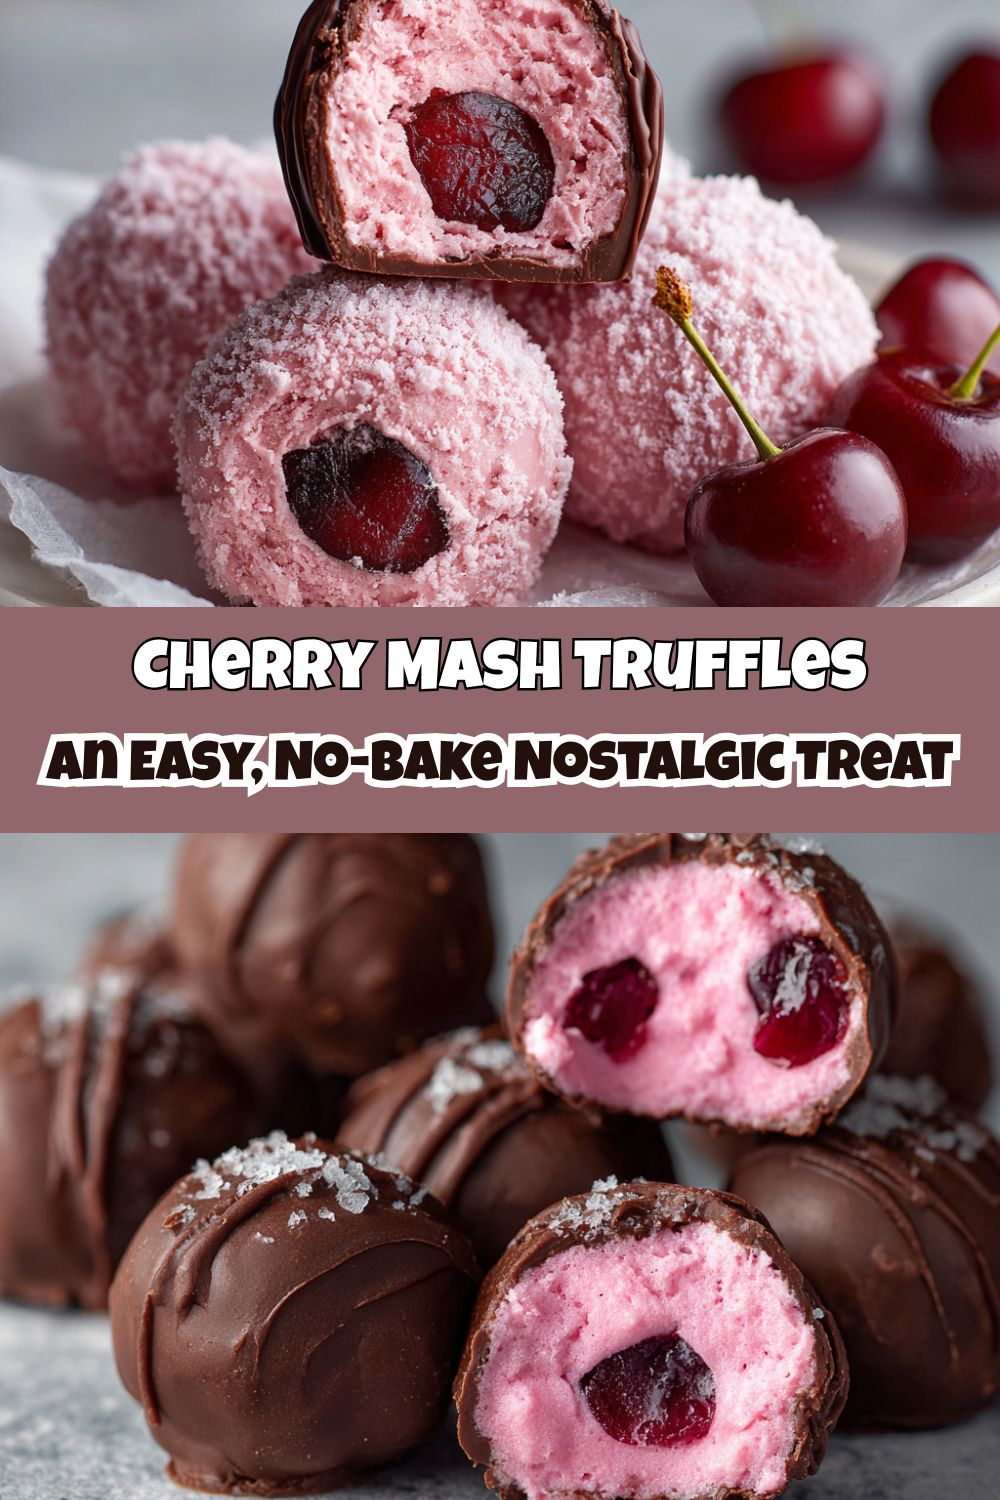
So, I got to tinkering. I wanted to capture that nostalgic magic but in a form that’s even more fun to make and share. The result? These unbelievably easy Cherry Mash Truffles. We’re talking a creamy, dreamy pink cherry center that just melts in your mouth, all wrapped up in a slick, rich coat of dark chocolate. They look like something from a fancy chocolatier, but I promise you, they are 100% beginner-friendly. No fancy equipment, no intimidating techniques—just simple, real ingredients coming together for a “you’ve gotta try this” moment. So, tie on your apron, and let’s cook something awesome together.
A Sticky-Fingered Memory
I’ll never forget the first time I successfully made a batch of these. It was for a holiday party, and I was determined to bring something homemade that would really wow people. As I was patting those maraschino cherries dry, the sweet, almost medicinal scent hit me, and I was instantly eight years old again, sitting at that polished marble counter with my grandpa.
He’d let me unwrap the crinkly red and white wrapper myself, and without fail, I’d get sticky cherry goo all over my fingers. He’d just laugh, his eyes twinkling, and say, “Jackson, the best things in life are worth getting a little messy for.” That’s the spirit I bring into my kitchen every single day. Making these truffles is my way of honoring that memory. It’s a little messy, a whole lot of fun, and the final result—that perfect bite of cherry and chocolate—is an absolute joy. It’s a reminder that food isn’t just fuel; it’s a time machine.
Gathering Your Flavor Arsenal
This is where the magic starts! The ingredient list is beautifully short, which means every single one plays a starring role. Here’s what you’ll need and my quick chef insights to set you up for success.
- 1 (10 oz) jar maraschino cherries, drained and finely chopped – This is the heart and soul of our truffle! That iconic pink color and sweet, slightly almond-y flavor all come from here. Chef’s Hack: Do NOT skip the draining and patting dry step. We’re talking serious pat-downs with paper towels until they’re no longer weeping. Excess moisture is the enemy of a perfectly firm truffle center.
- 2 cups powdered sugar – This is what gives our center that smooth, melt-in-your-mouth texture you can’t get with granulated sugar. If your mixture feels a bit too soft after adding the cherries, don’t be shy—add another 1/4 cup of powdered sugar until it’s scoopable and not soupy.
- ½ cup unsalted butter, softened – This builds the rich, creamy base. Using unsalted lets you control the salt level. Pro Tip: “Softened” means it gives slightly when you press it, but it’s not greasy or melted. Take it out of the fridge about 30-60 minutes before you start.
- 1 teaspoon vanilla extract – The flavor booster! It rounds out the sweetness and makes the cherry flavor pop even more. If you have almond extract on hand, a 1/4 teaspoon swapped in for some of the vanilla is a game-changer and really amplifies that classic cherry mash taste.
- Optional Shell: 12 oz semisweet chocolate chips + 1 tablespoon coconut oil or shortening – I highly recommend this step for that authentic candy shell experience. The chocolate chips are easy and reliable. The coconut oil/shortening is our secret weapon—it thins the chocolate just enough for a sleek, professional-looking coat that sets beautifully. It prevents the chocolate from being too thick and clunky.
Let’s Get Rolling: Your Foolproof Truffle Roadmap
Alright, team, this is where we turn these simple ingredients into something unforgettable. Read through these steps once before you start—it’s a smooth, easy process, and I’ve packed it with all my favorite little hacks to make it even smoother.
- The Cherry Prep (The Most Important Step!)
Drain your maraschino cherries in a colander, then spread them out on a stack of paper towels. Grab more paper towels and gently press down, soaking up all that extra liquid. The drier they are, the better your truffle mixture will hold its shape. Once they’re nice and dry, give them a fine chop. We want little bursts of cherry flavor, not big chunks that will make rolling difficult. - Creamy Dreamy Base
In a medium-sized bowl, beat your softened butter with a hand mixer (or a stand mixer with the paddle attachment) until it’s pale and creamy. This should take about a minute. Now, gradually mix in the powdered sugar and vanilla extract. Start slow so you don’t get a sugar-dust cloud! Once it’s combined, it should look like a thick, luscious frosting. - Bringing It All Together
Now, gently fold in your finely chopped, very dry cherries. I like to use a spatula for this part. You’ll see the mixture come together and turn a lovely pale pink. This is where you check the consistency. It should be thick enough to scoop and roll. If it’s too sticky, add a tablespoon or two more of powdered sugar until it’s manageable. - The Chill Session
Pop the bowl into the refrigerator for 20-30 minutes. This short chill makes the mixture much easier to handle and prevents it from sticking to your hands. Don’t skip this—it’s a game-changer for a clean rolling process. - Scoop and Roll
Using a small cookie scoop (about 1-inch in size) or a tablespoon, portion out the mixture. Then, roll them between your palms to form smooth balls. If things get sticky, just dust your hands with a tiny bit of powdered sugar. Place the balls on a parchment-lined baking sheet. - The Deep Freeze (Briefly!)
This is the second secret to a perfect chocolate dip! Stick the entire baking sheet into the freezer for a solid 15 minutes. A very cold center is your best friend when working with melted chocolate—it prevents the truffle from melting into a puddle and ensures a quick, clean set. - Create the Chocolate Shell
While the balls are chilling, melt your chocolate and coconut oil (or shortening) together. You can do this in a double boiler, but my go-to is the microwave. Heat in 30-second bursts, stirring well after each, until it’s completely smooth and glossy. Be patient—burnt chocolate is a sad thing! - The Grand Finale: The Dip
Take your chilled cherry balls out of the freezer. Using a fork or a dipping tool, lower one ball into the melted chocolate. Swirl it around to coat completely, then gently tap the fork on the edge of the bowl to let the excess chocolate drip off. Carefully place it back on the parchment paper. For a fancy finish, you can use a second fork to push it off the first one, creating a little swirl on top. - The Final Set
Once all your truffles are coated, let them set at room temperature if your kitchen is cool, or pop them back in the fridge for about 30 minutes to firm up completely. And just like that, you’ve made homemade candy!
Sharing the Sweetness: How to Serve These Gems
Okay, you’ve made these stunning truffles—now, let’s show them off! Presentation is half the fun. For a simple, elegant look, arrange them in a single layer in a festive gift box or on a pretty ceramic plate. If you’re feeling extra, a light dusting of edible gold or pink glitter dust right after dipping makes them look like they cost $5 each.
These are the ultimate shareable treat. Pile them high on a cake stand for your next party and watch them vanish. They also make the most thoughtful homemade gift. Tuck a dozen into a cute cellophane bag, tie it with a ribbon, and you’ve got a present that says, “I really like you.” They’re perfect for holidays, teacher gifts, hostess gifts, or just because. Trust me, receiving homemade candy feels special every single time.
Make It Yours! Fun Flavor Twists
I love this recipe because it’s a fantastic canvas for your own creativity. Once you’ve mastered the classic, try one of these fun twists!
- The Almond Joy: Add 1/4 teaspoon of almond extract to the butter mixture and roll the finished centers in finely chopped toasted almonds before dipping them in chocolate. It’s a nutty, sophisticated upgrade.
- Cherry Cordial: For an adult-only version, add a teaspoon of brandy or kirsch (cherry liqueur) to the filling. Just make sure to reduce the vanilla by half to balance the liquid.
- Double Chocolate Cherry: Mix 2 tablespoons of unsweetened cocoa powder into the powdered sugar for a chocolate-cherry center. It’s a richer, deeper flavor that chocolate lovers will go crazy for.
- Coconut Dream: Fold 1/2 cup of finely shredded, unsweetened coconut into the filling along with the cherries. It adds a wonderful texture and a tropical vibe.
- Snow-Capped Cherry Hills: Instead of a chocolate shell, simply roll the thoroughly chilled cherry balls in a coating of extra powdered sugar or even crushed freeze-dried cherries for a pretty, non-chocolate option.
Jackson’s Kitchen Confidential
This recipe has become a staple in my house, especially around the holidays. But it wasn’t always perfect. My first batch was a delicious disaster—I didn’t dry the cherries enough, and my centers were so soft I had to call them “Cherry Mash Spoonfuls.” They tasted great, but they were not pretty! That’s how I learned the sacred art of the paper towel pat-down.
Over time, I’ve also learned that the quality of your chocolate for the shell really does matter. A good semisweet chip works great, but if you want to go next-level, use a baking bar of chocolate (like Ghirardelli or Baker’s) chopped up. It melts even smoother and has a fantastic flavor. Remember, cooking is all about trying, sometimes failing, and always learning. Don’t stress about making them look perfect—the homemade charm is part of what makes them so special.
Your Questions, Answered!
I’ve gotten a lot of questions about these truffles over the years. Here are the big ones to help you out.
- Q: My truffle mixture is too soft! What did I do wrong?
A: This is almost always due to excess moisture from the cherries. Don’t worry, it’s an easy fix! Just add more powdered sugar, a tablespoon at a time, until the mixture is thick and scoopable. Also, make sure you chill it thoroughly before rolling. - Q: Can I make these ahead of time?
A: Absolutely! They are a fantastic make-ahead treat. Store them in an airtight container in the refrigerator for up to a week, or you can freeze the un-dipped centers for up to 3 months. Thaw in the fridge before dipping. - Q: My chocolate is clumpy and hard to work with. Help!
A: This usually means it got too hot. If you see any seized chocolate, try stirring in a tiny bit more of your coconut oil or shortening (about a teaspoon at a time) to loosen it back up. And always, always melt in short bursts, stirring frequently. - Q: Can I use fresh cherries instead?
A: I don’t recommend it for this specific recipe. Maraschino cherries have a distinct flavor and texture that’s key to that nostalgic taste. Fresh cherries have too much water and a different, less concentrated flavor profile.
Let’s Talk Ingredients & Info
As a home cook, I believe in knowing what’s going into your food. These truffles are a treat, through and through, and they’re made with simple, recognizable ingredients. The base is primarily butter and powdered sugar, which gives them that decadent, creamy texture. The maraschino cherries bring that signature sweet cherry flavor and a pop of color.
The chocolate shell, while optional, adds a rich, antioxidant-rich finish. Using semisweet chocolate provides a nice balance to the sweet center. Remember, this is a “sometimes food”—one to be savored and enjoyed fully!
Yield: about 24 truffles
Prep: 20 minutes
Chill/Set: 45–60 minutes
Total: ~1 hour 15 minutes
Estimated per truffle (with chocolate shell):
Calories: ~140 | Fat: 7g | Carbs: 18g | Sugars: 16g | Protein: 1g
Please note: These are estimates based on the specific ingredients used. Values can vary depending on your brands and any modifications you make.
Your New Go-To Showstopper
And there you have it! You’ve just created a batch of homemade candy that’s bursting with flavor and fun. These Cherry Mash Truffles are more than just a dessert; they’re a conversation starter, a heartfelt gift, and a delicious trip down memory lane.
I hope you feel a huge sense of pride pulling that tray out of the fridge. Remember what my grandpa said: the best things are worth getting a little messy for. So, embrace the powdered sugar on your nose and the chocolate on your thumbs—it’s all part of the joy of cooking.
I’d love to see your creations! Tag me on social @FoodMeld and show me your beautiful truffles. Now, go enjoy every single bite. You’ve earned it.
Stay hungry,
Jackson


