Forget the Guilt, Keep the Party: Birthday Cake Protein Truffles Are Here!
Hey friends, Jackson from Food Meld here! Let’s talk about a feeling I know all too well. You’re crushing your fitness goals, feeling strong, energized, and awesome. But then it hits: that undeniable, deep-in-your-soul craving for something sweet, something celebratory, something that tastes like pure, unadulterated fun. Maybe it’s a Tuesday afternoon slump, maybe it’s post-workout, or maybe you just want a little treat that doesn’t derail your entire day. You stare into the fridge, then the pantry, and the internal battle begins. “Do I cave and have a slice of cake? Or do I just sip my water and dream of sprinkles?”
Well, I’m here to tell you that the battle is over. For good. What if I told you that you could have a treat that’s creamy, satisfying, rolled in cheerful rainbow sprinkles, and actually fuels your body? Sounds like a dream, right? Welcome to the delicious reality of my Birthday Cake Protein Truffles.
These little bites of joy are my go-to solution for smart indulgence. They’re smooth, they’re packed with protein to keep you full and satisfied, and they deliver that classic “birthday cake” flavor without the sugar crash. We’re talking about a recipe that’s simple enough for a kitchen newbie, fast enough for a busy weeknight, and so darn good you’ll be making them for every potluck, post-gym snack, and “just because” moment. This isn’t about deprivation; it’s about celebration—a celebration of flavor, fun, and feeling great. So, grab a bowl, and let’s cook something awesome together that’s equal parts party and protein punch!
A Birthday Wish for Year-Round Cake
This recipe has a little bit of my heart baked into it, and it all goes back to my seventh birthday. My grandma, who was the undisputed queen of Southern desserts, made me a classic funfetti cake from a box mix. Now, to her, a box mix was practically cheating, but she knew it was my absolute favorite. That cake, with its soft, vanilla-kissed crumb and those tiny, colorful sprinkles dotting every slice, was pure magic to me. It wasn’t just cake; it was happiness on a plate.
As I got older and my passion for cooking turned into a career focused on bold, balanced flavors, I never lost that love for the simple joy of birthday cake. But let’s be real, we can’t eat cake every day (trust me, I’ve tried). I wanted to capture that nostalgic, celebratory feeling in a way I could enjoy any day of the week. I started playing in the kitchen—mashing up protein powder, cream cheese, a little of this, a little of that. After a few, ahem, “not-so-amazing” batches (we don’t talk about the chalky peanut butter incident), I finally nailed it. The moment I took a bite of that first perfect, creamy truffle, it was like being seven years old again at my grandma’s table. That’s the “Meld” I love: taking a beloved memory and giving it a fresh, wholesome twist.
Gathering Your Flavor Party: The Ingredients
The beauty of this recipe is in its simplicity. We’re using just a handful of powerhouse ingredients to create something truly special. Here’s the lineup:
For the Truffles:
- 4 oz fat-free cream cheese, softened: This is our secret weapon for that incredibly smooth, rich texture. It gives the truffles a creamy base that feels indulgent without all the fat. Chef’s Insight: Let it sit on the counter for 20-30 minutes before you start. Room temp cream cheese blends seamlessly, preventing a lumpy dough.
- 1.5 scoops vanilla protein powder: The star of the show! This adds the protein punch and that classic vanilla cake flavor. Substitution Tip: Use a high-quality powder you enjoy the taste of on its own. A whey/casein blend often gives the best texture, but plant-based powders work great too!
- ¼ cup oat flour: This acts as our “flour,” helping to bind the truffles and give them a perfect, slightly dense texture. Chef’s Hack: No oat flour? No problem! Just pulse rolled oats in a blender or food processor until they form a fine powder. Instant oats work best for this.
- 2 tbsp almond milk: A little liquid to bring everything together. Start with 2 tbsp and add a teeny bit more if your dough seems too dry. Substitution Tip: Any milk you have on hand works perfectly here—cashew, oat, or even dairy milk.
For the Icing & Topping:
- ½ scoop vanilla protein powder: We’re doubling down on that vanilla flavor for a frosting that’s actually good for you.
- 3 tbsp coconut oil, melted: This creates a magic shell effect when chilled, giving us that gorgeous, glossy icing coating. Chef’s Insight: Refined coconut oil has a neutral taste, while unrefined will give a slight coconut flavor—both are delicious!
- 3 tbsp almond milk: Thins out the icing to a perfect, spoonable consistency.
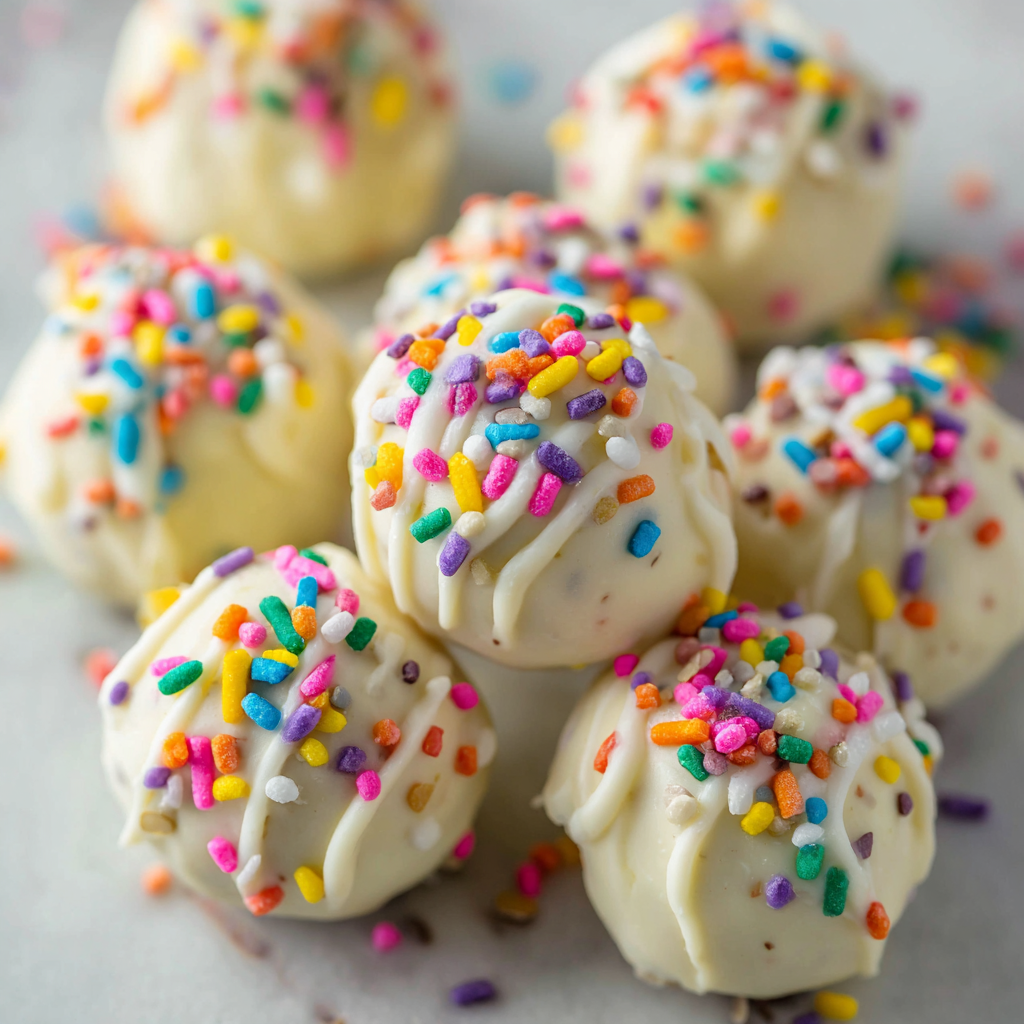
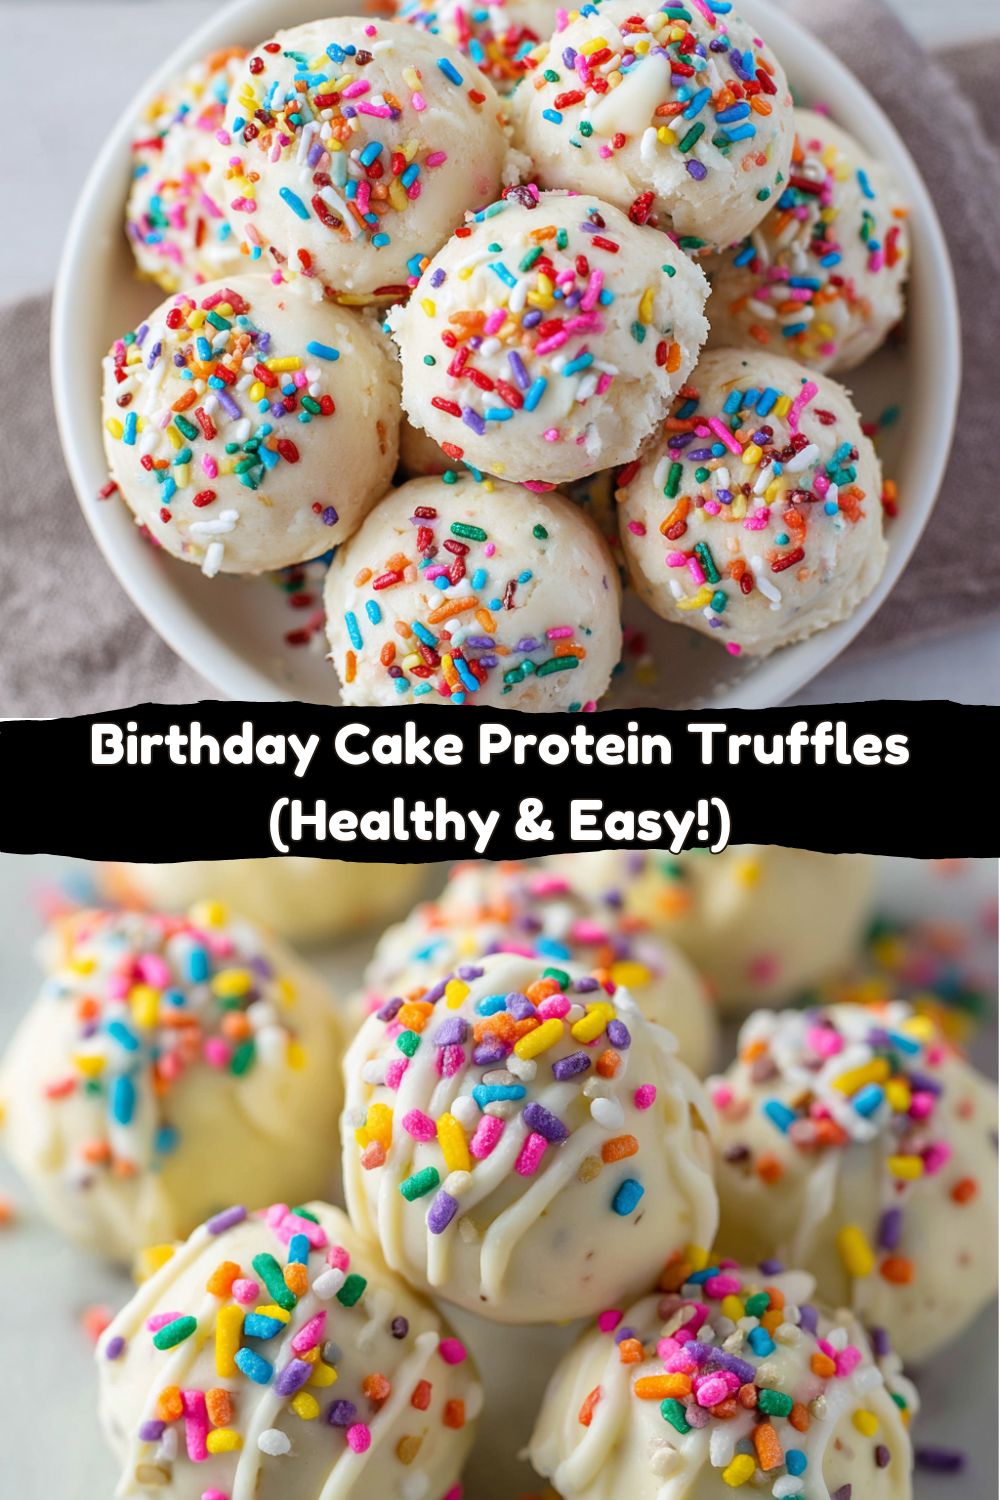
- Rainbow Sprinkles (jimmies): Non-negotiable for the birthday party vibe! They add a delightful crunch and make these truffles utterly irresistible.
Let’s Make Some Magic: Step-by-Step Instructions
Ready to get your hands a little messy? This is the fun part. Follow these steps, and you’ll be a truffle-making pro in no time.
- Make the Truffle Dough: In a medium-sized mixing bowl, add your softened cream cheese, 1.5 scoops of vanilla protein powder, oat flour, and 2 tablespoons of almond milk. Now, grab a spatula and get ready to mix! I like to start with the spatula to incorporate everything, but don’t be afraid to dive in with clean hands towards the end. You’re looking for a smooth, slightly sticky dough that holds together when you pinch it. Chef’s Hack: If the dough feels too wet, add a pinch more oat flour. If it’s too dry and crumbly, add almond milk one teaspoon at a time until it comes together. The perfect consistency is like a firm cookie dough.
- Roll ‘Em Up: Line a small baking sheet or plate with parchment paper. Pinch off small amounts of the dough and roll them into bite-sized balls, about 1 inch in diameter. I use a small cookie scoop to keep them uniform, but a tablespoon measure works great too. Place each ball on the parchment-lined tray. Pro Tip: If the dough is sticking to your hands, lightly wet your palms with water or a little almond milk. This creates a non-stick barrier and makes rolling a breeze.
- Chill Out (The Truffles, Not You… Yet): Pop the entire tray of un-iced truffles into the freezer for about 15-20 minutes. This quick chill firms them up, making them much easier to coat in the icing later without falling apart. This is a crucial step for picture-perfect truffles!
- Create the “Magic Shell” Icing: While the truffles are chilling, make the icing. In a small, microwave-safe bowl, melt the coconut oil in 15-second bursts until it’s completely liquid. Whisk in the remaining ½ scoop of protein powder and 3 tablespoons of almond milk until you have a smooth, thin icing. It should be runny enough to drizzle easily. Little Chef Story: The first time I made this, I added the protein powder to cold oil. Let’s just say it turned into a clumpy, un-dippable mess. Melting the oil first is the key to a silky-smooth glaze!
- The Grand Finale: Icing and Sprinkles! Take your chilled truffles out of the freezer. One by one, spoon the icing over each truffle, letting the excess drip down the sides. Work quickly before the truffles warm up. Immediately after icing each one, shower it with rainbow sprinkles! The chilled truffle will start to set the icing almost instantly, so the sprinkles will stick perfectly.
- The Final Chill: Once all your truffles are beautifully iced and decorated, return the tray to the refrigerator for at least 2 hours, or until the icing is completely firm to the touch. This allows the flavors to meld and gives you that satisfying snap when you bite into one.
How to Serve Your Protein-Packed Masterpiece
Presentation is part of the fun! These truffles are gorgeous all on their own, but here’s how I love to serve them up:
For a simple, elegant look, arrange them on a cute plate or a small cake stand. They look fantastic piled high in a little tower. If I’m bringing them to a friend’s house or a party, I’ll often place them in a mini cupcake liner for each truffle—it makes them look professional and keeps fingers clean.
These are the ultimate grab-and-go snack. Keep a container of them in the fridge for a quick breakfast bite with your coffee, a post-workout reward, or that 3 PM pick-me-up that actually helps you power through. They’re also the perfect healthy dessert to cap off a weeknight dinner, proving that eating well doesn’t mean skipping the sweet stuff.
Mix It Up! 5 Fun Variations to Try
Once you’ve mastered the classic, the kitchen playground is open! Here are a few of my favorite ways to mix up the flavor:
- Chocolate Lover’s Dream: Swap the vanilla protein powder for chocolate in both the truffle and the icing. Roll the finished truffles in crushed cacao nibs or dark chocolate shavings instead of sprinkles.
- Peanut Butter Cup: Use 1 scoop vanilla and ½ scoop chocolate protein powder in the truffle base. Add a tablespoon of natural, creamy peanut butter to the dough. For the icing, use chocolate protein powder and drizzle with a little melted peanut butter after icing.
- Lemon Poppy Seed: Use a vanilla or unflavored protein powder and add the zest of one lemon and a tablespoon of poppy seeds to the truffle dough. For the icing, use vanilla protein powder and add a teaspoon of fresh lemon juice.
- Coconut Almond Joy: Add 2 tablespoons of unsweetened shredded coconut to the truffle dough. Use unrefined coconut oil for a stronger coconut flavor in the icing, and roll the finished truffles in a mix of shredded coconut and sliced almonds.
- Cookies & Cream: Crush 2-3 gluten-free or regular cream-filled chocolate sandwich cookies and fold them into the truffle dough. Use the classic vanilla icing, and then roll the truffles in additional cookie crumbs.
Jackson’s Chef Notes & Kitchen Confessions
This recipe has been a fun evolution in my kitchen. It started as a simple “protein ball” recipe, but I was never happy with the texture—they were often too dry or too dense. The breakthrough was treating it more like a cheesecake truffle. The cream cheese is the game-changer. It creates that melt-in-your-mouth quality that makes these feel like a true dessert.
I also have a funny confession: my first attempt at the icing was a disaster. I tried to make a thick frosting with just protein powder and milk, and it was… chalky. So chalky. My dog wouldn’t even eat the test batch! The coconut oil idea came from remembering how magic shell hardens on ice cream, and it was the perfect solution. It just goes to show that sometimes the best recipes come from our biggest kitchen fails. Don’t be afraid to experiment!
Your Questions, Answered: FAQs & Troubleshooting
Q: My dough is too wet/sticky. What did I do wrong?
A: Don’t worry! This usually happens if your cream cheese was extra soft or your protein powder brand absorbs liquid differently. The fix is easy: just add a little more oat flour, a tablespoon at a time, until the dough is firm enough to roll.
Q: My dough is too dry and crumbly. Help!
A: This is also common, especially with certain protein powders. The solution is simply to add more liquid. Add almond milk one teaspoon at a time, mixing well after each addition, until the dough comes together smoothly.
Q: Can I make these vegan?
A: Absolutely! Use a plant-based vanilla protein powder and swap the fat-free cream cheese for a dairy-free alternative (like Kite Hill or Tofutti). The rest of the recipe is already vegan-friendly!
Q: How long do these last, and how should I store them?
A: Because of the cream cheese, these need to stay refrigerated in an airtight container. They’ll keep beautifully for up to a week. You can also freeze them for up to 3 months! Just thaw in the fridge for an hour or so before eating.
A Quick Note on the Nutrition
Now, I’m a chef, not a registered dietitian, so please treat these numbers as a close estimate. The exact nutritional content will vary based on the specific brands of ingredients you use. But here’s the general breakdown per truffle (assuming a batch of 12):
- Calories: ~90
- Protein: ~6g (That’s the goal!)
- Carbohydrates: ~6g
- Fat: ~5g
- Sugar: ~2g
The beauty of these truffles is the macronutrient balance. You’re getting a solid dose of protein to help with muscle repair and keep you full, a moderate amount of healthy fats from the coconut oil, and just enough carbs for energy. They’re a fantastic, balanced snack that satisfies your sweet tooth in a smart way.
Final Thoughts: Let’s Keep the Party Going!
And there you have it, friends! My secret weapon for when a birthday cake craving strikes. These truffles are proof that healthy eating can be exciting, flavorful, and yes, even fun. They’re a little project that brings a big payoff—a handful of joy that makes you feel good inside and out.
I truly hope you love making (and eating!) these Birthday Cake Protein Truffles as much as I do. They’re a staple in my fridge for a reason. If you give them a try, I’d be absolutely thrilled if you tagged me on social @FoodMeld so I can see your beautiful creations! Let me know what fun variations you come up with.
Remember, cooking is an adventure. Don’t be afraid to get a little messy, try new things, and make the recipe your own. Now, go on and enjoy every single guilt-free, protein-packed, sprinkle-covered bite. Until next time, let’s keep cooking awesome food together!
– Jackson


