Let’s Make Some Magic: Sugar Cookie Truffles!
Hey there, Food Meld family! Jackson here. Can we talk about the holidays for a second? I love them. The music, the lights, the feeling in the air… but let’s be real, the baking can get a little intense. Between the pie crusts that need to be *just* right and the gingerbread houses that threaten to collapse into a sugary crime scene, sometimes you just need a win. A big, beautiful, “wow-you-made-that?!” kind of win that doesn’t require turning your kitchen into a flour-dusted war zone.
Well, my friends, that’s exactly why I’m so excited to share these Sugar Cookie Truffles with you today. Imagine all the soft, buttery, melt-in-your-mouth goodness of your favorite sugar cookie, rolled into a creamy, bite-sized ball and dipped in a sleek coat of chocolate. They’re elegant enough for a fancy party platter, fun enough for the kids to help decorate, and shockingly easy to make. Seriously, we’re talking no oven required. This is the kind of recipe that proves unforgettable flavor doesn’t have to be complicated. It’s all about that “meld” of simple ingredients creating something truly special. So, grab your favorite mixing bowl and let’s cook up some festive, fuss-free magic together.

The Happy Accident That Started It All
This recipe actually has its roots in a classic Jackson-in-the-kitchen moment: a happy accident. A few years back, I’d gotten a little overzealous with my holiday sugar cookie baking. Let’s just say I ended up with a batch that was… well, let’s call them “well-done.” They were a little too crispy around the edges for my ideal soft-batch cookie. My Southern grandma would’ve had my hide for wasting good food, so I started brainstorming. I remembered the magic of Oreo truffles—crushing cookies and binding them with cream cheese—and a lightbulb went off.
I tossed those slightly-too-crunchy sugar cookies into the food processor, added a block of cream cheese, and crossed my fingers. What came out was this incredible, pliable dough that tasted even better than the original cookies! Rolling them into balls and dipping them in chocolate felt like a total redemption arc. I brought them to a friend’s potluck, and they were the first thing to disappear. People couldn’t believe they were made from a “mistake.” It taught me a fantastic lesson: sometimes the best recipes aren’t about perfection; they’re about a little creativity and a whole lot of “what if we tried this?” energy. Now, I make these truffles on purpose, and they’ve become a non-negotiable part of our holiday tradition.
Gathering Your Truffle Toolkit
One of the best things about this recipe is the short and sweet ingredient list. We’re using simple, powerful flavors that work together like a dream. Here’s what you’ll need:
- 20 Sugar Cookies (homemade or store-bought): This is your flavor base! I’ve used everything from leftover homemade cookies to a classic bag of soft-batch store-bought ones. The goal is about 2 cups of fine crumbs. Chef’s Insight: If you’re using store-bought, plain sugar cookies work best. Avoid ones with thick icing, as it can make the truffle mixture too sweet or sticky.
- 4 oz (½ block) Cream Cheese, softened: This is our magic binder. It adds a subtle tang that balances the sweetness and creates that perfect, rollable texture. Pro Tip: Take the cream cheese out of the fridge about 30-60 minutes before you start. Room-temperature cream cheese blends seamlessly without any lumps.
- ½ teaspoon Vanilla or Almond Extract: A flavor booster! Vanilla is a classic, but if you really want to elevate that sugar cookie vibe, almond extract is the way to go. It adds a wonderful depth and warmth.
- 10 oz White Chocolate or Vanilla Almond Bark: For that gorgeous, glossy coating. Chef’s Choice: I often prefer vanilla almond bark for dipping because it’s formulated to melt smoothly and set with a firm snap. High-quality white chocolate chips will work too—just add a teaspoon of coconut oil when melting to help thin it for a smoother dip.
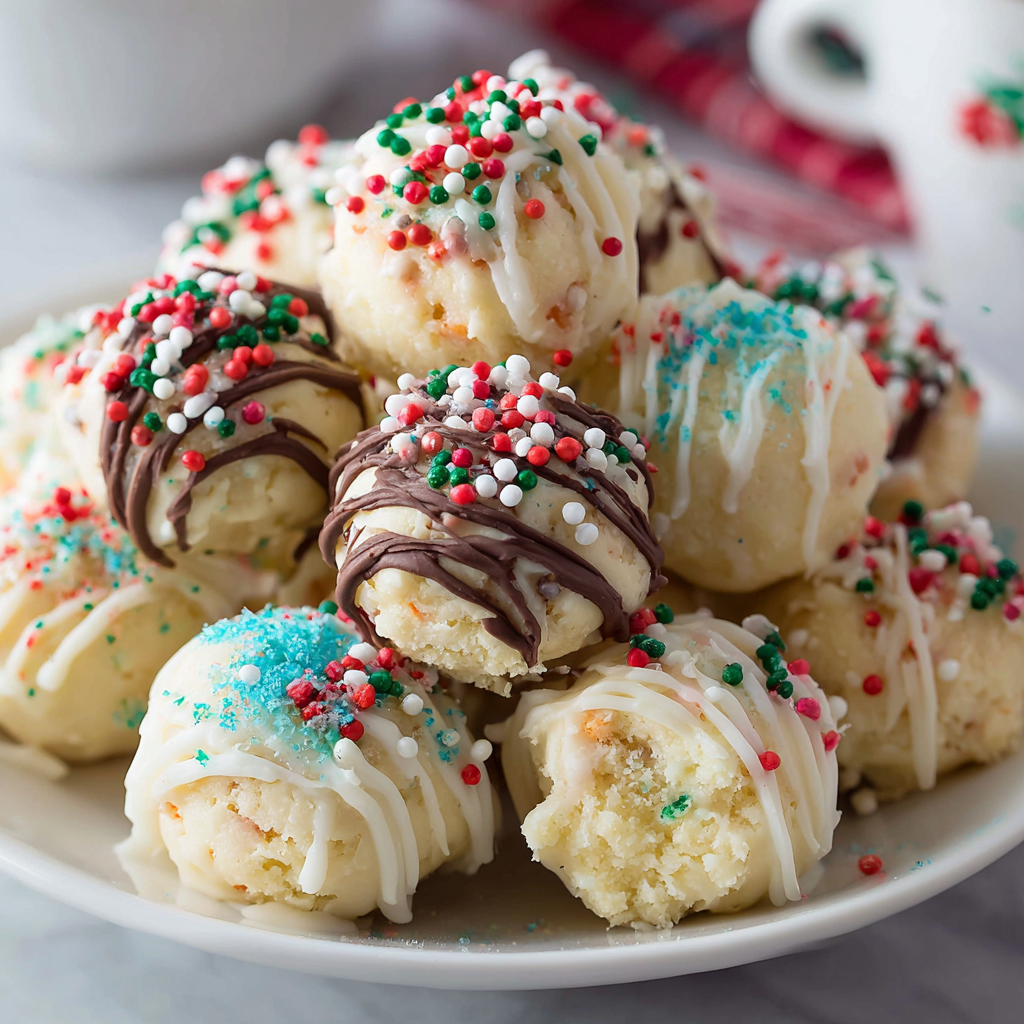
- Holiday Sprinkles or Sanding Sugar: This is where the fun begins! The decorations are your chance to get creative and make these truffles your own.
Let’s Get Rolling: Your Foolproof Truffle Method
Ready to see how easy this is? Follow these steps, and you’ll be a truffle-making pro in no time. I’ve packed each step with my favorite little hacks to make the process even smoother.
- Crush Those Cookies: If you’re using a food processor, just pulse the cookies until they become fine, even crumbs. No food processor? No problem! Place the cookies in a large zip-top bag, seal it (getting out as much air as possible), and use a rolling pin to crush them. Go to town on it—it’s a great way to relieve a little stress! You want the crumbs to be as fine as possible so your truffle mixture is smooth.
- Create the Truffle “Dough”: In a large bowl, combine the fine cookie crumbs, softened cream cheese, and your extract of choice. Now, get your hands in there! Mix it all together until it’s fully combined and has the texture of a soft, pliable dough. The mixing is the fun part—it should come together easily. If it feels a bit too dry, your cookies might have been on the drier side; just add another tablespoon of softened cream cheese. If it’s too sticky, a few more cookie crumbs will fix it right up.
- Scoop and Roll: Using a small cookie scoop (about 1 tablespoon size) or a measuring spoon, portion out the dough. Then, roll each portion between your palms to form a smooth, round ball. Chef’s Hack: If the dough is sticking to your hands, lightly dampen them with a bit of water or wear disposable food-safe gloves. This prevents sticking and gives you perfectly smooth truffles.
- The All-Important Chill: Place the rolled truffles on a baking sheet lined with parchment paper. Pop the whole tray into the freezer for about 15-20 minutes, or the fridge for at least 30 minutes. This step is non-negotiable! Chilling firms up the truffles, which makes them much easier to dip and prevents them from falling apart in the warm chocolate.
- Melt the Coating Like a Pro: Break your white chocolate or almond bark into small, uniform pieces and place them in a microwave-safe bowl. Melt in 30-second intervals on medium power, stirring thoroughly between each interval. Stop when there are just a few small lumps left—the residual heat will melt them as you stir. Big Tip: Do NOT overheat the chocolate! This is the most common mistake. Burnt chocolate seizes up and becomes grainy. Low and slow is the key to a smooth, dippable consistency.
- The Dip and Decorate: Remove a few truffles from the fridge at a time. Using a fork or a dipping tool, lower a truffle into the melted chocolate. Gently tap the fork on the edge of the bowl to let the excess chocolate drip off. Carefully slide the coated truffle back onto the parchment-lined tray. Now, the fun part—immediately shower it with sprinkles before the chocolate sets! Working in small batches keeps the truffles cold and makes for a cleaner dip.
- Set and Serve: Once all the truffles are dipped and decorated, return the tray to the refrigerator for another 15-20 minutes to allow the chocolate coating to fully set. And that’s it! You’ve just created a stunning, professional-looking treat.
How to Serve These Little Bites of Joy
Presentation is part of the fun! These truffles are so versatile. For a casual family treat, pile them high in a simple rustic bowl. But if you’re aiming to impress, here are a few of my favorite ways to serve them:
- The Elegant Platter: Arrange them on a beautiful cake stand or a festive platter. You can even use mini cupcake liners for a polished, individual touch that’s perfect for parties.
- The Holiday Gift: These make incredible edible gifts! Layer them in a cellophane bag tied with a ribbon, or pack them neatly in a decorative tin. They’re a heartfelt, homemade gift that everyone will adore.
- The Dessert Charcuterie: Add these truffles to a holiday dessert board alongside other goodies like peppermint bark, shortbread cookies, and fresh fruit. They add a beautiful pop of color and creamy texture.
Store them in an airtight container in the refrigerator. They’re best enjoyed cool, straight from the fridge!
Make It Yours: Fun Flavor Twists
Once you’ve mastered the basic recipe, the world is your oyster! Here are a few of my favorite ways to mix it up and keep things interesting:
- Spiced Sugar Cookie Truffles: Add ¼ teaspoon of ground cinnamon or a pinch of nutmeg to the cookie crumb mixture. It gives them a warm, cozy flavor that screams holidays.
- Peppermint Bliss: Mix 2 tablespoons of finely crushed candy canes into the truffle dough. Use dark or semi-sweet chocolate for dipping and sprinkle with more candy cane crumbs for a classic chocolate-peppermint combo.
- Lemon Zest Delight: For a brighter, tangier twist, add the zest of one lemon to the dough and use lemon extract instead of vanilla. Dip in white chocolate for a wonderfully fresh and zesty treat.
- Funfetti Fun: Stir 2 tablespoons of rainbow sprinkles right into the truffle dough before rolling. It creates a super fun, confetti-like interior that kids (and kids-at-heart) love.
- Chocolate-Dipped Strawberry: Use crushed strawberry-flavored cookies or add a teaspoon of freeze-dried strawberry powder to the dough. Dip in dark chocolate for a decadent, fruity truffle.
Jackson’s Kitchen Notes
This recipe has truly evolved over the years in my kitchen. I remember one time, I was in a hurry and tried to dip the truffles without chilling them first. Let’s just say it looked less like elegant truffles and more like a delicious, sugary landslide. I learned my lesson—patience is key! Another fun memory is the year my niece decided she was the official “sprinkle distributor.” She took her job so seriously, and let me tell you, some of those truffles had more sprinkles than chocolate. But you know what? they were the most loved ones at the party. Don’t be afraid to let your personality shine through. The best part about cooking is making it your own and having a blast while you do it.
Your Truffle Questions, Answered!
Q: My chocolate coating is thick and clumpy. What happened?
A: Ah, this usually means the chocolate got too hot and seized. It can be tricky to save, but you can try stirring in a teaspoon of coconut oil or vegetable shortening to smooth it out. The best prevention is to melt slowly and stir often!
Q: Can I make these truffles ahead of time?
A: Absolutely! They are a fantastic make-ahead dessert. You can store the finished truffles in an airtight container in the fridge for up to a week, or even freeze them (without the sprinkles) for up to 3 months. Thaw in the fridge before serving.
Q: The truffle mixture is too sticky to roll. Help!
A: No worries! This can happen if your cookies were particularly soft or humid. Just add a few more tablespoons of cookie crumbs until the dough is firm enough to handle. Chilling the mixture for 15 minutes before rolling can also help immensely.
Q: Can I use a different type of cookie?
A: You sure can! The basic formula is 2 cups of cookie crumbs to 4 ounces of cream cheese. This works wonderfully with Oreos (remove the cream filling first), ginger snaps, or even graham crackers for a s’mores-inspired version!
Nutritional Information*
Okay, let’s be real—these are a treat, through and through. But here’s a rough nutritional breakdown per truffle (assuming a yield of 30 truffles) so you can indulge mindfully. Remember, these are estimates and can vary based on the specific brands of ingredients you use.
- Calories: ~120 kcal
- Fat: 6g
- Carbohydrates: 14g
- Sugar: 10g
- Protein: 1g
*This information is approximate and provided for informational purposes only. I’m a chef, not a dietitian, but I believe all foods can fit into a happy, balanced life—especially during the holidays!
Final Thoughts from My Kitchen to Yours
Well, there you have it—my go-to recipe for stunning, stress-free holiday treats. These Sugar Cookie Truffles are proof that you don’t need fancy skills or all day to create something truly special. They’re about the joy of creating, the fun of decorating, and the pure happiness of sharing something delicious with the people you love.
I hope this recipe brings as much fun and flavor to your kitchen as it has to mine. Remember, cooking is an adventure. Don’t be afraid to get a little messy, try a new twist, and make these truffles your own. If you do make them, I’d love to see your creations! Tag me on social @FoodMeld so I can cheer you on.
Until next time, let’s keep cooking something awesome together.
– Jackson


