Let’s Make Some Holiday Magic: Christmas Tree Oreo Balls!
Hey friends, Jackson from Food Meld here! Is there anything better than that moment in December when your kitchen starts smelling like sugar, butter, and pure, unadulterated joy? I live for those days. But I also know that the holidays can get crazy. Between shopping, parties, and trying to find where you stored the “good” wrapping paper, the last thing you need is a complicated recipe that dirties every bowl you own.
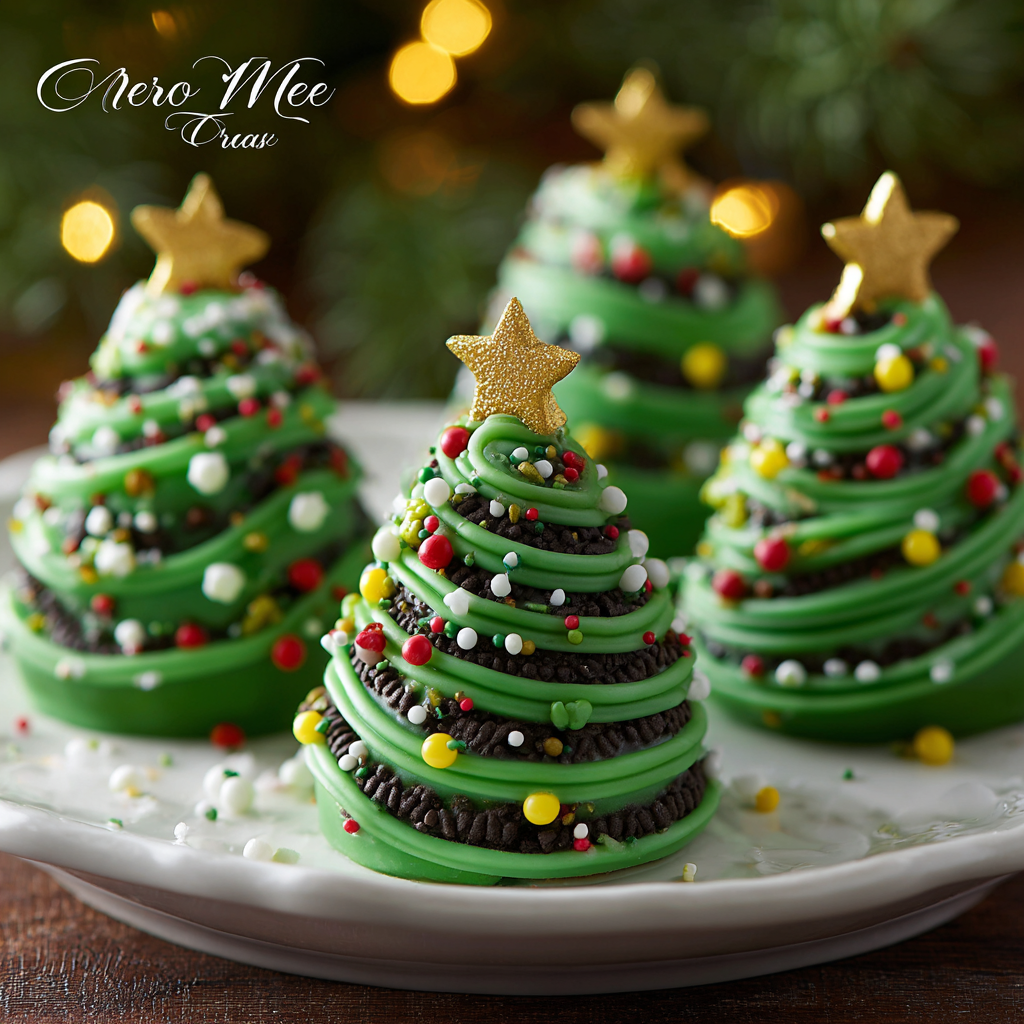
That’s exactly why I’m so pumped to share these Christmas Tree Oreo Balls with you today. We’re taking the legendary, no-bake wonder that is the Oreo truffle and giving it a full festive makeover. Imagine this: rich, chocolatey Oreo centers, shaped into cute little trees, dipped in a vibrant green coating, and decked out with sprinkle “ornaments.” They’re fun, they’re foolproof, and I promise you, they’re the treat that will disappear fastest from your holiday platter. Whether you’re a baking pro or someone who considers toast a culinary achievement, these little trees are your ticket to holiday hero status. So, grab your favorite apron, crank up the Christmas tunes, and let’s cook—er, create—something awesome together.

The Year My Sister and I Tried to Build a Gingerbread Empire
This recipe takes me right back to being ten years old, covered in flour, and attempting a gingerbread house with my little sister, Chloe. Our vision was… ambitious. Let’s just say it involved a multi-story design with a gumdrop pathway. The reality was a structural disaster held together by what felt like a full bag of royal icing. It listed to the side so dramatically we had to name it the “Leaning Tower of Gingerbread.” We laughed until we cried, and even though it looked nothing like the picture on the box, it’s one of my favorite holiday memories.
That’s the spirit I want you to bring to these Oreo trees. Perfection is not the goal here—fun is. Maybe one of your trees will be a little lopsided. Maybe another will have a serious case of the sprinkles. That’s not a mistake; that’s personality! These treats are all about embracing the messy, joyful, and delicious side of the holidays, just like my sister and I did all those years ago. The best holiday creations are the ones made with laughter.
Gathering Your Tree-Making Toolkit: The Ingredients
One of the best things about this recipe? You only need a handful of simple ingredients. Let’s break them down so you know exactly what you’re working with. I’ve also thrown in some of my favorite swaps and chef insights to make these truly your own.
- 36 Oreo Cookies: The heart and soul of the operation! I use the classic original Oreos for that perfect, familiar flavor. You’ll be pulverizing these into crumbs, so don’t worry about separating the filling—it all gets blended in. Chef’s Insight: For a fun twist, try mint Oreos for a “peppermint forest” vibe!
- 8 oz Cream Cheese, softened: This is our magic binder. It transforms the dry cookie crumbs into a pliable, rollable dough. Pro-tip: Make sure it’s truly softened to room temperature. This is non-negotiable for a smooth, lump-free mixture. If it’s cold, you’ll have to overwork the dough, and that’s no fun for anyone.
- 12 oz Green Candy Melts: This is what gives our trees their iconic festive color. Candy melts (also called candy wafers) are designed for dipping and set with a nice, firm shell. Substitution Tip: If you can’t find green, you can use white chocolate chips mixed with a little green gel food coloring. Just know that real chocolate can be trickier to temper and might not set as firmly.
- Holiday Sprinkles or Sugar Pearls: The ornaments! This is where you get creative. Use classic round sprinkles, little stars, or even tiny sugar pearls. I like to have a mix of colors for a truly festive look.
- Star Sprinkles or Mini Yellow Candies (optional): The pièce de résistance—the tree topper! A tiny star on top of each tree just completes the whole picture. If you don’t have stars, a single yellow sprinkle or a dab of yellow icing works great too.
Step-by-Step: Building Your Edible Evergreen Forest
Alright, let’s get our hands dirty! This process is simple, but a few key tips will make it a breeze. Read through these steps once before you start, and you’ll be a tree-making expert in no time.
- Crush Those Oreos: Toss all 36 Oreos (the whole cookie, filling and all!) into a food processor. Pulse until you have a fine, uniform crumb. No big chunks! If you don’t have a food processor, no sweat. Place the Oreos in a large zip-top bag, squeeze out the air, and go to town with a rolling pin. It’s a great way to work out any pre-holiday stress!
- Create the Dough: In a medium bowl, combine the Oreo crumbs with the softened cream cheese. Use a spatula or your hands (my preferred method!) to mix until it’s completely combined and looks like a soft, chocolatey dough. You shouldn’t see any streaks of white cream cheese.
- Shape Your Trees: Now for the fun part! Scoop up about a tablespoon of the dough and roll it into a ball. Then, gently roll one end between your palms to form a cone shape. Don’t worry about making them perfect—trees in nature aren’t perfectly symmetrical either! Place each shaped tree onto a baking sheet lined with parchment paper. Chef’s Hack: If the dough is sticking to your hands, lightly dampen them with a bit of water. It works like a charm.
- The Big Chill: Pop the entire baking sheet into the freezer for at least 30 minutes. This step is crucial! A firm, cold tree will be much easier to dip and won’t lose its shape in the warm candy coating.
- Melt the Coating: While the trees are chilling, melt your green candy melts. You can do this in a microwave-safe bowl in 30-second bursts, stirring well after each interval, or use a double boiler on the stove. The goal is smooth and fluid. If it seems too thick, you can add a tiny, tiny amount of coconut oil or paramount crystals to thin it out.
- The Dip & Decorate: This is the moment of truth! Remove a few trees from the freezer at a time (keep the rest cold). Spear the bottom of a tree with a fork or a toothpick. Dip it into the melted candy, swirling gently to coat it completely. Lift it out, tap the fork gently on the edge of the bowl to let the excess drip off, and then carefully slide it back onto the parchment paper. Now, act fast! While the coating is still wet, decorate with your sprinkles and pop a star on top. The coating sets quickly, so I like to decorate one tree at a time.
- Set and Serve: Once all your trees are decorated, let them set completely. You can leave them at room temperature if your kitchen is cool, or pop the tray back in the fridge for 10-15 minutes to speed things up. They’re ready when the coating is firm to the touch.
How to Show Off Your Festive Masterpiece
Presentation is half the fun! You’ve just created a batch of adorable, edible holiday decorations, so let’s plate them like a pro. I love arranging them on a simple white platter to really make that green pop. For a “winter wonderland” effect, dust the platter with a little powdered sugar “snow” before placing the trees. You can also line them up on a cake stand or a rustic wooden board. If you’re giving them as gifts, clear cellophane bags tied with a pretty ribbon make them look like they came from a fancy candy shop. They’re the perfect addition to any cookie swap, holiday party, or just as a sweet treat for the family on movie night.
Mix It Up! Creative Twists on the Classic Tree
Once you’ve mastered the basic tree, the playground of possibilities opens up! Here are a few of my favorite ways to mix it up.
- Peppermint Forest: Use Mint Oreos instead of original. Add a tiny drop of peppermint extract to the candy melts, and crush up some candy canes to use as “ornaments” for a cool, festive crunch.
- Chocolate Snow-Capped Trees: After dipping in the green coating and letting it set, drizzle the trees with melted white chocolate to look like snow. It’s beautiful and adds another layer of flavor.
- Peanut Butter Lover’s Trees: Swap the original Oreos for Peanut Butter Oreos. The rich, nutty flavor pairs amazingly with the sweet coating.
- Funfetti Party Trees: Mix a tablespoon or two of colorful sprinkles right into the Oreo and cream cheese dough before shaping. When you bite in, you’ll get a fun confetti surprise!
- Dairy-Free Delight: Use your favorite vegan Oreo-style cookies and a dairy-free cream cheese alternative. For the coating, look for vegan candy melts or use the white chocolate/food coloring method mentioned earlier.
Jackson’s Chef Notes: A Few Parting Thoughts
I’ve made these trees more times than I can count, and they’ve definitely evolved. The first batch was… let’s say abstract. They were more like green, lumpy mountains than trees! The key lesson was that freezer time is your best friend. I also learned that it’s totally okay to have a “test tree.” The first one you dip might be a little messy as you get a feel for the coating. That’s the chef’s treat! Eat it proudly. The best part about this recipe is how it brings people together. I love making these with friends or family—assign someone to shape, someone to dip, and someone (probably a kid) to be the Head of Decoration. It turns kitchen time into party time.
FAQs & Troubleshooting: Your Questions, Answered!
Q: My coating is too thick and clumpy. What did I do wrong?
A: This usually means the candy melts got too hot. Overheating can cause them to seize. Try adding a tiny bit of solid vegetable shortening or coconut oil (about 1/2 teaspoon at a time) and stirring vigorously. This can often bring it back to a smooth, dippable consistency.
Q: Can I make these ahead of time?
A: Absolutely! These are a fantastic make-ahead treat. Once set, store them in an airtight container in the refrigerator for up to a week. You can also freeze them for up to a month. Just be sure to separate layers with parchment paper so they don’t stick together.
Q: My trees are losing their shape when I dip them. Help!
A: This almost always means they weren’t cold enough. The 30-minute freeze is a minimum! If your kitchen is warm, or if you’re working slowly, don’t be afraid to pop the tray back in the freezer for 10 minutes halfway through dipping. A cold tree is a sturdy tree.
Q: Why can’t I use food coloring in the cream cheese mixture to make them green inside?
A: You totally can for fun! But be warned: liquid food coloring can sometimes make the cream cheese mixture a bit wet. If you do this, I’d recommend using a gel-based food coloring, which is more concentrated and won’t alter the texture as much.
Nutritional Information (Approximate)
Alright, let’s be real—these are a holiday indulgence! But it’s always good to know what you’re enjoying. The nutritional info is based on one tree and can vary based on the specific brands you use. Remember, treats like these are all about balance and joy!
Per Serving (1 tree): Calories: 150 | Total Fat: 8g | Saturated Fat: 4g | Cholesterol: 5mg | Sodium: 85mg | Total Carbohydrates: 17g | Dietary Fiber: 0.5g | Sugars: 13g | Protein: 1g
Final Thoughts: You’ve Got This!
And there you have it! Your guide to creating the most festive, fun, and downright delicious holiday treat on the block. I hope this recipe brings as much laughter and joy to your kitchen as it has to mine. Remember, cooking—and especially holiday baking—isn’t about perfection. It’s about the music playing in the background, the flour on your nose, and the proud smile when you present a plate of something you made with your own two hands.
So, what are you waiting for? Go melt some candy, get sprinkly, and let’s make this holiday season a little sweeter, one Oreo tree at a time. I’d love to see your creations! Tag me on social @FoodMeld with your forest of goodies. Until next time, happy cooking!
— Jackson


