
Homemade Christmas Peppermint Sticks: Your New Holiday Tradition
Hey friends, Jackson from Food Meld here. Is there anything that screams “holiday magic” quite like a classic peppermint stick? That sweet, cooling crush of mint, the iconic red-and-white swirl, the way it melts slowly into a mug of rich hot chocolate… it’s pure nostalgia in candy form. But here’s the thing: what if I told you that you can create that magic right in your own kitchen? No fancy equipment, no culinary degree—just a fun, slightly messy, and incredibly rewarding hour of kitchen alchemy. Forget the store-bought stuff; we’re making Homemade Christmas Peppermint Sticks from scratch. This is one of those recipes that looks impressive but is built on a foundation of simple, honest ingredients. It’s a project, yes, but the kind that fills your kitchen with the most incredible scent of sugar and peppermint and ends with you feeling like a certified candy genius. So, grab your favorite heavy-bottomed pot and let’s turn your kitchen into a old-fashioned candy shop. We’re about to cook up a batch of holiday cheer that’s perfect for gifting, garnishing, or just sneaking a piece (or three) when you think no one’s looking. Let’s get into it!
The Candy Pull That Started It All
My love for homemade candy started not in a fancy pastry kitchen, but in my grandma’s wonderfully chaotic kitchen one blustery December. She was a force of nature, my grandma, and she believed store-bought treats were a cardinal sin during the holidays. One year, she decided we were making peppermint sticks. I remember the sheer terror and excitement as that clear syrup boiled, the precise moment she’d shout, “Thermometer’s at 265, gloves on, now!” We’d butter our hands (a classic grandma hack) and dive in, pulling and stretching that impossibly hot candy mass until our arms ached, transforming it from a cloudy blob into a glossy, satiny rope. The best part was the “mistake” we made—a section we didn’t pull quite enough, leaving it a little cloudy and less perfect. That became the cook’s treat, broken into shards and devoured while the “good” sticks cooled. It was messy, it was a little dangerous, and it was one of the most fun, connected cooking experiences I’ve ever had. That’s the spirit I want to bring to you today. It’s not about perfection; it’s about the joy of creating something with your own two hands. A little mess is just part of the memory.
Gathering Your Candy-Making Crew (The Ingredients)
See? I told you it was simple. This is a short list, but every player has a crucial role. Here’s the breakdown:
- 1½ cups light corn syrup: This is the MVP of texture. It prevents the sugar from crystallizing, giving you that smooth, glassy, snap-able finish instead of a grainy one. Chef’s Insight: Don’t sub this with anything else if it’s your first time. Golden syrup or honey can work in a pinch, but they’ll add their own flavor and color, and the texture can be trickier to master.
- 1 cup water: Just plain water. It’s the vehicle that helps the sugar dissolve evenly before the real boiling begins.
- 2 cups granulated sugar: The sweet soul of the operation. Standard white granulated sugar is perfect here—it melts cleanly and provides the structure.
- 1½ teaspoons peppermint extract: The star of the flavor show! Use a high-quality extract for the best, brightest flavor. Substitution Tip: Feel like mixing it up? Swap in ¾ tsp of cinnamon extract or orange extract for a different holiday twist!
- Red food coloring (and optional white): Gel food coloring is my absolute top choice here. It’s highly concentrated, so you need less, and it won’t water down your candy like liquid dyes can. The optional white food coloring is a pro-move to make the white sections pop even brighter against the red.
The Fun Part: Let’s Make Some Candy!
Alright, team. Read through all these steps once before you start. Candy-making is a fast-paced game, and having a mental map is key to success. You’ve got this!
- Prep Your Station: This is non-negotiable. Lightly grease a large baking sheet or line it with parchment paper. Have your thermometer, a heatproof spatula, and food coloring ready and within arm’s reach. Once the candy hits temperature, everything happens quickly. Chef’s Hack: I also lightly grease a pair of kitchen shears for cutting the ropes later—it prevents sticking.
- Dissolve the Sugar: In a heavy-bottomed saucepan (this ensures even heating and prevents hot spots that can burn the sugar), combine the corn syrup, water, and sugar over medium heat. Stir gently with your spatula just until the sugar granules have completely dissolved and the mixture looks clear. This should only take a few minutes.
- The Boil is the Goal: Now, stop stirring. Seriously, don’t touch it. Attach your candy thermometer to the side of the pot, making sure the bulb isn’t touching the bottom. Bring the mixture to a boil over medium-high heat. Let it bubble away, undisturbed, until it reaches between 260°F (for a slightly softer, more chewy stick) and 270°F (for a classic hard, snap-able stick). This is the “hard ball” stage. This can take 10-15 minutes, so be patient!
- Off the Heat & Flavor Up: The second that thermometer hits your desired temp, immediately remove the pot from the heat. Carefully stir in the peppermint extract. It might sizzle a bit—that’s normal! Now, quickly add your red food coloring. If you’re going for a swirl, you can pour it all in one spot and resist the urge to over-mix.
- The Pour & The Pause: Immediately pour the hot candy onto your prepared baking sheet. Let it sit for just 30-60 seconds. You’ll see the top begin to set slightly around the edges. This short rest is crucial—it lets the candy cool just enough to handle without being a molten lava disaster.
- Fold and Cool (Gloves On!): Put on those heat-resistant gloves! Carefully lift and fold the edges of the candy toward the center. You’re essentially “turning” it to help it cool evenly. Repeat this a few times until the candy is cool enough to handle but still very pliable.
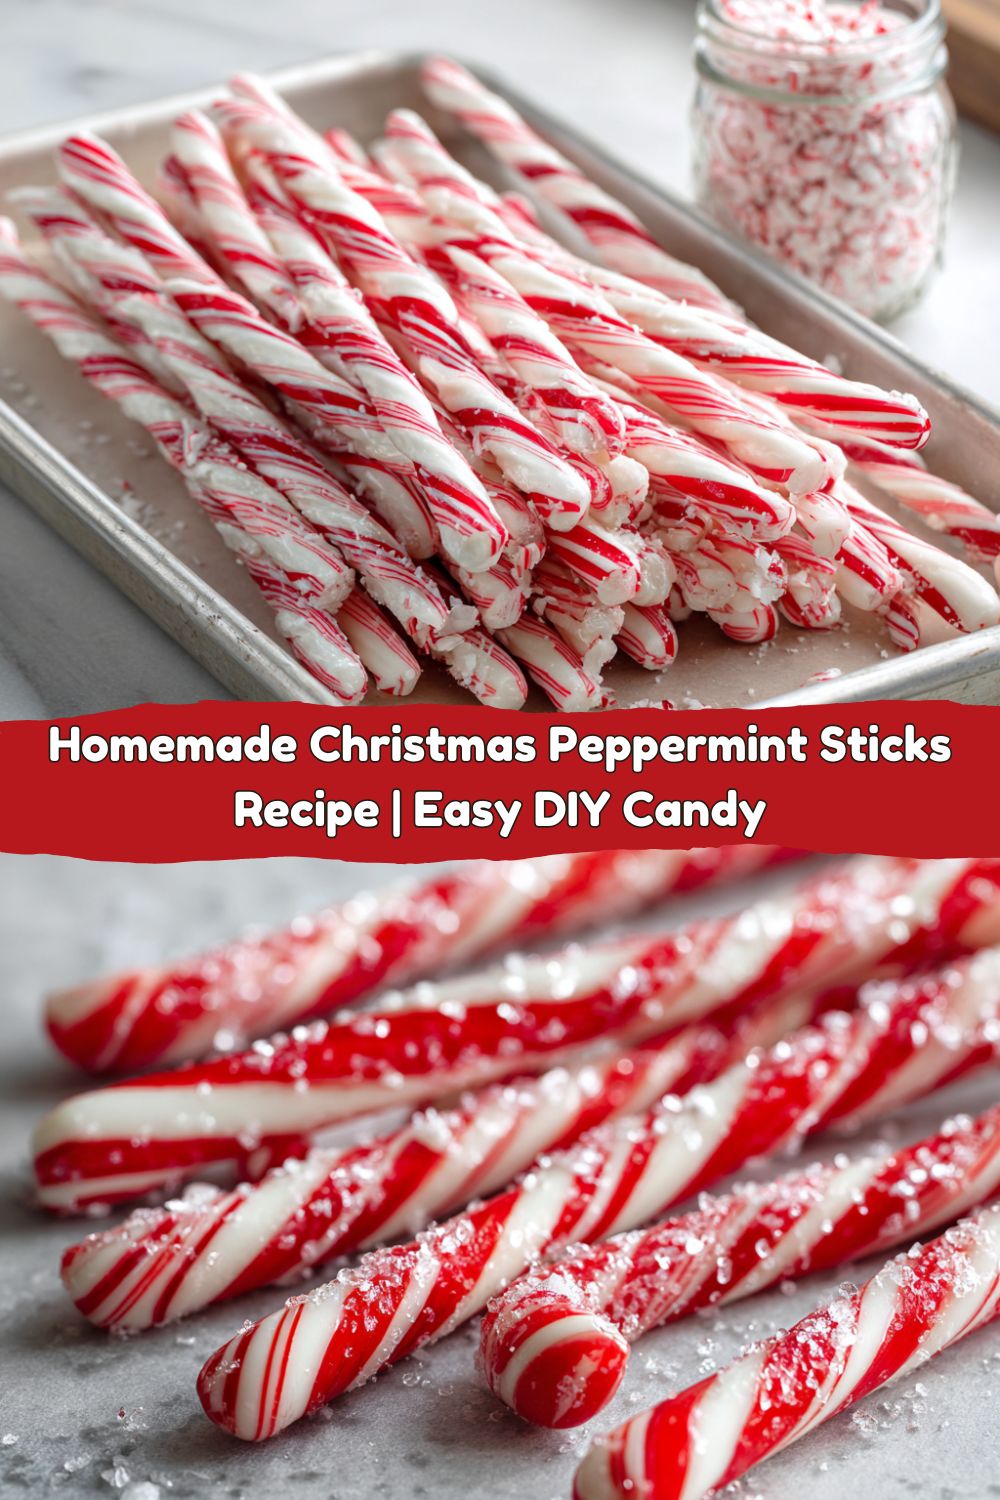
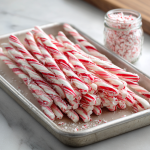
- The Candy Pull: This is the most fun part. Pick up the mass and start pulling! Stretch it out, fold it back on itself, and pull again. You’ll see it change from a cloudy, opaque color to a glossy, shiny, satin-like finish. This incorporates air, creating that classic light texture. If you want a twisted red-and-white look, divide the batch in half, color one half red, and then twist the two ropes together before cutting.
- Shape and Snip: Once the candy is glossy and firming up, roll and pull it into long, thin ropes, about ½-inch thick. Working quickly, use your greased kitchen shears to cut the ropes into 4-6 inch sticks. If they aren’t perfectly straight, don’t sweat it—it adds to the handmade charm!
- The Final Cool Down: Lay the finished sticks on parchment paper and let them cool completely and harden at room temperature. This usually takes about 30 minutes. Do not put them in the fridge, as the humidity can make them sticky.
How to Serve Your Sweet Creations
You did it! Now, what to do with these beautiful homemade treasures? The possibilities are endless:
- The Classic: Plunk one right into a steaming mug of homemade hot chocolate. It’s the ultimate stirrer and sweetener all in one.
- Giftable Gourmet: Package them in clear cellophane bags tied with a rustic ribbon, or stack them in a festive holiday tin. A homemade gift like this speaks volumes.
- Dessert Decor: Crush them up and use the pieces as a stunning topping for cupcakes, ice cream sundaes, or even a peppermint bark cheesecake.
- Straight-Up Snacking: Honestly? Just put them in a jar on the counter and let people enjoy the pure, simple joy of a perfect peppermint stick.
Mix It Up: Creative Twists on the Classic
Once you’ve mastered the basic recipe, the world is your candy shop. Here are a few ways to make it your own:
- Chocolate-Dipped Ends: Melt some dark or white chocolate and dip one end of each cooled stick. Sprinkle with extra crushed candy cane immediately for a gorgeous and delicious finish.
- Flavor Fusion: Swap the peppermint extract for other flavors. Think ½ tsp of cinnamon extract plus ½ tsp of vanilla for a “Red Hot” vibe, or use orange extract for a chocolate-orange combination that’s to die for.
- Color Party: Go beyond red! Use green for a Grinch-themed stick, or go full rainbow for a unicorn-inspired treat that kids will adore.
- Mini Moments: Instead of long sticks, pull the candy into a thinner rope and break it into small, bite-sized pieces perfect for topping cookies or filling candy dishes.
- Vegan & Gluten-Free Note: The great news is, this recipe is naturally gluten-free and vegan! Just double-check that your sugar is certified vegan (some refined sugars use bone char in processing) and you’re good to go.
Jackson’s Chef Notes & Kitchen Stories
This recipe has evolved in my kitchen from a once-a-year spectacle to a regular holiday tradition. My biggest lesson? Don’t fear the sugar. The first time I made it, I was so nervous about burning it that I pulled it off the heat too early and ended up with a sticky, chewy mess. It was still delicious, but it wasn’t the snap I wanted. Trust your thermometer! Another time, I got overzealous with the pulling and ended up with a rope so long it draped over the edge of the counter and onto the floor. My dog thought it was the best day of his life. So embrace the imperfections. The slightly wonky stick has more character, and the “mistakes” are just bonus snacks for the chef. The goal is fun and flavor, always.
FAQs: Your Candy Questions, Answered
Q: My candy turned out grainy and sugary. What happened?
A: This is almost always caused by sugar crystals forming. This can happen if you stirred the mixture while it was boiling, or if a stray sugar crystal got stuck to the side of the pot. To prevent this, use a pastry brush dipped in water to wash down the sides of the pot after the sugar dissolves and before it comes to a boil.
Q: I don’t have a candy thermometer. Can I use another method?
A: You can use the cold water test! Drop a small bit of the syrup into a bowl of cold water. At the “hard ball” stage (260-270°F), the syrup will form hard, rigid balls that hold their shape but are still pliable. It’s less precise than a thermometer, so I highly recommend investing in one for candy-making.
Q: My candy is too sticky after cooling. How can I fix it?
A: This means it didn’t quite reach a high enough temperature. Unfortunately, you can’t fix it once it’s set. But all is not lost! Crush it up and use it as an ice cream topping or mix-in. It’ll still taste amazing.
Q: How long do these stay fresh, and how should I store them?
A: Stored in an airtight container at room temperature in a cool, dry place, they’ll stay perfect for up to 3 weeks. Any longer and they might start to lose their snap and become sticky due to humidity.
Homemade Christmas Peppermint Sticks
- Total Time: 30 minutes
- Yield: 20–30 sticks 1x
Description
These classic peppermint sticks are sweet, minty, and full of holiday charm. Made from scratch with just a few pantry staples, they’re perfect for stirring into hot cocoa, decorating desserts, or gifting in a festive tin. They snap when you bite, melt when you stir, and sparkle with old-fashioned magic.
Ingredients
1½ cups light corn syrup
1 cup water
2 cups granulated sugar
1½ teaspoons peppermint extract
Red food coloring
Optional: white food coloring for contrast
Instructions
Prepare a large baking sheet by lightly greasing it or lining with parchment paper. Set aside all your tools—once the candy is ready, you’ll need to move quickly.
In a heavy-bottomed saucepan, combine corn syrup, water, and sugar over medium heat. Stir just until the sugar is fully dissolved.
Clip a candy thermometer to the pot and bring the mixture to a boil without stirring. Heat until it reaches 260°F for softer sticks or 270°F for a firmer finish.
Immediately remove from heat and stir in peppermint extract and food coloring.
Pour the hot mixture onto the prepared baking sheet and let it sit for 30–60 seconds, just until the top begins to set slightly.
Wearing gloves, fold the edges of the candy toward the center repeatedly to cool it slightly.
When it’s cool enough to handle, begin pulling the candy by hand, stretching and folding until it becomes glossy and firm.
Shape into long ropes, twisting if desired. Cut into 4–6 inch sticks while still pliable.
Let cool completely on parchment paper. Once hardened, store in an airtight container at room temperature.
- Prep Time: 15 minutes
- Cook Time: 10–15 minutes
Nutrition
- Calories: 80 / Stick
- Sugar: 18g / Stick
- Carbohydrates: 20g / Stick
Nutritional Information (Approximate)
Let’s be real—this is a candy recipe, a special holiday treat to be enjoyed in moderation. But here’s the basic breakdown per stick (assuming a yield of 25 sticks):
- Calories: 80
- Total Carbohydrates: 20g
- Sugars: 18g
- Fat: 0g
- Protein: 0g
Please note: This is an estimate based on the ingredients used. Values can vary based on specific ingredients and portion sizes.
Your Holiday Kitchen Awaits
And there you have it! Making homemade peppermint sticks is about so much more than the candy itself. It’s about the laughter when you’re pulling sugar with a friend, the pride of giving a gift made with your own hands, and the simple, sweet taste of a tradition you built yourself. This Christmas, I challenge you to carve out a little time for this project. Turn on some holiday tunes, maybe get a helper (kids love the pulling part with gloves on!), and create something unforgettable. It might just become your new favorite holiday ritual. From my kitchen to yours, happy holidays and happy cooking! Don’t forget to tag @FoodMeld if you make them—I love seeing your creations!
Jackson


